How to Style a WordPress Sticky Post to Make it Stand Out

In case you weren’t aware, there is a sticky post function built into WordPress. It resides in the upper right-hand corner of the editor in the area where you hit “Publish” or where you schedule your posts. It’s under the “Visibility” section.

A “sticky post” is, of course, a post that you select to always be on top of your homepage. You make a post a sticky because you want it to gain extra attention.
But is putting the post at the top enough? If you really want it to gain extra attention, then it would seem you should make it stand out from the rest of the posts even more.
As it turns out, that’s easy to do with a little bit of CSS styling.
You can get very creative with this if you’d like, but in this post we’ll just run through a few basics.
Add Your Styling
Because sticky posts are now built into WordPress, it’s not going to take much to accomplish what you want. All you need to do is to add a line or two to your theme’s Style Sheet.
>> In your Admin area, go to Appearance > Editor
>> This should land you by default on the Stylesheet (style.css) page. If it doesn’t, navigate yourself to it. If you have a custom.css stylesheet, then you’ll want to use that. A custom stylesheet allows you to add styles that won’t be overwritten if the theme is updated.

FREE EBOOK
Your step-by-step roadmap to a profitable web dev business. From landing more clients to scaling like crazy.

FREE EBOOK
Plan, build, and launch your next WP site without a hitch. Our checklist makes the process easy and repeatable.
>> At the bottom of your stylesheet, add whatever type of styling you’d like. Here’s an example:
.sticky {background: #A2D9FD; border: 3px solid black; padding: 10px;}
As you can see, you start with …
.sticky {
Then I’ve added a background color for the post (a light blue) …
background: #A2D9FD
Then I’ve added a solid black border for the post …
border: 3px solid black;
Then I’ve added some padding and closed the styling with a bracket …
padding: 10px;}
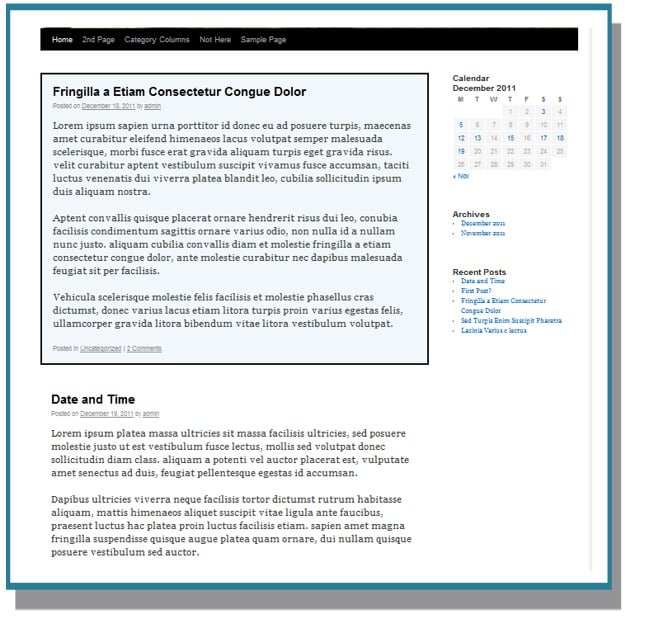
Here’s the result:
Background Images
You can also do things such as add a background image instead of a background color. You’d do that by including the URL for the image you’d like to use as the background.
.sticky {background-image:url('http://www.mysite.com/images/sticky-background.jpg'); }
In order to do anything more sophisticated than this, you’ll need to call on some CSS skills. But these few small tips should be enough to at least get you going.
*Note: For some reason, sometimes when I style a sticky post it seems to take longer for me to see the styling appear than it should, even after clearing my cache. I’m not sure if this is a personal issue or not, but if you run into the same issue, you may give it some time before declaring it a failure.
Photo: Standing Out from BigStock
Tags: