The Ultimate WordPress Multisite Domain Mapping Guide
WordPress Multisite makes it a breeze to manage several sites as part of a single network. But what if you want all the subsites to use a custom domain of their own? This is the problem WordPress Multisite domain mapping solves.
You’ll still get the same benefits of managing a multisite network on the back-end. On the front-end, your site visitors won’t notice a difference. Even though each subsite will have its own unique domain.

In this post, I’ll show you how to get domain mapping up and running on the latest version of WordPress Multisite. I’ll cover how to do it with a traditional shared hosting account (using cPanel), and a managed WordPress hosting (WPMU DEV Hosting). And yes, you need not use a plugin anymore (more on that later).
We’ll cover:
- What is Domain Mapping?
- Uses of WordPress Domain Mapping
- Say Goodbye to Domain Mapping Plugins
- An Overview of WordPress Domain Mapping
- Adding SSL Certificates for Your Mapped Domain
- Fixing Network Subsite Login Error
What is Domain Mapping?

By default, a WordPress Multisite network with a top-level domain (e.g. network.com) assigns all the subsites as either:
- Sub-domains – subsite1.network.com, subsite1.network.com
- Sub-directories – network.com/subsite1, network.com/subsite1
When you’re first activating a Multisite network, you can select if your subsites will use sub-domains or sub-directories. Please make a note that you cannot change this later.

Now, having a sub-domain or sub-directory URL is acceptable for most use cases.
But what if you’re managing distinct sites as part of a single Multisite installation? It’s ideal to give each site a unique, custom domain of their own (e.g. domain1.com, domain2.com).
WordPress Multisite Domain Mapping assigns the network’s subsites a specific, unique domain name.
Uses of WordPress Domain Mapping
- You have many of your clients’ websites hosted on a single WordPress multisite network. And you want to give all of them a unique, custom domain name that reflects their brand better.
- You’re managing a large business or enterprise website. If each product/service has a separate subsite, giving each of them a custom domain can be helpful from a branding and marketing perspective. For example, apple.com can have a network of subsites for their various products hosted at iphone.com, ipad.com, macbook.com, etc.
- You want to set up a multisite blog network like WordPress.com or Edublogs.org. Here, users can create their own blogs or sites for free. And if they want, you can offer them an upgrade to include a custom domain. For easier management, you can use paid plugins like WP Ultimo to automate domain mapping for your users.
Say Goodbye to Domain Mapping Plugins
Gone are the days of using a plugin for domain mapping a WordPress Multisite.
WordPress 4.5 introduced domain mapping as a native feature. So, you don’t have to use any third-party plugin anymore.
Since this is a new functionality, most domain mapping tutorials you’ll find on the web are no longer up to date. They’re based on using plugins like our very own Domain Mapping (now retired).
You can ignore all those tutorials. This guide is the only method you should use from 2019 onward. And as always, please take a complete backup of your site before you make any changes.
An Overview of WordPress Domain Mapping
- Install a WordPress Multisite Network
- Configure DNS Records (Nameservers) for the Custom Domain
- Add the Custom Domain to Your Hosting Account
- Map a Network Subsite to its Custom Domain
- Repeat the Process for More Subsites (if needed)
Have the dashboards of your hosting account, domain registrar, and WordPress Multisite open and ready.
Now, let’s get mapping!
Step 1: Install a WordPress Multisite Network
To get started, have a WordPress Multisite Network up and running, ideally with one or more subsites. Since this guide is about domain mapping WordPress, I won’t go into finer details of how to set up a Multisite.
Here’s a basic overview of the Multisite network and subsites creation process:
- Install a regular WordPress site.
- Define multisite function in the wp-config.php file to allow Multisite on your WordPress setup.
- Activate Multisite network by going to Tools > Network Setup menu item in your WordPress dashboard. Here, choose whether you want to go with sub-domains or sub-directory configurations for your future subsites.
- Enable the Multisite network. To do this, you need to add the two code snippets given after you finish the network setup process. Add the first code snippet to your wp-config.php file; the second one should replace all the code in your .htaccess file.
- Add subsites to your Multisite network by going to Sites > Add New in your Network Admin dashboard.
You can refer to our Ultimate Guide to WordPress Multisite for a detailed step-by-step process.
If your site is on WPMU DEV Hosting, you can do this with just a single click. And it takes a full backup of your site automatically before starting the process, so in case you want to reset and restart, you’re covered there too.
Note: Before domain mapping WordPress, make sure that your Multisite network is running perfectly. Also ensure that subsites creation works on your network with no issues.
Step 2: Configure DNS Records (Nameservers) for the Custom Domain
First, you need to make sure that your custom domain name points to your hosting server.
If you have different domain and hosting accounts (which you really should), you’d have to repeat the steps to set up your network’s main domain name (i.e. the primary domain on which you’ve installed WordPress).
If you bought a combo domain-hosting package, your hosting provider will have taken care of this process for you in the beginning.
In either case, you need to configure your custom domain’s DNS records manually. I can’t give you a single catch-all process, since the exact method will depend on which domain registrar and hosting provider you use.
Here are official guides on how to edit DNS records on a few popular domain registrars (and make sure to check out our Ultimate Guide To DNS For WordPress):
Note: We now also offer DNS management for WPMU DEV hosted sites (and we’ve fine-tuned it for Multisite!)


Depending on what kind of hosting account you have, you’ll either have to add and/or edit one or all these records.
- CNAME record – Also known as Canonical Name, it’s a DNS record that maps an alias name to a true domain name (aka canonical domain name). CNAME records are typically used to map a sub-domain such as www or mail to the primary domain hosting that sub-domain’s content. For example, a CNAME record can map www.example.com to the domain example.com.
- A record – It maps a domain name to the IP address (Version 4) of the server hosting the domain.
- AAAA record – Also called quad-A records, it specifies IPv6 address for a web host. It works the same way as A record, the only difference being the updated version of IP address. You should use AAAA record along with A record, as it’s considered best practice and might even lead to performance boost.
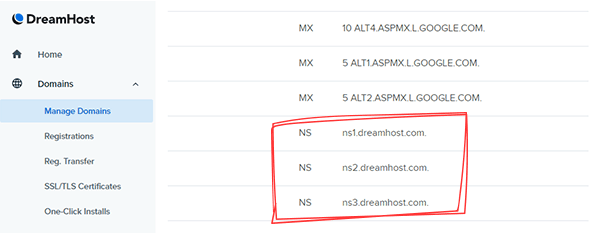
- Nameservers – Also called NS records, they’re given to you by your hosting provider. They serve as a bridge between your domain and the IP address of your hosting account so visitors can reach your site. Unlike other DNS records, if you change your Nameservers, then your hosting provider will have to manage all your other DNS records.

For an in-depth guide, there’s no better resource than our DNS & Domain Management docs to get started.

FREE EBOOK
Your step-by-step roadmap to a profitable web dev business. From landing more clients to scaling like crazy.

FREE EBOOK
Plan, build, and launch your next WP site without a hitch. Our checklist makes the process easy and repeatable.
Usually, it takes less than an hour to update your DNS records. Yet, in some rare cases, it may take up to 48 hours for them to propagate. Why? Well, only the DNS gods would know!
If you have many subsites you want to map to their own custom domains, you need to update all their DNS records right away. This way, you don’t have to wait again later.
You can use DNS lookup services such as DNS Checker or MxToolbox to make sure that your domain’s new DNS records have propagated successfully (tip: you only need to check for the records you’ve updated).
If you’re using WPMU DEV Hosting, you don’t have to bother with third-party DNS lookup services. After you finish Step 3, our system will automatically perform a regular check. If your custom domain’s DNS records resolve to your hosting account, we’ll notify you via email.
Once you’re done with Step 2, regardless of whether your domain’s DNS records have propagated, you can move ahead to the next step.
Step 3: Add the Custom Domain to Your Hosting Account
Next, you need to add this custom domain to your hosting server on which you’ve installed your main network site.
The exact method to do this depends on where you’re hosting your network site, so I’ll consider two common scenarios:
- Using cPanel – most shared hosting environments use this setup.
- Using WPMU DEV Hosting – our custom dashboard makes it much easier. Most managed WordPress hosting providers have a similar setup.
Adding a Domain Alias with cPanel
Go to your hosting account’s cPanel dashboard. Here, look for an option called Alias or Parked Domains under the Domains section.
Domain Aliases (or Parked Domains) let you access your website from different domain names. For example, you can make www.domain.org and www.domain.edu show content from www.domain.com. For more details, head to cPanel docs.
In my example, I’ll use the Alias option. Your cPanel dashboard may instead have the Parked Domains option. They both refer to the same thing. Click it to get started.

Create a New Alias by entering your subsite’s custom domain name and hitting the Add Domain button.

Some web hosts automatically set up a redirection for any domain alias. You can confirm this by looking at the Redirects To column. In my case, there wasn’t any redirection set.

If it sets a redirection, click Manage Redirection link on the right, and then select Disable Redirection.
You’ve now added your subsite’s custom domain to your hosting account.
Adding a Domain with WPMU DEV Hosting
Adding your subsite’s domain is a breeze on WPMU DEV Hosting.
Go to the Domains tab in your Hosting dashboard and then click on the blue Add Domain button.

Enter your subsite’s custom domain name in the popup. I recommend you to tick the Also use www.your-domain.com checkbox here. And then hit the Add Domain button.

Once you’ve added the subsite’s custom domain, our system will automatically check whether its DNS records resolve to your hosting server’s IP address. If it fails, it’ll try again after a few minutes. This will continue until it’s successful.
If you’re impatient though, you can click the Recheck DNS link to trigger the check manually.

Look out for a green tick in the DNS Status column to confirm the successful propagation of your custom domain’s DNS records.
One of the many advantages of WPMU DEV Hosting is automatic SSL certificates for all added domains. The minute our hosting system sees that your domain’s DNS records resolve towards us, it’ll automatically install a free SSL certificate for that domain. No more dabbling with SSH or clunky web apps from the 2000s!

You’ll also get an email once it’s all done. When we say fully managed, we mean it!
Step 4: Map a Network Subsite to its Custom Domain
When you add a subsite to your WordPress Multisite network, you need to give it a sub-domain or sub-directory name (depending on your network’s settings). This is what we need to map.
In the example below, we have a Multisite network (wpdemo.wpmudev.host) with subsites assigned as sub-directories (alpha, beta, charlie).

Go to your Sites panel in your Network Admin dashboard. Here, hover over the subsite whose domain you want to map. Click on the Edit button.

Enter the custom domain you want to map in its Site Address (URL) field. Then, hit the blue Save Changes button.
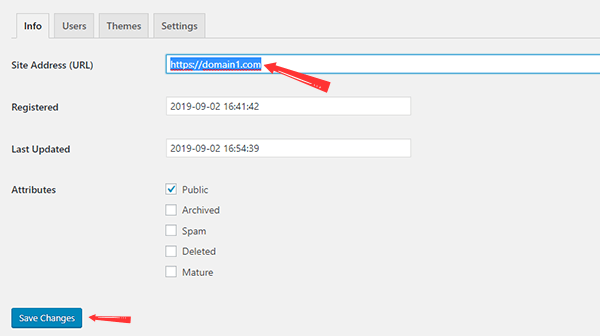
Now, your WordPress Multisite network considers that this subsite is at its custom domain (i.e. domain1.com), rather than its default URL with the sub-directory extension.
This completes mapping the custom domain to your subsite.
When you visit the custom domain in your browser, it’ll lead to the subsite it’s mapped to.
Note: You cannot map the domain name of your main installation (i.e. network.com) from here. You can instead redirect it to another domain directly from its domain/hosting settings.
Step 5: Repeat the Process for More Subsites
If you have over one subsite on your Multisite network, and you want to have them all running on their own custom domain, you need to repeat Steps 2, 3 & 4. It’s that simple!
Adding SSL Certificates for Your Mapped Domain
It’s crucial that you install SSL certificates for your primary network domain and all your mapped domains. Not only is it essential for your Multisite network’s security, it also helps immensely with SEO. Google ranks SSL-certified websites higher in their search results.
If you’re using WPMU DEV Hosting, we install SSL certificates for all the domains you add to your account. But most basic shared hosting setups don’t support installing many SSL certificates for several domains on the same account.
Here’s a relevant thread in our forums discussing the same. You need to get in touch with your hosting provider. Tell them you have a Multisite network setup with unique domains mapped for each subsite, and you want to have SSL certificates installed for all these mapped domains. A reliable host will definitely help you with this.
Want expert help? You can always rely on our 24/7 live support team. Start a risk-free membership today!
Fixing Network Subsite Login Error
One of the most common issues faced by WordPress Multisite network admins is not being able to login to their subsites. You’ll most probably face an error about blocked cookies. Rarely, you may even fail logging in with no error message at all.
It’s an easy fix. Open your wp-config.php file and add the below code after the line you added to create the network.
define('COOKIE_DOMAIN', $_SERVER['HTTP_HOST']);
If this still doesn’t fix it, you need to get in touch with your hosting provider’s support staff.
WordPress Mapping, So You Don’t Get Lost
Drop the excess and give each subsite on your Multisite network a unique URL. Not only does it make all your sites easier to find, it’s also better for branding them. Whether you’re setting up unique product subsites for a single company or hosting your client websites on a single Multisite network, domain mapping is the way to go.
Mapping custom domains to subsites on your WordPress Multisite network isn’t hard. Older versions of WordPress had it way harder, just like all our parents during their times!
WordPress 4.5 has changed the game. No more dabbling with third-party plugins and complicated configurations. All it takes is a few clicks to get it up and running.
It’s time to make your WordPress Multisite a legend with domain mapping!
Tags:
Salman Ravoof Salman was formerly a Technical Editor at WPMU DEV. He's a self-taught web developer, writer, creator, and a massive admirer of Free and Open Source Software (FOSS). Besides tech, he's excited by science, philosophy, arts, cats, and food. Learn more about him on his website, and connect with Salman on Twitter