How to Develop WordPress Locally with MAMP
Sometimes you need to make changes to your WordPress site (like activating plugins or changing the design) that you need to test out before you start to mess with your live site. The good news is that there is a way to do this – by making a local version of your site for testing and development.
Or maybe you want to start working on a new site but instead of doing all your development on a remote server (i.e. on the Internet), you want to create a development site on your own computer to try things out on. Not only does this keep your development site hidden from the world, it will also speed up your development as you won’t have to wait for files to upload when you make changes.
In this post, I’ll show you exactly how to install WordPress locally (i.e. on your computer instead of on the web). I’ll take you through the process step-by-step with screenshots along the way. Hopefully, once you’ve read this you won’t be daunted at all and you’ll be ready to start using WordPress locally.
You’ll need to follow a four-part process:
- Install MAMP on your computer (this applies to Windows and Mac users, as MAMP is no longer restricted to Mac as it once was).
- Activate MAMP’s local servers and change port settings (optional).
- Create a database on your computer where your site’s content will be stored (which means typing one word and clicking one button!).
- Install WordPress using the famous five-minute install.
So let’s get started!
Installing MAMP
First you’ll need to download the MAMP program. MAMP stands for Macintosh, Apache, MySQL, and PHP. This reflects the fact that MAMP was originally developed for use on Macs, but it now runs on Windows and Linux too and is the easiest way to run WordPress locally.

The reason you need MAMP is that it runs PHP (which WordPress is written in), MySQL and Apache on your machine. This means you can create and run queries from a database, which is where WordPress stores your content.
Go to the MAMP website, download the free software and install it on your computer.
Activating Local Servers with MAMP
Now that you have MAMP installed you need to start it and get it to run servers on your local machine. This means editing the post settings to one of two options:
- Keep the Apache port setting at the default of 8888, which means that when you visit your local site you’ll have to type the port number in the browser.
- Change the Apache port setting to 80, which means you won’t have to type the post number in the browser but does mean that whenever MAMP launches, it will ask you for your computer’s password.
Which of these you choose makes no difference to how MAMP runs or how your website will run: it’s just a choice between whether you want to keep typing 888 in the browser or you’d prefer to enter your password. I prefer the second option as I type the website address into my browser more often than I launch MAMP, so I’m going to change the settings.
But first let’s launch MAMP.
Launching MAMP
Open the MAMP software as you would any program on your computer. You’ll see the MAMP window:

The small boxes next to Apache Server and MySQL Server should come on and the power icon should turn green. If one or both of the boxes isn’t filled or the power icon is red, click the Start Servers link (which will be the right-hand link, where it says Stop Servers in the screenshot).
Now if you’re happy to keep the ports at their default setting, skip the next step. If you want to change them, read on!
Editing Port Settings
To configure the port settings, click the Preferences link to open the preferences window, then click on the Ports tab at the top:
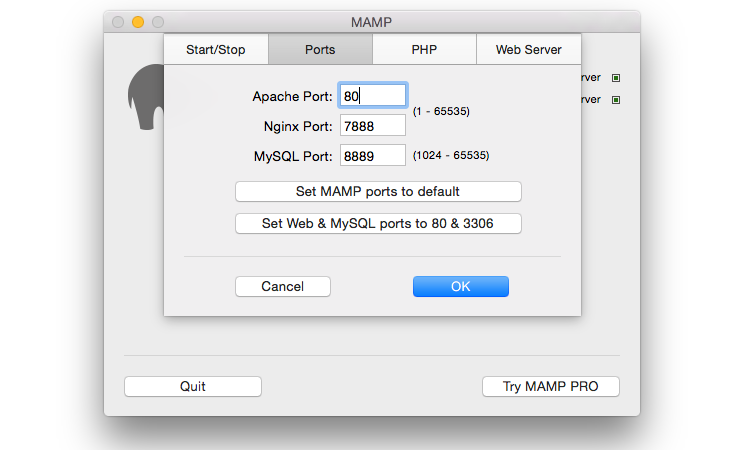
Edit the Apache Port field so it says 80 (as in the screenshot) and click the OK button. The settings will change and you’ll be prompted for your computer’s admin password.
The next step (whether or not you change your port settings) is to create a database for your site.
Creating a Database
From the MAMP opening dialog box, click the Open start page button.
In your browser, the MAMP start page will open:

Note that this screen gives you details of your MySQL database settings, which you’ll need to use later on when you’re installing WordPress. Don’t worry about remembering them, though, I’ll give you those when we get to that step.
Now click the phpMyAdmin tab at the top of the screen to open the phpMyAdmin module. Once that’s open, click the Databases tab at the top of the screen to view the databases screen:

Note that I’ve already got some databases set up on my local host, which are blurred out in the screenshot. You won’t see these as yours is a fresh MAMP installation.

FREE EBOOK
Your step-by-step roadmap to a profitable web dev business. From landing more clients to scaling like crazy.

FREE EBOOK
Plan, build, and launch your next WP site without a hitch. Our checklist makes the process easy and repeatable.
Now to create that database. In the Create database field, type the name of your database. If you’ll only be running one site locally, you can call the database WordPress: but if you plan to run more than one local site, it’s helpful to give the database a name that relates to the site. The database name may need to be shorter than your site name, though, and you can’t include spaces or punctuation.
After you’ve typed in the database name, click the Create button. A database will be created for you.
Were you expecting to create a database to be more complicated? Sorry! Now let’s get on with installing WordPress.
Installing WordPress
Now for the fun part: installing WordPress. If you’ve installed WordPress manually before on a remote server you’ll be familiar with this. But if you’ve always relied on installers, read on!
Downloading WordPress and Moving it to the MAMP Folder
First you’ll need to get hold of a copy of WordPress. Go to the WordPress download page and download a copy of the latest version.
Once you’ve downloaded the zip file containing WordPress, unzip it and then copy the entire folder to the MAMP/htdocs folder:
- On a Mac, this will be in the Applications folder, so your WordPress files will be contained within Applications/MAMP/htdocs/Wordpress.
- On a PC, your WordPress files will be in c:/MAMP/htdocs/Wordpress.
If you think you’ll be running more than one local site, change the name of the WordPress folder to something more meaningful, without any spaces.
Now you’re ready to start the setup process.
The Famous Five Minute Install
Open your browser and type localhost/WordPress in the URL field at the top of the screen. If you opted not to change your port settings earlier, type localhost:8888/wordpress. If you used something other than WordPress as your folder name, type that instead.
You’ll see the first of the WordPress installation screens, asking you to select the language you want to work in:

Select your language and click the Continue button.
Next you’ll see a screen telling you what information about your database you’ll need to install WordPress:

I’ll give you this information so you don’t need to worry! Just click on the Let’s go! button.
Now comes the screen into which you need to input your database details:

Type in the following (as per the screenshot):
- Database Name: WordPress (or whatever name you gave your database when you created it)
- User Name: root
- Password: root
- Database Host: localhost
- Table Prefix: wp_
You’ll probably find that most of these fields are pre-populated with the correct settings anyway.
Now click the Submit button.
The next screen is my favorite – it tells you that WordPress is talking to your database, which is the most important step:

Click on Run the install to move to the next step.
Next you’ll see a screen asking you for details of your site:

Type in the details for your site as you normally would when installing WordPress on your web host. WordPress will encourage you to use a strong password, although that is less of an issue when working locally. You may as well uncheck the Privacy box, as Google won’t be able to access your local site anyway – but if you copy the site to a remote host later, remember to change that setting in the admin screens.
Finally, click on Install WordPress.
You’ll now see a success screen – great stuff!

Click on the Log in button to access your site:

Now simply log in to your site as you normally would. You’ll be taken to the WordPress dashboard for your new site from where you can add content, install plugins and themes, and everything else you’d expect on a remote WordPress site.
All done! You’ve installed WordPress on your local machine. Now you can use it to create a new development site or to import content from your remote site and test it safely.
Summary
Hopefully, now that you’ve read this post (and maybe followed along) you won’t find the task of creating a WordPress site locally quite so daunting. With the MAMP software, it’s straightforward to run local servers, create a database and then install WordPress.
Now you can use your new site to develop new ideas or test plugins and themes before using them on your love site. Enjoy!
Tags:
Rachel McCollin Rachel is a freelance web designer and writer specializing in mobile and responsive WordPress development. She's the author of four WordPress books, including WordPress Pushing the Limits, published by Wiley.