Producing Content In WordPress – Everything You Need To Know
When you first see WordPress, it can be difficult to know where to start.

Please note: this tutorial assumes that you are using WordPress 3.3.1 with the default Twenty Eleven theme installed.
Whilst the feature-laden Graphical User Interface (GUI) can be somewhat overwhelming at first glance, a fresh WordPress install actually creates a functional blog design and layout, straight out of the box. If you want to get stuck straight in with producing content, you can!
However, the scope of WordPress’ capabilities does come at a short term cost. As a new user, you are going to be presented with a whole swathe of widgets and buttons – the capabilities or functions of which may be initially unclear to you. However, if you are keen to get cracking with content creation, you will find everything you need to know in this tutorial!
Finding The Add New Post/Page Screen
There are actually a few different ways to start working on a new post or page in WordPress, but we are going to keep it simple. From your Dashboard, hover your mouse over “Posts” in the navigation bar, and select “Add New”.

You will now see a screen that looks a little like this:

As you have no doubt already figured out, the process would be similar for adding a new page. From your Dashboard, hover your mouse over “Pages” in the navigation bar, and select “Add New”.
Your screen may have more widgets than what you see above, depending on what theme and plugins you have installed. If you are on the Add New Page screen, you will be missing some of these widgets, but will have a Page Attributes widget that is not included in the Add New Post screen.

For the purposes of this tutorial, we are going to assume that you only have the widgets that are available with the default WordPress install and accompanying Twenty Eleven theme. I’m going to introduce you to them all below, and have noted beside each one whether it is featured on the New Page screen, New Post screen, or both.
So let’s get started!
Title & Permalink (Pages & Posts)
The first thing you will want to do when you start a new post or page is draft a title and corresponding permalink (which will be the post/page’s URL).
Now there is a little more to writing a title for your blog post than you may think. I am not going to go into too much detail here, but generally speaking, you should keep your title relatively short (ideally under 70 characters, including spaces). This is beneficial for SEO and social media purposes. However, consider this a recommendation rather than an absolute rule – don’t sweat it if you run over every now and then.
If you want to know more about crafting great titles, check this out.
Setting Your Permalinks To The Post/Page Name
I recommend that you set your blog up so that your permalinks reflect the content of your title. Say your post title was “My Awesome Vacation”. With the right settings, the permalink for your post/page will automatically set itself to “http://www.yoursite.com/my-awesome-vacation/”.
As with the length of your title, this is great for SEO, and also makes your permalinks more memorable (who wants to see http://www.yoursite.com/page?=75 in their browser address bar, right?).
So let’s quickly change your settings so that post titles appear in your permalinks. Hover your mouse over “Settings” in the navigation bar and select “Permalinks”.
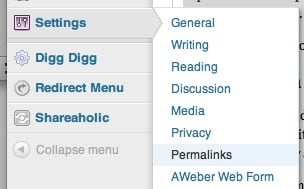
From the following screen, simply select the “Post name” radio button, then click “Save Changes”. That’s all there is to it!
You may have read that this permalink-naming structure can slow down your site, but you do not need to worry about that. Whilst it was an issue for particularly large blogs in the past, the latest version of WordPress (3.3) fixed the problem.
Now when you enter your blog’s title, the permalink should populate appropriately:

A word of warning – WordPress has been known to butcher permalinks at times (this often happens when apostrophes and the like get involved in your title). You should always check your permalink before you publish a post.
The Text Editor (Pages & Posts)
By the text editor, I mean this area on your screen:

Anyone familiar with WYSIWYG editing will be fairly comfortable with the Visual Editor (which is selected by default – if it isn’t, click the “Visual” tab at the top right of the screen). If you have used Microsoft Word or any similar text editor, you will be able to produce functional posts and pages without too much trouble.
However, there are plenty of bells and whistles that you should familiarize yourself with. Here are some other tutorials that you will find helpful:
- WordPress Tutorial For Beginners: Using The Visual Editor
- WordPress Tutorial For Beginners: The HTML Editor
- WordPress Tutorial For Beginners: Importing Images With The Media Uploader
For a full tutorial on the myriad functions of the WordPress Visual Editor, click here. Tutorials on the HTML editor and the Media Uploader will follow shortly.
Format (Posts Only)

This is a relatively new feature, having been first introduced in WordPress 3.1. The Format widget allows you to specify the “type” of post you are creating. So for instance, if you were producing a gallery of images, you might select “Gallery”. Whatever you select will not affect the content of your post, but it can affect the styling.
The functionality of the Format post depends entirely upon the theme you are using, and some themes do not use it at all. If you do not want to overcomplicate matters then simply leave the Format as “Standard”, but a little trial and error will demonstrate to you what the different options produce.
For more information on post formats, click here.
Categories (Posts Only)
I am sure you have gathered that you can use the widget pictured below to categorize your posts.

By default, WordPress comes with one category – “Uncategorized”. Not very exciting, is it? You can use The “+ Add New Category” link to create new categories. Besides that, you don’t have any further control over categories in the New Post screen.
If you want to edit your categories, hover your mouse over “Posts” in the navigation bar, and select “Categories”. You will be presented with this screen:

As you can see, there is a fair bit of functionality here, but we are just going to focus on boxes to the left of the screen. In order to create a new category, you need to enter a Name and a Slug (which will be the URL of the page that lists all posts belonging to your new category).
You only need to enter a Parent if you want to create a sub-category (i.e. one that “sits” under another category, in hierarchical terms). You’ll probably never need to enter a Description – it is only utilized by select themes.
It is important for SEO purposes that the slug matches your category’s name. So you will want to create your posts in this format:

Notice that I have replaced the space in the slug with a hyphen. You cannot have spaces in your slug.
Hit “Add New Category”, and that’s all there is to it! Your new category will show up in the list to the right of the screen.

You will now be able to use this category in your new post or page.

Post Tags (Posts Only)
If you are not particularly familiar with web 2.0, tags may mean nothing to you, but don’t worry, the concept is pretty straightforward.
You can “tag” any post you create with relevant keywords. Say I was creating a post about my recent vacation in Belgium. I might tag it with “vacation”, “Belgium”, “Europe”, “vacation photos” and so on. The idea is to link each post with contextually-relevant tags, which in time will build a picture of the main focuses of your blog.
Depending on the design of your blog, you can create a “Tag Cloud“, like this:

Click here if you want to know how to feature a tag cloud in your blog.
Anyway, let’s get back to the post tags widget, which is actually rather clever. In order to tag your post, just enter the tag into the box and hit “Add”. Your tag will then appear below.

You may notice that I did not capitalize “belgium”. Tags are case-sensitive, so you can accidentally produce duplicate tags (e.g. “belgium” and “Belgium”). I find it is easiest to keep all tags lowercase, to prevent this from happening.
The Tags widget will also recognize previously entered tags and suggest them to you as you type. Say I had previously written a post and tagged it with “europe”. When I come to write my Belgium vacation post, I will want to use that tag again. So I start typing, and…

Pretty cool, right? Selecting “prefill” tags is a great way of ensuring that you do not create duplicates.

FREE EBOOK
Your step-by-step roadmap to a profitable web dev business. From landing more clients to scaling like crazy.

FREE EBOOK
Plan, build, and launch your next WP site without a hitch. Our checklist makes the process easy and repeatable.
Finally, you will have noticed the “Choose from the most used tags” link. Once you have built up a library of tags and started including them in various posts, clicking this link will present you with a list of your most used tags. For instance, if I click this link on my own blog, this is what I get:

There are plenty of other tags below that, but you get the idea. Larger tags in the “cloud” have been featured in more posts than smaller ones.
For more information on the best use of tags, click here.
Featured Image (Posts & Pages)
This widget makes use of the Media Uploader, for which you can find a tutorial here. Enjoy!
Page Attributes (Pages Only)

As you can see from the above screenshot, the Page Attributes widget has three features. Let’s take a look at each one in turn.
Parent
You can select a Parent for a page, much in the same way as you can for a category.
Picture page hierarchy as the folders and subfolders on your computer. You probably have a “Documents” folder, where your documents/music/picture/movie subfolders are stored. You will also have a “Program Files” or “Applications” folder, where software subfolders are stored. You might choose to have a similar setup for your blog.
Selecting a Parent for a page is particularly useful when you want to nest page links in your navigation bar. Let’s take a look at an example. Say I have created an About Me page and a Contact Me page, but I want the Contact Me link to be listed under the About Me link in my navigation bar.
All I need to do is select my About Me page as the Parent when I am creating the Contact Me page.

With that done, my navigation bar will render without the Contact Me link:

However, if I hover over the About Me link, the Contact Me link will appear!

By means of an aside, I personally don’t like to nest the Contact Me page underneath the About Me page, but it you will see it being done.
Template
This feature is similar to the Format widget on the posts screen, with one key difference – selecting different formats for a post does not alter the content, but selecting a page template might. For instance, your theme may include a “Contact Form” template, which will populate your page with a contact form, without you having to use any code.
As I have alluded to above, the functionality and options available in the Template drop down box depends on the theme you are using. For instance, in the default Twenty Eleven theme, the default template looks like this:

As you can see, the default template removes the sidebar and centers the content of the page, whilst setting its width to around 600px.
This is what the same page looks like if I select the “Showcase Template”:

As you can see, the width of the content has been increased, and is now aligned to the left. Furthermore, recent posts are featured below the content of the page.
Finally, the Sidebar Template changes things up again:

This template can turn the structure of any pages on your blog into a standard two column layout with the sidebar to the right.
As you can see from the examples above, the Template feature allows you to make some pretty drastic design changes to pages, with just the click of a button.
Order
This is really straightforward. By default, your blog’s pages will be displayed in alphabetical order, like this:
If you wanted to change the order of the links in the navigation bar, you would assign a relevant numerical value to each page in the Order field.
Let’s take a look at an example. Say I wanted to draw my visitors’ attention to my “Why You’re Awesome” page first – I want that to be the first option they see (after the Home link). After that, I want them to see why I’m awesome too, so that’s the next page. That just leaves the About Me page to be displayed to the far right.
All I need to do is go into each page screen and change the numbers in the Order field to the following:
- Why You’re Awesome: 1
- Why I’m Awesome: 2
- About Me: 3
And as if by magic, everything is in the order I set:
![]()
Parent pages travel with “child” pages (so my Contact Me link will still appear under my About Me link when it is hovered over).
Publish (Posts & Pages)
This is where the action happens. As soon as you hit Publish, your post or page goes live to the world. That can be somewhat unnerving when you are writing posts for an audience of millions (hello WPMU readers!), but I have yet to prematurely publish a half-finished post (touch wood).
Let’s take a look at the options available to you that aren’t self-explanatory.
Save Draft
As a means of protecting your work, WordPress saves your posts and pages every 60 seconds, as you are writing them. You can actually see when your work was last saved at the bottom of the text editor:
![]()
The time to the left is when WordPress last autosaved your work. The date and time to the right is either (a) when you first opened the screen, or (b) when you last manually saved your work by clicking Save Draft.
As you can see from the screenshot above, I completely trust WordPress’ autosave featured, having not once manually saved the post since I started work on it approximately 2½ hours ago. But if I now click on the Save Draft button, the status changes:
![]()
There are a couple of key differences between WordPress’ autosave feature, and the Save Draft button. Whenever you hit Save Draft, a snapshot of the work you have done up to that point is saved as an individual post revision, of which an unlimited number can be stored (storage space permitting). Autosaves are not saved as post revisions, and each subsequent autosave overwrites the previous one (so one autosave is only ever stored).
You can go back to any of your post revisions in the future, should you choose to do so. If the widget isn’t displayed on your screen, just hit the Screen Options tab at the very top right of your screen and check the Revisions box.

You’ll then be presented with a list of every single revision you have made – just click to view.

Curious about the other widgets in the Screen Options tag? I’ll cover them in a tutorial soon!
Preview
Very simple this – click on Preview, and WordPress will open a new tab/window in your browser and render a replica of what your post/page would look like live if you published it at that point. Don’t worry – clicking this button does not publish your work!
A piece of advice – always check your posts and pages via the Preview button before publishing. Things can often look a little different when placed in the context of your blog’s layout.
Status
A post or page can have one of three statuses:
- Published
- Pending Review
- Draft
When you click the Publish button, the status will change to Published. Before that time, it is a Draft. You only really need to use the Status drop down box (which you uncover by clicking Edit next to the existing status) if you are writing for a blog owner/editor and need to set the status to Pending Review, so that they can check your work.
Visibility
This feature is pretty self-explanatory. If you hit the Edit link next to the visibility status, you will be presented with the following options:

Public is selected by default. If you choose to make the post “sticky” (by clicking the check box), the post will always display at the top of your home page. Please note that some themes do not include the “Sticky” feature, and some change it to present in a different fashion. For instance, one blog I work on uses the sticky feature to include posts in a “Useful Posts” widget in the sidebar.
If you set a password protect on a blog post, it will only be accessible by those who know the password that you set.

This is a very simple way of creating exclusive content for select readers of your blog.
Finally, if you set a blog post’s visibility to Private, it will only be visible to you and other editors and/or administrators of your blog.
Publish
Here’s a quick tip – if you are looking to increase readership of your blog, there are optimum times at which you should publish your posts. Unfortunately, I cannot tell you when those times are, as it varies by niche and timezone. Nonetheless, you should aim to publish your posts at a time where people are most likely to see and read them. Scheduling posts is also vital for multi-author blogs, so that authors aren’t all publishing posts at the same time.
Fortunately, scheduling a post or page to be published at a later date is a piece of cake. Just click the Edit link, select your chosen date and time, and hit OK.

Once you have confirmed a scheduled time, the Publish button will change into a Schedule button. Please note that your post or page will not actually be Scheduled until you hit the Schedule button.
Finally, if you do not wish to Schedule your post but simply want to get it out into the real world, all you need to do is hit Publish! The same goes for any alterations you make after a post has been published – no changes or additions you make to a post or page will ever go live until you hit the Publish button.
That’s All Folks!
You should now be fully-equipped to produce your own WordPress pages and posts, and an expert with all of the various features and tools that are available to you. If you have any questions, leave them in the comments section and I will get back to you!
Creative Commons images courtesy of Juhan Sonin, Peter Trimming, Eddy van 3000 and BriYYZ
Tags: