How to Build a Staff Intranet with BuddyPress and WordPress
BuddyPress continues to be one of the most popular free WordPress plugins. Its customizability and flexibility make it a great tool for creating your own social media platform.
But it has another use as well, one that I’ve used with a number of clients, and that’s as the basis for an intranet, or an internal website that staff members can use to communicate with each other and keep up to date with company news and events at a company or organization.

The fact that BuddyPress has so many features means that you can customize your intranet to work exactly the way you need it to, and you can also run the same theme as your main public website to keep things looking consistent. Or you can use a theme designed with BuddyPress in mind instead.
In this post, I’m going to show you how to configure BuddyPress for a staff intranet. I’ll walk you through the steps involved and show you how I’ve gone about it for my clients, as well as highlighting some of the benefits and uses of BuddyPress for intranets.
So let’s get started!
Note: Want to learn how to manage and add new features to your staff intranet? Check out part two: How to Manage and Add Features to Your BuddyPress-Powered Staff Intranet.
Planning Your Intranet
Before you dive in and install BuddyPress, you need to step back and do some planning. Not all intranets need to be the same, so you need to take the time to consider what features you need and how the site will be structured.
Involve multiple stakeholders in this, as there may be many teams and/or departments using the intranet, and they may have different needs.
Planning Your Approach
You also need to consider whether your whole organization should be on the same intranet, or if it’s best to set up a Multisite network with each team having their own site on it. That way you can customize each team’s site so it works in just the way they need it to.
However, if people from different teams are going to need to interact with each other, it may be best to set up just one site for your whole network. If teams don’t need to interact that much but do need to see content from each other’s sites or news from a central source, then you could use your main site on your network for this, maybe installing BuddyPress there for intra-departmental communications or using our own Reader plugin to display feeds from the sites on your network.
Note: For tips on using our plugins to do this, see our guide to creating a community with WordPress Multisite.
For the purposes of this post, I’m going to assume that you’re creating one standalone WordPress site internally, with BuddyPress installed and people from multiple teams able to access it. I’ll show you how to activate the BuddyPress Groups feature to manage communications within teams.
Deciding Which Features You Need
The next thing you’ll need to identify is which BuddyPress features your intranet needs. These are known as “components” and you can switch them on or off as you need them. They are:
- Extended Profiles – editable profile fields that let your users describe themselves.
- Account Settings – allow users to modify their account and notification settings from within their profiles.
- Friend Connections – Let users make individual connections.
- Private Messaging – users can message each other privately, both as individuals and in groups.
- Activity Streams – global, personal, and group activity streams.
- Notifications – with a toolbar bubble and/or via email.
- User Groups– groups of individuals with their own activity streams. Useful for different teams or project groups.
- Site Tracking – record activity for new posts and comments.
The two other components – BuddyPress Core and Community members – can’t be switched off, as BuddyPress won’t work without them.
All of these have a place within a staff intranet, but which you activate will depend on your specific needs. For example, Groups is useful for allowing individual teams to communicate internally, and Private Messaging will make the intranet even more useful for communication. Some organizations choose not to activate messaging as they prefer staff to use other systems for this such as internal email, picking up the phone or even talking face to face!
Identifying Hosting Requirements
Once you’ve identified what you need from your intranet and who’s going to use it, you need to work out how it will be hosted. This depends on security requirements and where people will be accessing it from.
It’s likely that staff will need to access the intranet from multiple locations: even if your office is in one place, they’ll need access when they’re out on business or working from home. In which case you need to decide whether you’ll host your intranet on your web server (with extra security measures) or if staff will need to access your internal systems.
This is something you’ll need to discuss with your IT team.
Installing and Configuring BuddyPress
Now you know what you need, let’s walk through the steps involved. I’ve created a dummy site running a BuddyPress-compatible free theme from the WordPress Theme Directory. In theory, all themes are compatible with BuddyPress – you don’t have to tweak them to make them work. But some will be better suited than others.
I’d advise choosing a theme with a simple, uncluttered design that doesn’t distract people from the content. Or you may prefer to use the same theme as on your public website, which is what one of my clients does.
Installing the BuddyPress Plugin
First, install BuddyPress via your Plugins screen in the admin. You’ll be presented with the BuddyPress intro screen:

Configuring Settings
First, let’s configure components. Click on the Set Up Components link to be taken to the Components tab in the BuddyPress Settings screen:

I’m going to select all of the optional components by ticking the checkboxes next to them. Once you’ve selected your components, click the Save Settings button.
Now we can move on to pages. BuddyPress creates some specific pages for you to use in your intranet, containing things like activity screens, member details and groups. Click the Pages tab at the top of the screen:

Depending on which components you selected, pages will be displayed here. I’ve selected all components so all available pages are shown. If you didn’t select the User Groups component, for example, you won’t have the option of creating a page for that.

FREE EBOOK
Your step-by-step roadmap to a profitable web dev business. From landing more clients to scaling like crazy.

FREE EBOOK
Plan, build, and launch your next WP site without a hitch. Our checklist makes the process easy and repeatable.
It makes sense to stick with the BuddyPress defaults, so click the Save Settings button and then click the Options tab:

Here you can make more tweaks to your BuddyPress configuration. By default, all of the options are turned on. For an intranet it makes sense to turn some of these off:
- Account Deletion – you don’t want staff members removing themselves from the system.
- Group Creation – you may want to turn this off if you’re setting up all the groups as the site administrator. Alternatively, keep it on if you want people to be able to set up their own project groups.
Work through this screen identifying which options you want to switch off, uncheck them and click the Save Settings button. Remember, you can always come back and make changes later – you can even activate components you didn’t activate when you first installed BuddyPress.
Configuring Pages and Navigation
Now let’s configure BuddyPress and other pages in the site. BuddyPress adds the following pages to your site:
- Members
- Activity
- Groups
- Registration
- Activate
My site already has a static front page and a blog page, which gives me a set of pages as shown in the screenshot:

When you were planning your intranet you’ll have thought about the most important content types and what you want to show where. I’m going to remove my static front page (maybe keeping it as an ‘about’ page, and use the Activity page added by BuddyPress as my home page.
To do this, I’ll need to set that up as my home page in my site settings.
Go to Settings > Reading, and next to Front page displays, select A static page. The select the Activity page. Finally, click the Save Changes button.

To set up your site’s navigation, go to Appearance > Menus. If your site doesn’t already have a menu set up, create one. Then add the pages (BuddyPress and other pages) you want to include in your main navigation menu, and make sure you’ve got Primary Navigation checked so it shows up in the right place.
I’ve chosen to structure my navigation with sub level items so that the menu isn’t too unwieldy:
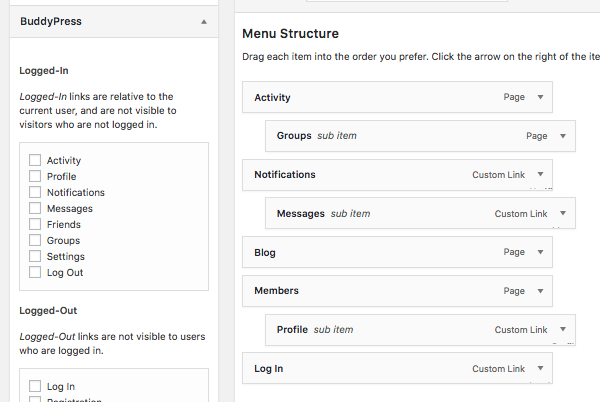
Now save your menu by clicking the Save Menu button.
Configuring Widgets
I want to add some widgets to the sidebar and footer to allow easy access to recent posts in the internal blog as well as BuddyPress activity. You might need some slightly different ones – let’s get those set up.
Go to Appearance > Widgets or open the Customizer and access the widgets from there.

My theme has widget areas in the sidebar and footer: what you have will depend on your theme.
BuddyPress provides you with seven widgets:
- Friends – lets logged in users see their friends’ activity
- Log in – lets users log in
- Recently active members – shows users what’s new
- Who’s Online – displays the profile photos of everyone currently logged in.
- Groups – shows group activity
- Members – a list of active members
- Sitewide Notices – displays notices posted by the administrator.
For an intranet, some of those are particularly useful, including Groups and Sitewide Notices. I’m also going to add the Recent Posts widget, which come built in with WordPress.
Take some time to identify which widgets you need and add them to the relevant widget areas in your theme.
I’m going with the following:
- Sidebar: Site-wide Notices, Search, Groups, Recent Posts.
- Below Content: Who’s Online, Members.
I’m using the Twenty Sixteen theme as it has a sidebar widget area plus two widget areas under the content, which do the same job as a footer widget area.
If you’re setting up a staff intranet, I recommend adding widget areas to your theme if you need more, to give yourself as much flexibility as possible.
Here’s how my intranet is looking so far:

It’s a bit bare right now, but that will change as people start using our intranet and adding content to it. In a future post, I’ll show you how to add users, set up groups, and manage your intranet.
Forcing Users to Log In
You may have noticed that I didn’t include a login widget on my site. This was deliberate because I don’t want anyone to have access to the site without logging in first. So I’m going to install a plugin that will force users to log in via the WordPress login screen before they can see anything on the intranet.
The plugin is called Force Login and all you need to do is install and activate it on your site. Then when anyone visits the site, they’ll see the WordPress login screen before they can access it:
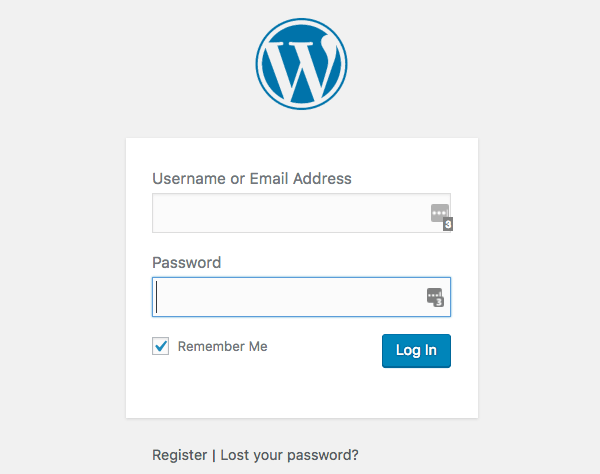
If you want to brand your login screen to make it look more professional, you can use our Ultimate Branding plugin.
You now have an intranet that’s ready for you to start adding users, groups, and content.
BuddyPress Makes Setting up a Staff Intranet Easy
BuddyPress is a great tool for creating an intranet for your company or organization, and something I’ve used with varied clients, including business, voluntary organizations, and schools.
It lets you create a secure online environment where your staff can see the latest internal news and interact with each other. And once you’ve got it up and running, the next step is to manage it and get the most from it, which I’ll cover in a future post. Watch this space!
Tags:
Rachel McCollin Rachel is a freelance web designer and writer specializing in mobile and responsive WordPress development. She's the author of four WordPress books, including WordPress Pushing the Limits, published by Wiley.