The Illustrated Guide to Installing and Setting Up BuddyPress 1.5+
BuddyPress 1.5 was a huge release that introduced tons of changes and improvements that make BuddyPress more intuitive and responsive than ever before. A few things have changed since the “old days” of installing BuddyPress, most notably that you have quite a few more options at setup. We’ll walk you through the process, which is really quite easy, though those who are new to BuddyPress may have questions.
Before you install BuddyPress, make sure your WordPress setup meets the minimum requirements:
- Server Requirement: PHP 5.2.4 or better
- Server Requirement: MySQL 5.0 or better
- Server Requirement: Apache Module mod_rewrite enabled for Pretty Permalinks
- Make sure WordPress was installed manually i.e. via FTP, cpanel and not via the quick install scripts offered by some hosts
- WordPress cannot be in its own directory – it must be installed on the root
These are the basics, but more detailed information is available in the BuddyPress codex.
Step 1: Install BuddyPress Using the Automated Installation
Installing BuddyPress is the easiest part of getting set up. You can do it directly from your dashboard, which is by far the quickest method. Go to Plugins >> Add New and search for BuddyPress. Click Install Now.
Activate the plugin. Installation is now complete! So simple, wasn’t it? Let’s move on to setup and configuration, where you may have a few questions.
Step 2: Follow the BuddyPress Wizard to Configure Components
The BuddyPress setup wizard is new in BuddyPress 1.5. It’s located under the new BuddyPress menu in your dashboard. You’ll start by selecting your components. Don’t worry, none of the choices you make in the wizard will be locked in. You can always change them later.
If you want to have the default setup with all the features that BuddyPress has to offer, then just leave all the boxes checked. Otherwise, each component is listed with a short description and you can choose to disable any that your community doesn’t require.
Click “Save & Next” at the top of the screen to progress to the next step of the wizard.
Step 3: Set Up BuddyPress Pages
BuddyPress can set these pages up for you with the default, ie. /members, /groups, /activity, etc. Your other option is to map these pages to existing pages on your website, ie. /people, /teams, /updates, etc.
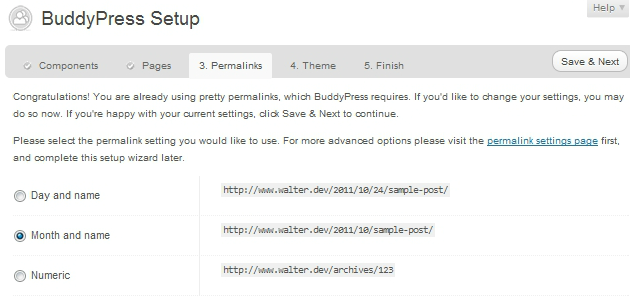
Step 4: Set Your Permalinks
BuddyPress requires pretty permalinks, so if you haven’t already set these, do so now.
Step 5: Select Your Theme
Here you will have a few choices, depending on which themes you have installed. If you’re just starting out with a clean installation of WordPress, you may want to opt for the BuddyPress default theme. It’s responsive for use on devices, comes with five new widgetized areas, featured images, and much more. Using the BP Default theme will enable you to get going with BuddyPress right away.
FREE EBOOK
Your step-by-step roadmap to a profitable web dev business. From landing more clients to scaling like crazy.
FREE EBOOK
Plan, build, and launch your next WP site without a hitch. Our checklist makes the process easy and repeatable.
If you’ve already got a highly customized WordPress theme and want to integrate BuddyPress later with the newly updated BP Template Pack, then select “Don’t change my current theme”.
Step 6: Click Finish & Activate
You should see a success screen that looks something like this:
Now you should see a new tabbed menu in place of the wizard. Here you can edit any of the selections you made during the setup process.
Your BuddyPress site is now ready! Visit the front end of your site to see it all in action.
Optional: Set Up Forums
If you’d like to have forums for your community, you can now visit BuddyPress >> Forums. Select whether you want to install group forums, use an existing installation or install site-wide forums. We’ll cover these in greater detail in another tutorial. Any of these choices will be easy to install.
Optional: Set Profile Fields
If you want to make more profile fields available to your users, go to BuddyPress >> Profile Fields. Adding a new field is simple. Give it a name and description, mark as required or optional, and then select a field type, ie. dropdown, checkbox, radio buttons, date selector, text box, multi-line text box, or multi-select box. Based on your selection, the profile field wizard will display any additional options you may need to configure.
Start Customizing!
You should be all set now for running your own social network on WordPress and BuddyPress. Play around with the basic components and features and then start adding more plugins to extend your site even further. There are currently 373 BuddyPress-specific plugins on wordpress.org alone, plus many premium, professionally-supported plugins. Give us a shout on Twitter or in the comments if you have any questions about the installation process. We’d be happy to point you in the right direction.
Tags:


