The Ultimate Guide to WordPress Multisite
Here at WPMU DEV, we’re more than a bit keen on WordPress Multisite. We’ve been developing plugins for Multisite since the old days when it was WordPress MU, and we use it to power Edublogs, a huge network of blogs for educators and students.
Personally I also use Multisite a lot. I use it to host client websites, to create sites demonstrating techniques I outline in my books and tutorials, and to keep everything in one place.
In this guide to Multisite, I’m going to show you everything you need to know to get started with Multisite and create your own network of blogs or sites.
Continue reading, or jump ahead using these links:
- What Is a WordPress Multisite and How Is It different from a Single Site?
- When to Use a Multisite (with some examples)
- When not to use Multisite
- How to activate Multisite on a new or existing WordPress installation
- Managing your network
- Managing and Maintaining a Huge Network of Sites
But first, let’s get some terminology straight. In this post I’m going to use the word network and site to refer to two different things:
- Network refers to the entire Multisite network, i.e. your WordPress installation
- Site refers to one of the blogs or sites created as part of the network.
So when I refer to your site, I don’t mean your whole network of sites, but just one of the sites on it. Each network will have a main site, which is created when you install WordPress and which will probably use the main domain for your WordPress installation: that’s still a site. I’ll explain this in more detail as we go along.
So now we’ve got that sorted, let’s take a look at Multisite!
What is a WordPress Multisite?
The WordPress Codex defines Multisite as:
A feature of WordPress 3.0 and later versions that allows multiple virtual sites to share a single WordPress installation.
This means that by installing WordPress just once on your server, you can run as many sites as you want, and I really mean as many as you want. At the time of writing, WordPress.com hosts approximately 37 million sites, and our own Edublogs.org hosts nearly 3 million educational sites. You won’t be able to host millions of sites on a standard Multisite installation though.
The great thing about Multisite is that the WordPress installation itself is almost exactly the same as a standard installation: it has the same folder structure, the same core files and the same code base. This means that installing a Multisite network isn’t much more complicated than installing a standard WordPress site, and updating Multisite is exactly the same as updating any WordPress site. All of your network’s themes and plugins are stored just once, no matter how many sites you use them on, meaning you’ll be using a lot less server space than if you used a separate WordPress installation for each site.
But there are some differences in three areas: in the admin screens and the way you use them, in the files in your WordPress installation, and in the database tables.
How the Multisite Admin Screens Are Different
When you activate Multisite, some extra screens will be added to your admin, for managing the network. You can see below the there’s a special dashboard for managing the network.
These are accessible only to the Super Admin who manages the network (that’s you) and will let you install themes and plugins and create and manage sites. I’ll take you through these in more detail later in this post.
The admin screens that each site admin can access are similar to a standard WordPress site, but a couple are missing: site admins can’t install themes or plugins but can only activate those that have been installed on the network.
But apart from that, the screens will be very familiar to anyone who has used WordPress.

How the Multisite Files Are Different
There are just two differences to the files and folders in a Multisite network: the wp-config.php file and the uploads folder.
The wp-config.php file will have some extra lines added which activate Multisite and tell WordPress how it’s running. The uploads folder will contain a subfolder for each site on the network, with the site’s numerical ID as its name. Files uploaded to each site are stored in that site’s folder, in the same structure as you would normally expect to see them in the uploads folder in a standard WordPress installation.
But the good news is that WordPress manages the file structure for you, so you don’t need to worry about it!
How the Database is Different with Multisite
The final difference is one you really don’t have to worry about unless you’re into that sort of thing: the database tables. The database for a standard WordPress installation will have 11 database tables for storing your site’s content and settings. With a Multisite network, nine of these are duplicated for each site, meaning that if you’ve got a lot of sites, you’ll have a lot of tables. This keeps the content for each site separate.
Again this is something that goes on behind the scenes and which you should never need to worry about.
Uses for Multisite
Multisite has a lot of applications, but I like to think of them as coming under three categories:
- A privately run network of sites or blogs for an individual or business
- A network of client sites installed and administered by a developer or agency
- A network which people can add their own sites to, either for free or by paying a subscription.
I have my own network of personal sites on my blog. I use this to create sites to demonstrate techniques I write about in my books and tutorials, and to try out new ideas. You might want to create a network to host your own personal sites if you have more than one, and with domain mapping plugins you can even use a different domain name for each site.
Businesses also use Multisite to host multiple sites which they administer and manage themselves: an example is BBC America, which uses Multisite to host its network of blogs.

I also manage a network of client sites for my agency, Compass Design. I moved all of my client sites to Multisite a year or so ago after years of keeping them all separate. It means that when I need to update WordPress (or a theme or plugin) I only have to do it once, and I have one place from which to manage all of my client sites. I use domain mapping so each client can have their own domain, and give them admin access for their own sites if they need it (which not all do). The benefit of this is that it means your site admins have more capabilities than an editor would on a standard site but can’t install themes and plugins which might break their site or your network.
There are also plenty of examples of Multisite networks which let people create their own site. The biggest, WordPress.com, hosts millions of sites and is free to use, with premium themes and plugins available at a cost.

Our own Edublogs enables schools and educators to create a blog, and powers million of sites using one Multisite Network. Users create a blog for free, with the option to move to a Pro account with extra features.

When Not to Use Multisite
Although Multisite is great (yes it is!) and has plenty of uses, it’s not always going to be the tool that you need. Here are some examples of when you don’t need Multisite:
- You want to create a single site or blog and don’t plan to create any more in future.
- You’re creating sites for multiple clients but each will be hosted separately, maybe with clients having their own hosting providers.
- Each site you’re creating will need its own separate database (maybe for security reasons).
- Each site will need its own IP address.
- Site administrators will need to install their own themes or plugins.
- You’ll need to move your sites to another server (that this can be done but is more involved than for a standard site, and can be avoided completely if all you need is separate domains).
- Your hosting doesn’t provide the necessary server requirements.
- You don’t have access to the files on your server for editing.
If one of the above applies to you, I would recommend sticking with a single site WordPress installation. If you do need a network but your hosting setup prevents you from doing so, I’d recommend switching providers!
Activating Multisite
Now that you know what Multisite is and how it can benefit you, it’s time to learn how to activate it. How you do this will depend on whether your site is a brand new one or an established one. It will also depend on whether you want to use subdomains or subdirectories for your network’s sites:
- Using subdomains means that each site will have a url like
http://site1.yournetwork.com. If you’re planning to let people create their own site, you’ll need to have wild card subdomains activated for your hosting. - Using subdirectories means that each site will have a url like
http://yournetwork.com/site1. You can’t choose this option on an established site that you’re converting to a network as it may cause clashes with urls already created in your site.
Let’s start by activating Multisite in a brand new installation.
Activating Multisite on a Fresh WordPress Installation
Activating Multisite when you install WordPress involves a few extra steps. Firstly, you need to install WordPress and allowing a network.
- Install WordPress in the normal way. Download WordPress and use the “Famous 5 minute install” to install it on your server or local machine.
- Open your
wp-config.phpfile which you’ll find in the folder where you installed WordPress. Find the line that reads:
- Immediately above that line, create a new line that reads as follows:
- Now save your
wp-config.phpfile.
The next step is to visit the WordPress admin screens and install Multisite.
- In the WordPress admin, go to Tools >Network Setup. You’ll be prompted to choose subdomains or subdirectories for your installation: choose the one that works for your network.
- Edit the title of your network and email address of the network administrator when prompted, or leave them as they are.
- Click the Install button.
The final step is to copy some code provided by WordPress into your wp-config.php and .htaccess files.
- You will be taken to the Network Install screen:

- Open each of your
wp-config.phpand.htaccessfiles and edit them in line with the text provided on the screen. If you can’t find.htaccesson your server, it may because hidden files aren’t visible: change the settings in your code editor if you’re using one to access your files. - Save both files.
WordPress Multisite will now be installed. You’ll need to log in again, and when you do so you’ll see the Multisite dashboard.
Now you can start adding sites, plugins, themes and more.
Activating Multisite on an Established WordPress Installation
If you’re converting your existing site to a Multisite network, you follow the same steps as above with one exception: you won’t be given the option to select subdomains or subdirectories. If your site has been in existence for more than a month, you’ll be forced to use subdomains.

FREE EBOOK
Your step-by-step roadmap to a profitable web dev business. From landing more clients to scaling like crazy.

FREE EBOOK
Plan, build, and launch your next WP site without a hitch. Our checklist makes the process easy and repeatable.
Activating Multisite using The Hub
If you are a WPMU DEV member, activating Multisite on a new or existing WordPress installation is easy.
To do this, go to The Hub and either add a new site or select an existing site from your list, then go to Tools > Multisite and click on the Off/On toggle switch.

You will be asked to select the type of structure for adding sites to your Multisite network, i.e. subdomains or subdirectories.
After selecting your choice, click the Continue button to convert your WordPress site into a WordPress multisite network.

As the change from a single site to a Multisite network is irreversible, you will be asked to confirm your decision before continuing. Once your site has been converted (the process will take anywhere from a few seconds to a couple of minutes, depending on the size of your existing site), your new Multisite network will be activated and ready to go.
For more details on installing and activating Multisite from The Hub, check out our documentation section. If you’re not a WPMU DEV member, we recommend choosing one of our risk-free membership options.
Managing Your Network
Now your network is in place and running just one site, which is the main site for the network. This site is no different from the other sites which will be added to your network: it has the same admin screens and the same permissions.
Managing your network will consist of:
- Creating and managing sites
- Installing and activating themes
- Installing and deactivating plugins
- Installing updates
Let’s start by creating a site.
Creating a Site
You can create sites manually or you can install a plugin that lets users create their own. I’ll cover how you do this with a plugin later, but first, here’s how to create a site manually.
- Go to the network admin screens by clicking on My Sites > Network Admin in the admin menu.
- Go to Sites > Add New.
- Type in the site address (i.e. the subdomain or subdirectory), the site title and the email address of the site administrator, as shown in the screenshot:

The new site will be created. If you’ve used your own email address for the site admin, you’ll be able to see it when you hover over the My Sites link in the admin menu. If you’re not the administrator, you can still see it from your network admin screens. Click Sites > All Sites to view all of your sites. Below you can see just a selection of the sites in the network I’ve set up on my own domain:

You can also create a new site from the front end of your main site, using a plugin.
Installing and Activating Themes
Only the super administrator of a network can install themes and make them available for sites to use. You can do this in one of two ways: you can allow them for individual sites or you can network activate them. A theme can only be activated on a site if it’s been network enabled or enabled for that site.
Here’s how you install a theme and network enable it:
- In the Network admin screens, go to Themes > Add New and install the theme in the same way as you would for a standard WordPress site.
- On the ‘Installing Theme’ screen that appears, click the Network Enable link.
Alternatively, to network enable a theme you’ve already installed, click on Themes to go to the Themes screen, then click the Network Enable link below a theme.
You can also enable a theme just for one site. This can be useful if your network runs lots of sites each of which will need a different theme, for example if you’re hosting client sites. Enabling themes by site means that other themes won’t be available to sites which don’t have them enabled, so there’s no risk of site admins accidentally activating the wrong theme.
To do this, follow these steps:
- In the Network admin, click on Sites to view all of your sites.
- Hover over the name of the site you want to enable the theme for and click the Edit link that appears.
- Click the Themes tab to view the themes settings screen for the site:

- Under the theme you want to enable, click the Enable link.
Now when you go to the site administration screens for that site and click on Appearance > Themes, you’ll see the theme you’ve enabled included in the available themes for activation:

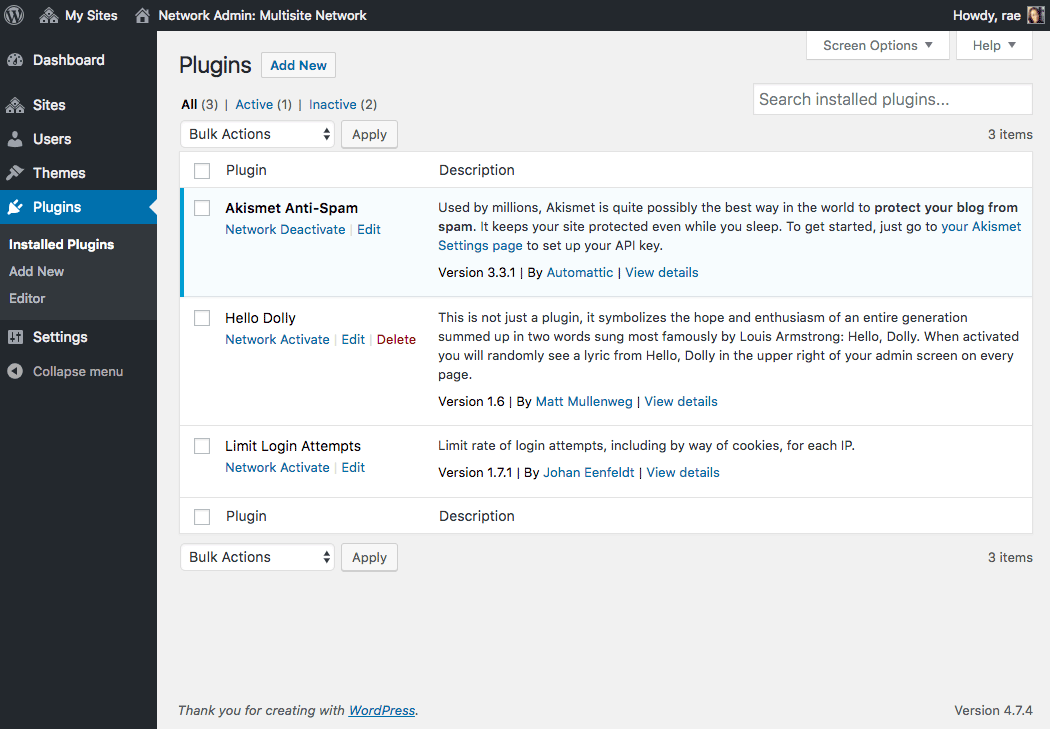
Installing and Activating Plugins
Plugins also have to be installed by the network administrator, but they work slightly differently with regard to the sites on the network. You can’t enable a plugin for an individual site. Instead, you can network activate it, so it runs on every site on the network, or you can just install it, so that individual sites can choose to activate it.
Network activating plugins is useful if you’ve written or downloaded a plugin to provide features which you want all of your sites to have, for example on my network of client sites I’ve installed the Snapshot plugin to ensure that all of the sites are backed up regularly. Here’s how to install and network activate a plugin:
- In the network admin screens, got to Plugins > Add New and install the plugin as you would in a normal WordPress site.
- In the Installing Plugin screen, click the Network Activate link.
That’s it! The plugin will now run on all the sites in your network and site admins won’t be able to disable it.
But what if you want to just activate the plugin on one site? That’s done by installing the plugin as a network admin and then activating the plugin if you have site admin privileges for the site.
- In the network admin screens, got to Plugins > Add New and install the plugin as you would in a normal WordPress site.
- In the Installing Plugin screen, click the Return to Plugin Installer link.
- Visit the site admin screens for the site you want to activate the plugin for and click the Plugins link in the admin menu.
- Under the plugin you want to activate, click the Activate link as you would in a normal WordPress site.
You’ll notice that in the Plugins screen for a site admin, there’s only the option to activate or deactivate plugins, not to delete or update them:
Managing Sites
There are other screens you can use to manage the sites on your network, accessible via the Sites screen in the network admin. These are:
- Info
- Users
- Themes
- Settings
The Info screen contains basic information on the site. This is where you would change the domain for the site if needed, or update its status.
The Users screen lists all of the users for this site, who will also be users on your network. You can use this screen to remove users from a site or to add a user to a site if they’ve already been added to your network (more of which shortly). You can also change user roles from here. Site admins can also add users from the Users section of their own admin as you would for a normal WordPress site: they can add users not already registered on the network as well.
The Settings screen gives you access to all of the settings for the site, some of which site admins have access to via the Settings section of their admin menu. This includes everything in the site’s options table in the database, including the site title, description, theme and more. I would advise against changing any settings you’re not familiar with.
Managing Your Network: Updates, Users, and Settings
As well as managing the individual sites in your network, you’ll need to manage the network itself. This will include:
- Updating WordPress
- Updating themes and plugins
- Managing users
- Customizing the settings.
Let’s take a look at each of these in turn.
Updates
Updating themes, plugins, and WordPress itself via the network admin screens is straightforward: you’ll see a notification if any of your code needs updating and you simply update it in the same way as you would for a normal site. Updating WordPress is a two-step process: you need to install the update and then update the network of sites. This is just a case of clicking a couple of extra links which WordPress will guide you through.
Users
The Users screen works in the same way as for a standard WordPress site: it will list all of the users on your network and let you edit and delete them. This will include users that site admins have added to your site as well as users who’ve signed up for a site.
The one main difference is that the Users screen tells you which sites a user has access to. If you want to add a user to a site, you do so via the Users tab in the site settings.

Settings
You use the Network Settings screen to customize the way your network is used:

Settings you can customize are:
- The title of your network
- The network admin’s email address
- Registration settings: whether users can register accounts and/or sites, whether site admins can add new users, and email domains and site names which are banned.
- New site settings: the content of the welcome email for site admins and users and the first page, post and comment created on new sites.
- Upload settings: file types permitted and maximum file size
- Language settings: the default language
- Menu settings: enable or disable the plugins menu item for site admins. If you disable this they won’t be able to activate or deactivate plugins.
Managing and Maintaining a Huge Network of Sites
The examples I gave above of huge, successful Multisite networks will store vast amounts of data and receive millions of visits across their network every day. Clearly this isn’t something your site can handle if it’s installed on a shared server with a cheap hosting plan, so as your network grows you’ll need to make changes to the way you manage your data and serve up content to accommodate the extra data and traffic.
To learn more about how this is done, see our post about how we scaled Edublogs to meet the needs of hundreds of thousands of blogs (at the time of the post) and millions of users.
Conclusion
I hope I’ve convinced you that WordPress Multisite makes WordPress even more powerful. It lets you create more than one site with just the one WordPress installation, helping you to keep all of your own sites in one place or let others create their own sites which you can make money from.
Activating Multisite just takes a few extra steps once you’ve installed WordPress, and managing your network and creating sites in it isn’t complicated. As you’ve seen, the screens do look slightly different but won’t be unfamiliar to anyone with experience of managing a standard WordPress site.
Tags:
Rachel McCollin Rachel is a freelance web designer and writer specializing in mobile and responsive WordPress development. She's the author of four WordPress books, including WordPress Pushing the Limits, published by Wiley.