Tutorial: Integrating Thesis and BuddyPress – Part 3
This is the final part of the 3 part series, Integrating Thesis and BuddyPress, in which we will perform some basic styling, edit our custom.css file, and create a unique BuddyPress experience using the Thesis Theme Framework for WordPress multisite.
As a quick recap, In Part 1 of Integrating Thesis and BuddyPress – we covered installing WordPress Multisite (briefly), reviewed the network and site dashboards, and then moved on to a detailed video installation of BuddyPress.
In Part 2 of Integrating Thesis and BuddyPress, we focus on the installation of the Thesis Theme Framework and the Thesis BuddyPress Child Theme.
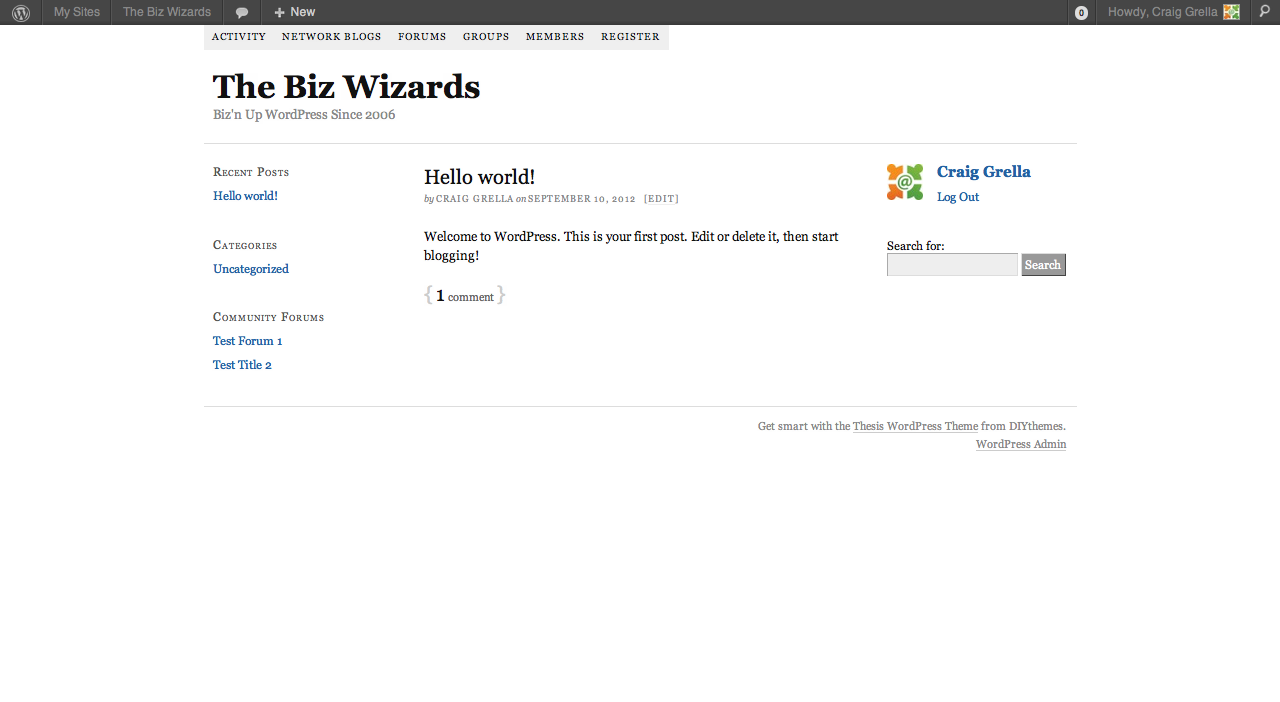
If you’ve been following along with the tutorial thus far, your website should look something like this:
Custom Editing in CSS
We’re going to concentrate on making a full size header, styling the main nav menu, and more evenly spacing our content and sidebar columns. With just 12 short lines of CSS you can turn a plain, stock installation of thesis into a unique display different than any other BuddyPress theme out there.
There’s no video tutorial for this section, but you do get a copy of the custom code we used to make your site look like what we have in our example.
Finding the Right CSS File
One of the benefits of using Thesis is that your custom CSS can be contained in just one file, conveniently located in the child theme folder. Since we’re operating on the only site on our network, the blog id = 1, and to find the custom css file we’ll look in the custom folder that corresponds to our blog id – namely custom-1.
Here’s the path inside your web host: /wp-content/themes/thesis-bp-child_0.4.1/custom-1/custom.css.
Again, if the id of the blog you are styling is different than #1, make sure to input that number instead of #1 in the path above.
Once you’ve located the custom.css file on your server make a copy of it by pulling it down to your local computer. After you’ve done that, make another copy for safe keeping – we’re not going to touch the safe file – it will be used only as a backup.
Open the custom.css file with your code editor and insert the following code at the bottom of the file:
{code type=php}
.custom {background:#000;padding: 40px 0px;}
#container {width:960px;}
#header {border:none;}
.menu {width: 100%;height:50px;border:none;background: #000;text-align: center;}
.menu li {display:inline;float:none;padding:0px 15px;}
.menu li a {display:inline-block;font-size: 16px;background: #000;}
.menu li a, .menu .current-menu-item a, .menu .current-menu-item a:hover {background:#000;color:#fff;border:none}
.menu li a:hover, .menu ul li a:hover, .menu .current-menu-item a:hover {background:#df4932;color:#fff;}
#content{width:540px;}
#bbpress-forums{width:920px;padding:20px;}
#sidebars{width:200px;}
#sidebar_1,#sidebar_2{width:200px;}
.bbp-login-form fieldset{padding:10px;}
Make sure to save the file, and upload it back to the server with your FTP program. It will probably ask if you want to overrite the file that is currently there, answer yes.
Breaking Down the Code
Just 12 lines of code for great custom styling, but still, it might be confusing to some – so here’s a quick explanation of what we’re doing.
{code type=php}.custom {background:#000;padding: 40px 0px;}
This class selector highlights the background of the entire web page and turns it black. It also adds 40 pixels of padding to the top of the page before the menu starts.
{code type=php}container {width:960px;}
Here we’re setting the page container to 960 pixels wide – a popular standard web page size.
{code type=php}#header {border:none;}
Thesis inserts borders around the header automatically, so we’re turning those off this with code.
{code type=php}.menu {width: 100%;height:50px;border:none;background: #000;text-align: center;}
Here we’re setting the menu to span the entire width of our page container, and we’re setting a menu height of 50 pixels, which is more room than we actually need to display the font. That extra room will give us some spacing before the header starts, and since we are making the background black, it will blend in nicely. We’re also centering the text, which, along with the block display used in the following lines of code, will center the menu text in it’s unordered list menu items.
FREE EBOOK
Your step-by-step roadmap to a profitable web dev business. From landing more clients to scaling like crazy.
FREE EBOOK
Plan, build, and launch your next WP site without a hitch. Our checklist makes the process easy and repeatable.
{code type=php}.menu li {display:inline;float:none;padding:0px 15px;}
This sets each menu list item to display inline, removes the automatic left menu float, and adds padding of 15 pixels to the left and right side of each menu list item. This helps space our nav text so the words don’t look so crunched together.
{code type=php}.menu li a {display:inline-block;font-size: 16px;background: #000;}
The anchor text links inside the menu items are set to display as inline-block items. The background is set to match the page background, which makes the menu look like it fades into the page.
{code type=php}.menu li a, .menu .current-menu-item a, .menu .current-menu-item a:hover {background:#000;color:#fff;border:none}
Here, we target the menu items with anchor links – including the currently selected page, and the color of the menu link text.
{code type=php}.menu li a:hover, .menu ul li a:hover, .menu .current-menu-item a:hover {background:#df4932;color:#fff;}
Here we set what color the menu items appear when we hover over the links. This is what gives the menus a red highlight when we hover over them, which makes a great contrast to the black background.
{code type=php}#content{width:540px;}
Here we set the middle content column to 540 pixels wide. This gives us more room in the main content area for the BuddyPress features like activity stream, groups, and profiles.
{code type=php}#bbpress-forums{width:920px;padding:20px;}
BBPress forum styling is automatically set to span the full width of our content column, but that makes the words butt up against the borders of our site. We use 20 pixels of padding all-around to give the forums some breathing room around the edges. It looks more pleasing to the eye and is easier to read.
Since we’re using 20 pixels on each side for a total of 40 pixels side padding, we need to reduce the column width from 100% (where it is set automatically) to 920 pixels as shown above. We arrive at this number by subtracting our side padding from the total width – 960 pixels – 20 pixels left padding – 20 pixels right padding = 920 pixels total width.
{code type=php}#sidebars, #sidebar_1,#sidebar_2{width:200px;}
This sets all sidebars used to a width of 200 pixels.
{code type=php}.bbp-login-form fieldset{padding:10px;}
This adds some spacing inside the border for the login area in the top right sidebar.
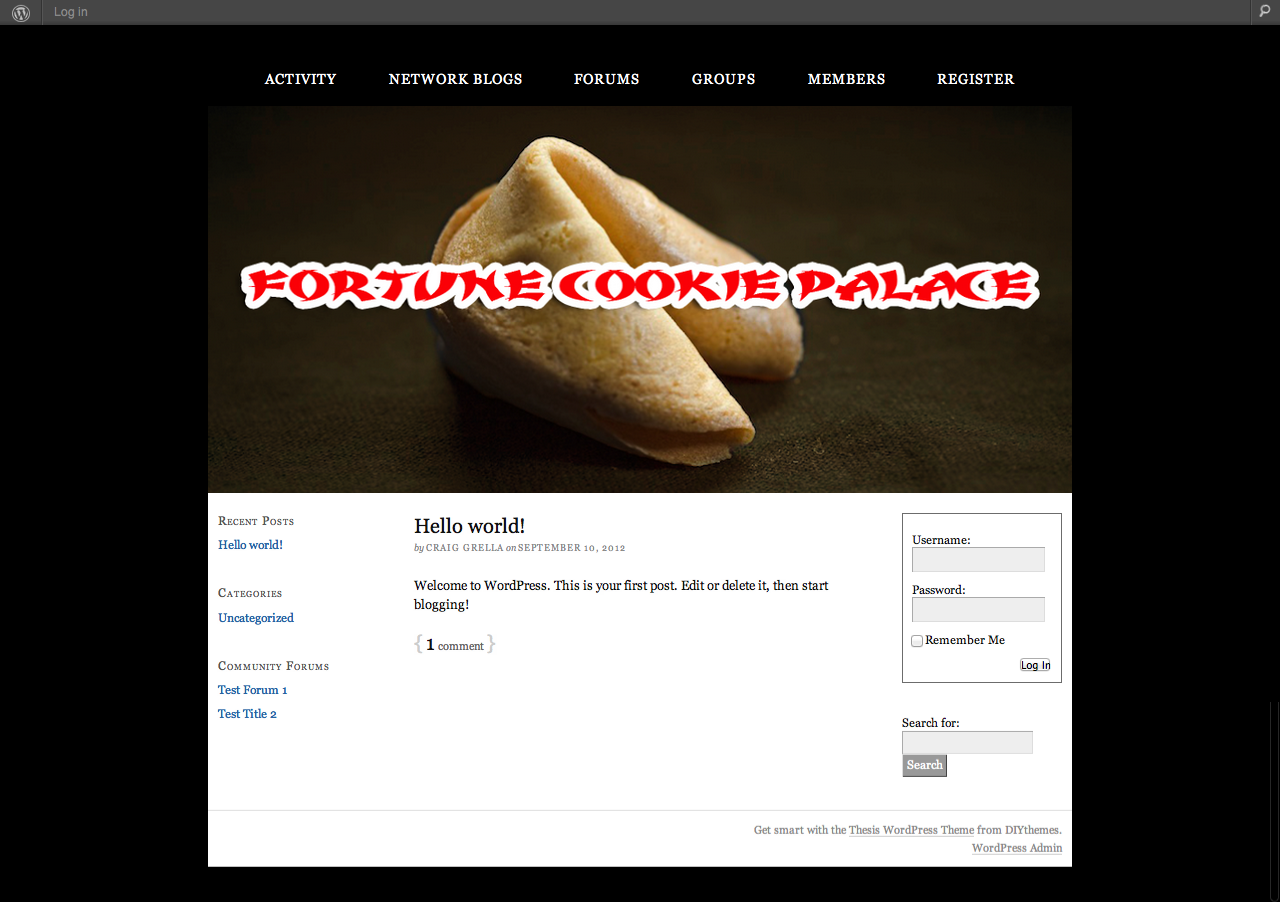
Adding a Full Size Header Image
Thesis, like some other theme frameworks, gives you the ability to easily add a custom, linkable header right from the options panel. A linkable header will forward your viewer back to the home page of your site when clicked. This allows us to remove the “home” page from our menu bar and save space for other more important items.
To use the same image that we use here in the tutorial, you can download a full-size header here. Once you’ve grabbed that image, save it to your desktop, then navigate to your site admin settings. Find the Thesis Options, then select Header Image. Select choose file and navigate to the file you just saved.
That header will display in your options panel and will automatically be added as your site’s header. Since the image is the same size as our site – 960 pixels wide, it will appear as if it takes the entire width of the web page.
The Finished Product
If you’ve followed along with the tutorial, your site will now look like this:
Pat yourself on the back, you’ve got the beginnings of a great BuddyPress site running on the fantastic Thesis Framework.
You can continue styling the site to your liking, and you can also add some additional content in your custom_functions.php file for even more functionality – like adding an activity stream to your home page (or any other page for that matter), or showing forum replies, or even group members. Stay tuned to WPMU.org for future tutorials on doing just that.
If you messed up somewhere along the line just go back and retrace your steps. If all else fails, start from scratch with a clean slate. If you have questions or just want to send a note, leave them in a comment below.
Tags:


