How to Add Custom CSS to Your WordPress Site: 6 Methods Explored
There’s more than one way to add custom CSS to your WordPress site. You’ll see how in this article.
In this post, I’ll explain the strengths and weaknesses of 6 different methods so you can decide which suits you best, and let you get on with customizing your site.
Continue reading, or jump ahead using these links:
- Finding the Design Elements You Want to Customize
- How WordPress and CSS Work Together
- Method #1: Use the WordPress Customizer to Edit CSS
- Method #2: Edit Your Theme’s style.css File
- Method #3: Use a Child Theme to Edit CSS
- Method #4: Edit a Full Site Editor Theme
- Method #5: Use a Page Builder to Edit CSS
- Method #6: Use a Plugin to Edit CSS
Finding the Design Elements You Want to Customize
Once you’ve isolated a part of your theme that you’d like to change (for example, the post title), you’ll need to determine the CSS properties applied to it so that you can make the appropriate changes. Fortunately, that process isn’t complicated.
CSS uses selectors to determine which design declarations to apply to a specific part of your website. Usually, this is done by specifying a “class” for the specific element. However, CSS can also be used to define the layout for an entire element (for example, the “<body>” tag) or an element based on its ID.
Fortunately, popular browsers allow you to see which selectors and which declarations are applied to an element on the page with just a few clicks. In Google Chrome, for example, you simply highlight a specific portion of the document and then right-click, as shown below.

Select Inspect Element from the drop-down that appears and you’ll see the design information in the window on the right. You can see an example of that below.

Those items highlighted in red show you the specific design descriptors that apply to the text you had highlighted. For example, the “font-size” element tells you that the font displayed in that highlighted text is sized at 13 pixels (“13px”). The descriptors are surrounded in curly braces by the selectors. The name of the relevant style sheet file is displayed just to the right of the selectors.
Once you’re armed with all of that information, modifying the design is easy. For example, if you want to change the font from 13px to 14px, you simply search your style sheet file, displayed just to the right for those selectors (“#plugin-info .block-content”) and change the “13px” to “14px.”
You can do the same thing in Firefox, just highlight a specific portion of the page, right-click on it, and then select Inspect Element from the menu that appears.
How WordPress and CSS Work Together
It’s a given that no two WordPress themes are created equal. So, keep in mind that your WordPress theme might not comply 100% with what you read in the following sections.
That said, it’s more than likely that the CSS used to present your WordPress site is located in a file called style.css. This is a common name for a stylesheet for any type of website, not just a WordPress website.
If you look at that file, you’ll find that it includes comprehensive stylistic ‘instructions’ for your theme. It’s beyond the scope of this tutorial to cover CSS syntax in complete detail, but if you want to delve deeper into it, we recommend you start with W3Schools’ course here.
With that out of the way, let’s move on to the aforementioned methods for editing CSS!
Method #1 – Use the WordPress Customizer to Edit CSS
The WordPress Customizer allows you to customize your website’s appearance, including adding CSS code.
To do this, go to Appearance > Customize in your WordPress dashboard, and then select the “Additional CSS” option.
Here, you can add your CSS code and see a live preview of the changes as you make them.
For example, to change the font color of your website’s body text to blue, you could add the following code to the “Additional CSS” section:
body {
color: blue;
}

Method #2 – Edit Your Theme’s CSS File
There are two ways to access your theme’s style.css file.
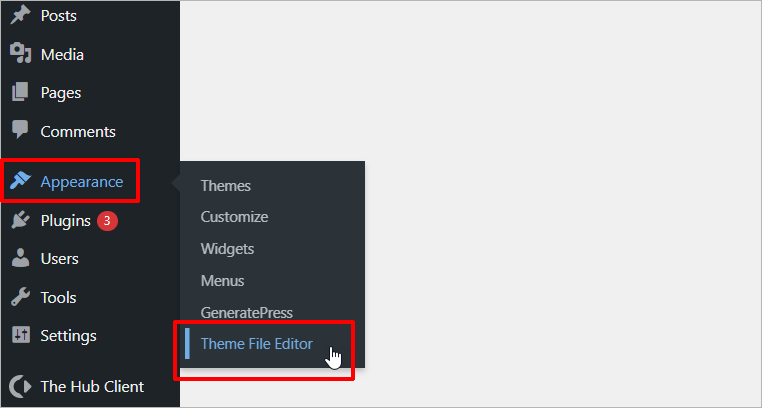
One way is to do so from your WordPress administration dashboard. On the left-hand navigation bar, highlight the Appearance option. A fly-out menu should display several more options. At the bottom of that menu, you’ll see the Theme File Editor option. Click on that.
Once you’re on the Edit Themes page, you’ll see a list of files on a vertical bar on the right-hand side of the page. Scroll down that list of files and select style.css.

You can use this screen to edit the file to make changes to your site’s design, but there’s a better way to do it (more on this in a moment).
The other way to find the stylesheet is to browse through the operating system of your hosting provider and locate the file in the theme folder. The exact location will vary depending on your hosting provider.
In the example shown below, the name of the website (in our case thecare) is a folder under the public_html folder. Since WordPress is installed for that site, you can see the wp-content folder under thecare.
Underneath the wp-content folder is another folder called themes, which is where all of the WordPress themes are installed. Since that site uses a theme called Newsletter, the correct style.css is located in the newsletter-parent folder.

At this point, you might be asking yourself: “Why is there a newsletter-parent and a newsletter-child folder?” That’s a very good question, and it’s about to be answered.

FREE EBOOK
Your step-by-step roadmap to a profitable web dev business. From landing more clients to scaling like crazy.

FREE EBOOK
Plan, build, and launch your next WP site without a hitch. Our checklist makes the process easy and repeatable.
Method #3 – Use a Child Theme to Edit CSS
If you’ve downloaded an awesome theme and want to make some changes to it, you should do so with a child theme, as opposed to editing the main (or parent) theme.
Why? Because developers can often update themes for bug fixes and design changes. If you make changes to the main theme and then install an update, you’re going to overwrite your hard work.
On the other hand, if you use a child theme to make CSS changes, only the parent theme will be updated. All of your changes in the child theme will remain.
Some professional theme developers are aware of the importance of child themes and will include one for you. Then, you can just update that child theme as much as you want without worrying about parent theme updates overwriting your changes.
If you have a theme that doesn’t include a child theme, it’s easy to add one. You can find instructions to do that in our comprehensive guide to creating a child theme.
Note: If you cannot find the Theme File Editor in the Appearances menu, use the option below.
Method #4 – Edit Full Site Editor Themes
Many newer WordPress themes are starting to take advantage of the Full Site Editor (FSE).
FSE lets you edit the layout and design of your entire website using the WordPress block editor (similar to editing a page or blog post) and is only available for selected themes.
With FSE-enabled themes, you will not find the Theme File Editor in the Appearances menu or the Theme Customizer, so to edit CSS in these themes, you will need to bring up a “hidden” and more restricted version of the Customizer and add your CSS there.
To do this, log into your WordPress admin, copy and paste the URL below into your web browser, and replace example.com with your own domain.
https://example.com/wp-admin/customize.php
Click on the ‘Additional CSS’ tab and add your custom CSS here as explained earlier.

Method #5 – Use Page Builders to Edit CSS
If you are using a page builder (e.g. Elementor), you can often add the code directly in the page at the item level.
In Elementor, for example, go to Advanced > Custom CSS. See this video below for more details:
Note: This method works differently for different page builders. Check the documentation for your specific page builder’s for details.
Method #6 – Use a Plugin to Edit CSS
The most convenient way of editing your site’s CSS is arguably via a plugin.
One of the main advantages to using a plugin is similar to that of using a child theme. If you update the theme, your changes won’t be overridden because they’re stored separately from the theme’s files. The other advantage, of course, is that you won’t have to bother creating a child theme.
There are several plugins available that allow you to add custom CSS to your WordPress website.
Here are a few great plugins to use for modifying CSS:
Simple Custom CSS and JS

Simple Custom CSS and JS allows you to easily add custom CSS and JavaScript code to your website.
For example, let’s say you want to change the background color of your website’s header to green.
Simply install the “Simple Custom CSS and JS” plugin and navigate to the “Add Custom CSS” section:

Add the following code and hit the Publish button to implement your new style change:
.header {
background-color: green;
}
Simple Custom CSS

Simple Custom CSS is one of the most popular options. It’s been installed more than 100,000 times and has received a five-star rating.
Child Theme Configurator

Last, but certainly not least, is Child Theme Configurator. This is a solution that enables you to customize the layout of your website with a child theme.
The plugin also optimizes your design strategy. If you’ve worked with CSS for any length of time, you know that sometimes the overall structure of your stylesheets can get cumbersome. Child Theme Configurator assists you in that it properly allocates your stylesheets so for optimal performance.
Child Theme Configurator has been downloaded more than 40,000 times and enjoys a 4.8 star rating.
The bottom line is this: Whatever functionality you’re trying to create, it’s probably already been created by someone else who’s willing to provide it to you, either free of charge or for a reasonable fee. It might be best to save some time and just go with a solution that’s already been produced for you.
For more plugins, check out these free CSS plugins for live editing your WordPress site.
Wrapping Up
If you’re comfortable with coding, create a child theme and dig into style.css. But if you prefer to leave those well alone, however, there are plenty of plugins available, and chances are they’ll cater to your needs reasonably well.
It’s a great idea to begin to get to grips with CSS if you’re looking to develop your site further, and there are plenty of courses and tutorials out there to help you.
Tags:
Aileen Javier Aileen has over 10 years of experience in content writing and content marketing. She’s handled content teams, planned editorial calendars, and managed projects. She’s also written blogs, web copy, social media posts, and email newsletters for brands in different industries.