How to Set Up WordPress Multisite with Nginx
Recently, due to the many attacks launched on the internet, especially the botnet DDoS attacking WordPress hosts, I was forced to move some of my sites to a shared server — a virtual machine — with little memory and just a slice of one CPU core.
This required rethinking the whole strategy of hosting them: instead of having huge server with almost unlimited memory, disk space, many CPU cores, and infinite resources, I had to somehow extract the same amount of performance out of this tiny virtual server. How?
After a whole week of reading mostly outdated tutorials, and evaluating many different approaches and strategies, it was clear that my beloved LAMP environment, favored by so many for running WordPress, had to go. Apache simply refused to be fit into such strict limits.
The alternative seemed to be Nginx, which I had absolutely no experience with, so I was not expecting miracles — and I was aware that WordPress has been designed to take good use of Apache’s tricks, like mod_rewrite to get not only pretty URLs but also work tightly with disk caches.
But to my utter surprise, not only Nginx plays nicely with WordPress, but the result was unsurpassable performance that I never thought to be possible! Small is beautiful, but it can be ultrafast too. Here’s how!
Requirements
For this tutorial you will need three things:
- A virtual machine (also known as virtual private server), either created on your own computer (using VMWare or similar software), or, more likely, leased from a commercial provider. You can get a good overview of pricing and features at CompareVPS. I’m using a VPS with 512 MB of RAM, 40 GB of disk, and 500 GB of monthly traffic for a bit less than US$10/month.
- A pre-installation of Ubuntu. For this tutorial we will use Ubuntu 12.04. There are more recent versions; and many of the commands and configurations will probably work under Debian Linux as well. Commercial providers will usually pre-install the operating system when you sign up with them.
- Some familiarity with Unix console commands. At least you should not be afraid to experiment with them!
Quick overview
So here is what we’re going to install. First, we’ll begin with MySQL, and tweak it a bit to get it to fit into our limited-memory environment.
Then comes Nginx with a basic configuration. Nginx requires an external way to communicate with PHP, so we will need to install PHP-FPM — a way of managing PHP FastCGI processes which shows good performance on benchmarks (and yes, that’s precisely what WordPress.com is running to achieve their levels of performance), and fine-tune it all.
We’ll be using PHP with the Alternative PHP Cache (APC) — a way to speed up PHP processing — which plays nicely with the W3 Total Cache plugin (which, in turn, is fully Nginx-aware).
And finally we’ll explain how you can host multiple sites with completely different domain names using a single WordPress multisite installation.
Caveats and disclaimers
Before you start following this tutorial, you should have in mind a few things. Choosing the “best” setup for WordPress is a tricky business, because, on one hand, it depends on the definition of “best”; but on the other hand, it depends on your WordPress setup (and the hardware it’s running on), what it’s being used for, the kind of data (like images and multimedia files) you’re hosting, and, more importantly, your visitors and what they’re doing.

There are plenty of benchmarks on the Web attempting to “prove” that one solution is “better” than others. I did the same for my own particular setup, and what will be described below is the result of my own tests. But you might have a different environment and not be able to reproduce the same results.
For instance, some people question very seriously the claim that Nginx + PHP-FPM is actually slightly slower than Apache + mod_php unless you have a lot of static content (because Nginx will serve it directly without the need of contacting the PHP-FPM backend). If you have plenty of memory to spare, a solution using Varnish + Apache + mod_php might beat a very fine-tuned Nginx + PHP-FPM solution. Just because Nginx + PHP-FPM might work best for the kind of setup that WordPress.com has, it doesn’t mean it’s the best for you.
But if you have a very tight environment with few resources — or, instead of opting for a huge server with lots of memory and CPU, you prefer to distribute your load among several small cloud instances — then this tutorial might help you out with extracting the most performance out of your tiny virtual private server.
Installing MySQL
So, your virtual server provider has just sent you the access password to your own slice! It’s time to to log in via SSH and start installing things. We’ll begin with MySQL.
Some pre-installed versions of Ubuntu might have MySQL 5.5 already as part of the package list. If not, what you need is to run:
sudo apt-get install mysql-server
Now it’s the time to tweak MySQL to make it fit into as little memory as possible, but still perform adequately well. The first choice is to either go with MyISAM or InnoDB, the two most popular table engines. MyISAM is the oldest one, InnoDB comes as default with MySQL 5.5.
Discussions have been raging on the Internet about which solution is best for WordPress, and, again, it might be a matter of personal taste and specific environment. What is important here is that you just use one of them. It’s pointless to let MySQL run both, and that will save you some memory.
After some reflection, especially after researching articles where MySQL was benchmarked using both approaches), it seems that MyISAM might be a preferred choice on single-CPU environments. Since for this tutorial we’re using a tiny virtual server, which might just have one CPU core, we’ll stick with MyISAM.
Open /etc/mysql/my.cnf (you will need a text editor; nano is a popular one and should be installed on most systems; if not, sudo apt-get install nano should get you that) and change/add the following:
#
# * MySQL configuration for tiny memory footprint
#
[client]
port = 3306
socket = /var/run/mysqld/mysqld.sock

[mysqld_safe]
socket = /var/run/mysqld/mysqld.sock
nice = 0

[mysqld]
#
# * Basic Settings
#
user = mysql
pid-file = /var/run/mysqld/mysqld.pid
socket = /var/run/mysqld/mysqld.sock
port = 3306
basedir = /usr
datadir = /var/lib/mysql
tmpdir = /tmp
lc-messages-dir = /usr/share/mysql
skip-external-locking
skip-networking
key_buffer = 24M
sort_buffer_size = 4M
read_buffer_size = 4M
#binlog_cache_size = 2M
max_allowed_packet = 12M
thread_stack = 128K
thread_cache_size = 8

# This replaces the startup script and checks MyISAM tables if needed
# the first time they are touched
myisam-recover = BACKUP

#max_connections = 200
#table_cache = 64
table_cache = 128
thread_cache = 256
#thread_concurrency = 10
thread_concurrency = 4
myisam_sort_buffer_size = 1M
tmp_table_size = 12M
max_heap_table_size = 12M
wait_timeout = 200
interactive_timeout = 300
max_connect_errors = 10000

#
# * Query Cache Configuration
#
query_cache_type = 1
query_cache_limit = 1M
query_cache_size = 16M

#
# * InnoDB
#
# InnoDB is enabled by default with a 10MB datafile in /var/lib/mysql/.
# Read the manual for more InnoDB related options. There are many!

skip-innodb
default-storage-engine = myisam
skip-external-locking
skip-slave-start
skip-name-resolve

[mysqldump]
quick
quote-names
max_allowed_packet = 16M

[mysql]
#no-auto-rehash # faster start of mysql but no tab completition

[isamchk]
key_buffer = 16M
#
# * IMPORTANT: Additional settings that can override those from this file!
# The files must end with '.cnf', otherwise they'll be ignored.
#
!includedir /etc/mysql/conf.d/
Some short explanations on the above configuration: you might have seen tutorials for improving performance under MySQL, even from Matt Mullenweg himself, and the settings are a bit higher. Here we’re looking at a compromise: we don’t want MySQL to have terrible performance, but we don’t want to have it consuming too much memory.
The more surprising aspect might be “no networking” (and all the related aspects to that, e.g. skipping name resolving, and so forth) and getting rid of InnoDB completely. This saves us some networking buffers, but, of course, it means that WordPress will need to contact MySQL on an Unix socket and be installed on the same machine; we’ll see how this works later on.

If you prefer to run two servers, side-by-side, one with MySQL, the other with Nginx/WordPress, then of course you will need to turn networking on. This might be a more suitable environment for cloud-based networks — some providers allow you to allocate a set amount of CPUs, memory and disk, but you can launch as many instances as you wish.
Usually, only some of those will be accessible by the outside world, and the rest is inside a “private” network, with no routing to the exterior. Cloud providers usually do not charge anything for traffic among your virtual instances — only for traffic that crosses the boundary to the “real world”.
This will mean that although you have open network connections in this case, they’re completely shielded from the outside world, and, as such, are secured. And, of course, you can later duplicate the MySQL instances (or the front-end instances) if you need.
But for this tutorial, we’re keeping it simple: everything is inside the same virtual private server, and, as such, networking is not necessary — we can communicate via Unix sockets instead.
Start MySQL with:
service mysql start
At the end, you should most definitely set a root password (also known as “administrative account”) for MySQL, since by default it’s empty. There are many ways to do that, but Ubuntu 12.04, for MySQL 5.5, has a neat command:
sudo dpkg-reconfigure mysql-server-5.5
Under other distributions, you will need to use the following commands:
sudo mysqladmin -u root -h localhost password 'mypassword'
sudo mysqladmin -u root -h myhostname password 'mypassword'
Remember to pick a very hard-to-figure-out password, preferably randomly generated.
Installing Nginx
The next step is to install Nginx. This is a software application that is under constant development, and it pays off to get the latest batch of security enhancements. Unfortunately, the Ubuntu core developers are not always up-to-date with Nginx, so the recommended choice, as per the Nginx Wiki, is to add it from a third-party repository (or, as the Ubuntu crowd calls them, from a Personal Package Archive [PPA]), which is maintained by volunteers and is not distributed by nginx.org. It has some additional compiled-in modules and may be more fitting for your environment.
sudo -s
nginx=stable # use nginx=development for latest development version
add-apt-repository ppa:nginx/$nginx
apt-get update
apt-get install nginx
If you get an error about add-apt-repository not existing, you will want to install python-software-properties:
sudo apt-get install python-software-properties
and then just run the above commands again.
Overview of the configuration for Nginx

You can run Nginx and Apache side-by-side on the same server (for instance, letting Nginx deal with static content and having Apache handling PHP), but for this tutorial, we’re going to assume that only Nginx will be running, and we will use the same data directory structure (the one where the actual files for the websites are going to be) used by Apache.
Why? It will make changing to Apache easy, if you decide to drop Nginx; or, if you’re following some tutorials on the Web, which assume you have a “standard” structure for a Linux distribution with Apache, then you won’t be much confused about the right directory to place your files.
What this means is that all data will be under the /var/www directory. Nginx itself follows a configuration style which is similar to all applications under Debian/Ubuntu. The main configuration directory is /etc/nginx. The main configuration file is /etc/nginx/nginx.conf. Additional configuration files (we will use that for adding WordPress-specific configurations) are under /etc/nginx/conf.d; they will be automatically loaded when Nginx restarts/reloads.
And finally, all website-specific configurations (for each virtual host) will be under /etc/nginx/sites-available. Each time you create a new virtual host, that configuration file will be symbolically linked to /etc/nginx/sites-enabled.
Some Nginx configurations that you might find out there will probably just use one single file for everything (Nginx usually doesn’t have very long configuration files anyway). Here, however, we will split everything according to the usual tradition of Debian/Ubuntu. The idea is that each virtual host will have as little different information as possible, and draw from common rules for everything.
Installing PHP5, PHP5 Extensions and PHP-FPM
Nginx, as you might remember, does only handle static files — everything else needs to be passed to an external service. In our case, we’ll use PHP-FPM to handle PHP5 on behalf of Nginx. PHP-FPM is like a mini-webserver, with its own options, but which will only process PHP — we’ll get back to it later.
Figuring out what PHP5 extensions you really, really need to have is not always easy! For this tutorial, we want to have PHP5 with as few extensions as possible (to make sure it consumes little memory!), but we need at least a few, since WordPress (or some of the plugins) will depend on them.
I have mostly followed Rahul Bansal‘s suggestions. The first thing is to make sure we get PHP 5.4 (instead of the default PHP 5.3 which comes with Ubuntu 12.04 LTS), and that means adding another repository to get the latest version. Newer versions of Ubuntu might already have PHP 5.4 as the default, so you might wish to skip this step.
sudo add-apt-repository ppa:ondrej/php5
sudo apt-get update
Now we need to install PHP5 and all the necessary modules:
sudo apt-get install php5-common php5-mysql php5-xmlrpc php5-cgi php5-curl php5-gd php5-cli php5-fpm php-apc php5-dev php5-mcrypt
For some WordPress plugins you might need to add php5-pear to that list, as well as a few others (like php5-imap if you are using some sort of newsletter which gets mailed out to your users). International users will probably add php5-intl. I normally add php5-tidy which gets used by W3 Total Cache, but it is not strictly necessary.
Configuring Nginx
To give you a rough overview of what the Nginx configuration below does, it’s good to understand that Nginx is configured with rules: as it gets an URL, Nginx will need what to do with it — look up into a certain directory for a static file (for images, CSS, and so forth), pass PHP scripts to PHP-FPM, or block access (for security reasons).
Nginx can obviously do quite a lot more processing, like adding no-expiry headers and removing cookie requests for static files (for better caching), or gzip‘ing everything on the fly (for saving bandwidth).
Here is the /etc/nginx/nginx.conf file which handles most of the common features:
user www-data;
worker_processes 1;
pid /var/run/nginx.pid;
events {
 worker_connections 256;
 # multi_accept on;
}
http {
 ##
 # Basic Settings
 ##
 sendfile on;
 tcp_nopush on;
 tcp_nodelay on;
 keepalive_timeout 65;
 types_hash_max_size 2048;
 server_tokens off;
 client_max_body_size 8m;
 reset_timedout_connection on;
 # server_names_hash_bucket_size 64;
 # server_name_in_redirect off;
 index index.php index.html index.htm;
 include /etc/nginx/mime.types;
 default_type application/octet-stream;
 ##
 # Logging Settings
 ##
 access_log /var/log/nginx/access.log;
 error_log /var/log/nginx/error.log;
 ##
 # Gzip Settings
 ##
 gzip on;
 gzip_disable "msie6";
upstream php5-fpm {
 keepalive 8;
 server unix:/var/run/php5-fpm.sock;
 }
# include /etc/nginx/conf.d/*.conf;
 include /etc/nginx/sites-enabled/*;
}
Notice a few things. First, worker_processes should be set to 1 per CPU (in my own VPS I just have one CPU). client_max_body_size is the size of uploaded files through POST; I believe it defaults to 1m (one megabyte), but 8 is the default used by PHP for file uploads, so I suggest those two settings are kept with the same values.
The upstream command is the setup to talk to PHP-FPM: as you can see, like we did with MySQL, we’re using Unix sockets to communicate with PHP-FPM. If you had a setup with Nginx on one VPS and PHP-FPM on another (using Nginx, say, as a front-end reverse proxy/caching server), you would use server my.ip.address:portnumber instead.
In this tutorial, we’ll show you both the single-site and multisite configuration for WordPress. The configuration files for those two choices will be stored under /etc/nginx/conf.d/, so we will activate the appropriate ones on demand. That’s why this line is commented out — we don’t want to load both configurations, since WordPress works rather differently under multisite mode!
The configuration for single-site WordPress (save it under /etc/nginx/conf.d/wordpress.conf) is as follows, inspired by the recommendations at WordPress.org and the entry for WordPress on the Nginx Wiki, which describe best practices as well how to avoid some common pitfalls.
# WordPress single blog rules.
# Designed to be included in any server {} block.
# This order might seem weird - this is attempted to match last if rules below fail.
# http://wiki.nginx.org/HttpCoreModule
location / {
 try_files $uri $uri/ /index.php?$args;
}
# Add trailing slash to */wp-admin requests.
rewrite /wp-admin$ $scheme://$host$uri/ permanent;
# Directives to send expires headers and turn off 404 error logging.
location ~* ^.+\.(xml|ogg|ogv|svg|svgz|eot|otf|woff|mp4|ttf|css|rss|atom|js|jpg|jpeg|gif|png|ico|zip|tgz|gz|rar|bz2|doc|xls|exe|ppt|tar|mid|midi|wav|bmp|rtf)$ {
 access_log off; log_not_found off; expires max;
}
# Uncomment one of the lines below for the appropriate caching plugin (if used).
#include global/wordpress-wp-super-cache.conf;
#include global/wordpress-w3-total-cache.conf;
# Pass all .php files onto a php-fpm/php-fcgi server.
location ~ \.php$ {
 # Zero-day exploit defense.
 # http://forum.nginx.org/read.php?2,88845,page=3
 # Won't work properly (404 error) if the file is not stored on this server, which is
 #  entirely possible with php-fpm/php-fcgi.
 # Comment the 'try_files' line out if you set up php-fpm/php-fcgi on another machine.  #  And then cross your fingers that you won't get hacked.
 try_files $uri =404;
 #fastcgi_split_path_info ^(.+\.php)(/.+)$;
 #NOTE: You should have "cgi.fix_pathinfo = 0;" in php.ini
 include fastcgi_params;
 fastcgi_index index.php;
# fastcgi_param SCRIPT_FILENAME $document_root$fastcgi_script_name;
# fastcgi_intercept_errors on;
 fastcgi_keep_conn on;
 fastcgi_pass php5-fpm;
}
And now the rules for WordPress running in multisite mode (save them under /etc/nginx/conf.d/wordpress-mu.conf):
# WordPress multisite subdirectory rules.
# Designed to be included in any server {} block.
index index.php;
# This order might seem weird - this is attempted to match last if rules below fail.
# http://wiki.nginx.org/HttpCoreModule
location / {
 try_files $uri $uri/ /index.php?$args;
}
# Add trailing slash to */wp-admin requests.
rewrite /wp-admin$ $scheme://$host$uri/ permanent;
# Pass all .php files onto a php-fpm/php-fcgi server.
location ~ \.php$ {
 # Zero-day exploit defense.
 # http://forum.nginx.org/read.php?2,88845,page=3
 # Won't work properly (404 error) if the file is not stored on this server, which is entirely possible with php-fpm/php-fcgi.
 # Comment the 'try_files' line out if you set up php-fpm/php-fcgi on another machine. And then cross your fingers that you won't get hacked.
 try_files $uri =404;
# fastcgi_split_path_info ^(.+\.php)(/.+)$;
 #NOTE: You should have "cgi.fix_pathinfo = 0;" in php.ini
include fastcgi_params;
 fastcgi_index index.php;
# fastcgi_param SCRIPT_FILENAME $document_root$fastcgi_script_name;
# fastcgi_intercept_errors on;
 fastcgi_pass php5-fpm;
}
location ~ ^/files/(.*)$ {
 try_files /wp-content/blogs.dir/$blogid/$uri /wp-includes/ms-files.php?file=$1 ;
 # access_log on; log_not_found on; expires max;
}
#avoid php readfile()
location ^~ /blogs.dir {
 internal;
 alias /var/www/wordpress/wp-content/blogs.dir ;
 access_log off; log_not_found off; expires max;
}
# Directives to send expires headers and turn off 404 error logging.
location ~* ^.+\.(xml|ogg|ogv|svg|svgz|eot|otf|woff|mp4|ttf|css|rss|atom|js|jpg|jpeg|gif|png|ico|zip|tgz|gz|rar|bz2|doc|xls|exe|ppt|tar|mid|midi|wav|bmp|rtf)$ {
 access_log off; log_not_found off; expires max;
}
The difference is mostly dealing with file uploads, since each WordPress multisite installation will have a “common” area, but separate areas for the uploads. We will see later how this magic happens (hint: we will need to map each subdomain to the correct $blogid).
For now, notice that this configuration is not perfect: I had to explicitly add alias /var/www/wordpress/wp-content/blogs.dir; — ideally, this should be set from each virtual server’s configuration, or this will work with just one multisite installation…
Beyond these rules, we’ll add also a common set of restrictions, in an attempt to make Nginx more secure. Place them under /etc/nginx/conf.d/restrictions.conf:
# Global restrictions configuration file.
# Designed to be included in any server {} block.</p>
location = /favicon.ico {
 log_not_found off;
 access_log off;
}
location = /robots.txt {
 allow all;
 log_not_found off;
 access_log off;
}
# Deny all attempts to access hidden files such as .htaccess, .htpasswd, .DS_Store (Mac).
# Keep logging the requests to parse later (or to pass to firewall utilities such as fail2ban)
location ~ /\\. {
 deny all;
}
# Deny access to any files with a .php extension in the uploads directory
# Works in sub-directory installs and also in multisite network
# Keep logging the requests to parse later (or to pass to firewall utilities such as fail2ban)
location ~* /(?:uploads|files)/.*\\.php$ {
 deny all;
}
All that is left to do are the configuration files for the individual websites! But first, we need to set up PHP-FPM; then, after we install WordPress, we will be able to see all of this working together: at this stage, all you can do is to see if there are any configuration errors:
sudo service nginx configtest
If all’s well, you should just see:
Testing nginx configuration: nginx.
Configuring PHP-FPM

PHP5 itself is configured from /etc/php5. Under Debian/Ubuntu, each different way of launching PHP5 will have its own, separate configuration — e.g. apache2 for the Apache configuration, cli for the command-line version of PHP5, and, naturally, fpm for PHP-FPM. They are all set independently, which sometimes might be confusing, as you can launch different modules and have different settings for each configuration.
We can start with /etc/php5/fpm/php.ini first, since it doesn’t need many changes. Just check that memory_limit = 128M (you can tweak this to consume less memory, but keep in mind that W3 Total Cache will consume a fair amount of memory — in exchange for superfast performance). You might have noticed from the Nginx configuration that we ought to use cgi.fix_pathinfo=0. Also remember to set date.timezone for your own timezone (it’s mandatory for PHP 5.4). The rest should be pretty much the standard.
Check under /etc/php5/fpm/conf.d which modules PHP5 should load. In my case, I had to delete 20-snmp.ini, which I didn’t need. Each of those files calls the appropriate extension and allows you to set extra parameters. You should have something like this list:
10-pdo.ini
20-apc.ini
20-curl.ini
20-gd.ini
20-mcrypt.ini
20-mysql.ini
20-mysqli.ini
20-pdo_mysql.ini
20-xmlrpc.ini
Now we need to configure the service that provides PHP to Nginx. PHP-FPM has an extra configuration file for that, stored under /etc/php5/fpm/php-fpm.conf. We will not need to change this file; this is the global configuration for PHP-FPM. Then it launches several pools.
The analogy is that PHP-FPM works a bit like a webserver with virtual hosts: php-fpm.conf has the overall configuration, and then we have separate configurations for the pools under /etc/php5/fpm/pool.d/. By default there is just one pool, www.conf, and this is all we need to edit. It’s a long file, I’m just showing some of the changes and checks you should do:
listen = /var/run/php5-fpm.sock
pm = dynamic
pm.max_children = 20
pm.start_servers = 3
pm.min_spare_servers = 1
pm.max_spare_servers = 5
pm.max_requests = 500
This looks familiar, right? First, we must make sure that PHP-FPM is using the same Unix socket than Nginx. Then we’ll use dynamic allocation of pools — in this case, we tell PHP-FPM to start with 3 servers (that means three processes ready to listen to PHP requests from Nginx), limit it to a maximum of 20, don’t keep too many spare servers around, and, every time a child process serves 500 requests, it gets killed.
This naturally reflects my own setup — 512 MB of RAM, some of which is naturally also needed for MySQL and Nginx itself (Nginx doesn’t eat much memory, though). After some careful tuning of the parameters, this allows me to serve something like 10 concurrent requests and have all processes in memory — no swapping!
But, of course, this depends on how many extensions you have loaded on PHP5, how much concurrency you really need (10 simultaneous connections is not that much), how quickly your webpage loads (which, in turn, depends on the plugins, widgets, external calls, and so forth)…
The whole trick is to twiddle with these numbers until you get acceptable performance, avoid disk swapping, and don’t leave your users endlessly waiting for pages!

FREE EBOOK
Your step-by-step roadmap to a profitable web dev business. From landing more clients to scaling like crazy.

FREE EBOOK
Plan, build, and launch your next WP site without a hitch. Our checklist makes the process easy and repeatable.
If you want to have separate logs, which will report things like processes dying too early from lack of resources or connectivity issues with Nginx and similar errors, add the following to the www.conf pool configuration file:
php_admin_value[error_log] = /var/log/fpm-php.www.log
If not, PHP-FPM will just pipe most errors via Nginx (but not all), and they will appear on the webserver’s log.
You start PHP-FPM with:
sudo service php5-fpm start
Double-check that Ubuntu is launching MySQL, Nginx, and PHP-FPM when it boots (this is the default behaviour for newly installed packages providing network services); if not, use update-rc.d to check them all in.
Installing WordPress

Most of you will install WordPress directly from the sources, and a good reference for that is on the Ubuntu Server Guide website. I personally dislike the way Ubuntu handles WordPress as an application. It will be better integrated into the overall system, but you will only get upgrades when the Ubuntu team feels they should upgrade it. Looking at the dates of the last update, this was quite a while back. In the case of WordPress, the latest and greatest is also the safest (security-wise) choice, so I recommend to install it manually.
Although Nginx can read pretty much anything from any place on the directory structure, as mentioned before, I’m true to the “Apache/Ubuntu” way of organizing things, and that means placing everything under /var/www — including, in this case, the virtual host that will hold our WordPress installation.
sudo -i
cd /var/www
wget -O wordpress.tar.gz http://wordpress.org/latest.tar.gz
tar -zxvf wordpress.tar.gz
chown -R www-data:www-data /var/www/wordpress
rm wordpress.tar.gz
Now we need to handle the database. WordPress needs a “clean” database (freshly created). In this example, we’ll also add a user just for that database.
If you prefer to use a Web-based database configuration tool, just follow the instructions on this tutorial about installing phpmyadmin. If you’re fine with using command prompts to make database changes, then log in to mysql server as the root user:
mysql -u root -p
Create a database with the name wordpress:
CREATE DATABASE wordpress;
Create a new user, which will have access to this database only; its username will also be wordpress:
CREATE USER wordpress;
Set the password to the user wordpress to be VeryHardToFigureOut2013! (use your own, but make it hard to guess or just generate it randomly as suggested before) :
SET PASSWORD FOR wordpress = PASSWORD("VeryHardToFigureOut2013!");
Grant user wordpress all permissions on its database of the same name:
GRANT ALL PRIVILEGES ON wordpress.* TO wordpress@localhost IDENTIFIED BY 'VeryHardToFigureOut2013!';
FLUSH PRIVILEGES;
And now you can log out from the session by typing:
exit
I usually try to log in immediately afterwards with the username/password just created, to be sure everything is fine.
Next, it’s configuration time! WordPress will do pretty much everything on its own, but first we need to let Nginx become aware of our new site.
Open /etc/nginx/sites-available/mydomain.conf and type the following:
map $http_host $blogid {
 default 0;
 mydomain.com 1;
}
server {
 server_name mydomain.com;
 root /var/www/wordpress;
 access_log /var/log/nginx/mydomain.com-access.log;
 error_log /var/log/nginx/mydomain.com-error.log;
 include conf.d/restrictions.conf;
 include /var/www/wordpress/nginx.conf;
 include conf.d/wordpress-mu.conf;
}
We’ll get into this later.
cd /etc/nginx/sites-enabled
ln -s /etc/nginx/sites-available/mydomain.conf
touch /var/www/wordpress/nginx.conf
Note that the last command is a requirement for W3 Total Cache (that file has to exist and be readable by the webserver’s user).
Finally, to make sure all this is readable by the webserver, do
chown -R www-data:www-data /var/www/wordpress
Running the WordPress self-installer
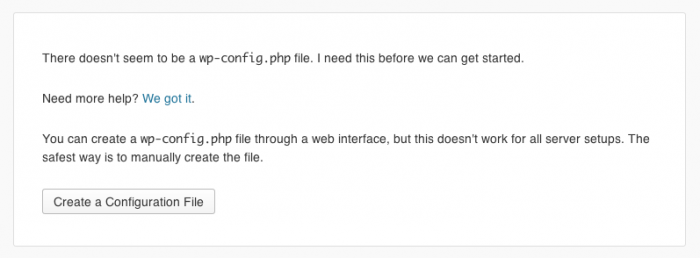
Go ahead and let WordPress create it.
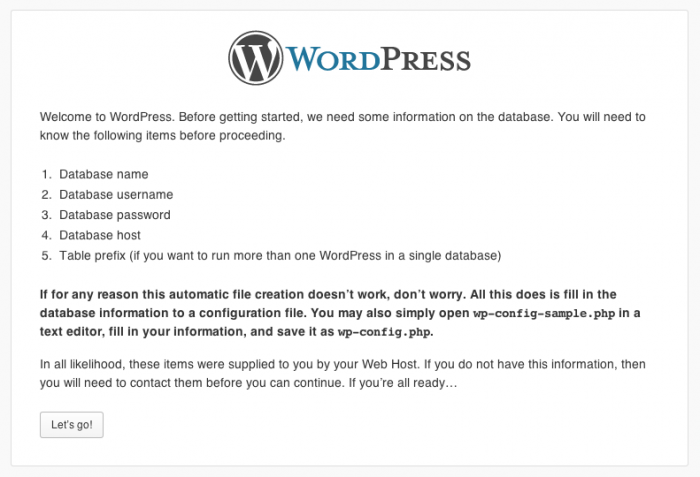
Click on Let’s Go:
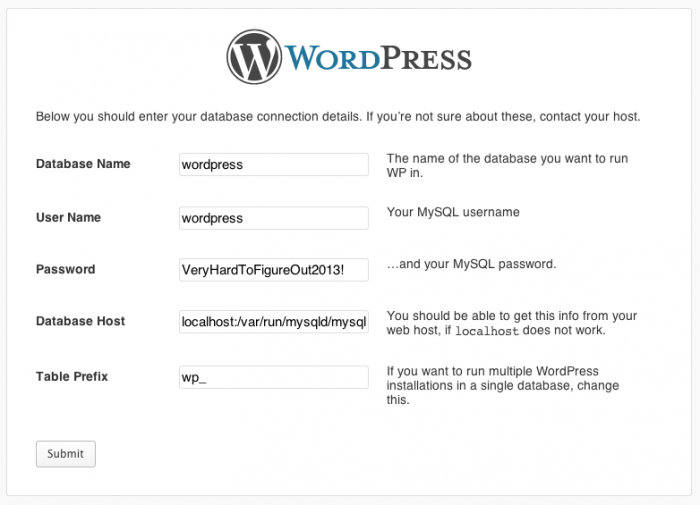
Note that the database host is: localhost:/var/run/mysqld/mysqld.sock. This will get WP to talk to the database via the Unix socket which is set up for MySQL by default, and, as said, totally avoid any TCP-based network connections.
If all goes well, you should be able to get to the familiar steps below:


If not, two things might be wrong. The first is that our “unusual” MySQL setup is not properly configured. The second one is that somehow one password or setting was written wrongly; just go back and fix it. Remember not to use the “admin” name for the Super Administrator: as said, the latest BotNet attack on WordPress sites looked specifically for “admin” and tried to crack its password.
After that, you should be able to login; WordPress is still running in “single site” mode. Now to the next step!
Defining Multisite
To enable WP in Multisite mode, you need to open /var/www/wordpress/wp-config.php with your favourite text editor. If you have done this before, it should be easy. Above the bit that says:
/* That's all, stop editing! Happy blogging. */
Add the following lines:
/* Multisite */
define('WP_ALLOW_MULTISITE', true);
Refresh your browser, and you should have a new option under Tools > Network Setup:

For this tutorial, I will be setting it up as separate sub-domains. There is a reason for that — the Nginx rules later will be a bit easier. At this point, if you press Install, WP will do some validations and probably return an error about a missing “wildcard domains”. Don’t worry. What matters next is that wp-config.php needs another change. As you can see, WP “assumes” you’re running under Apache, so we will pretty much ignore step 2, and just add the prompted lines on step 1 to wp-config.php:
define('MULTISITE', true);
define('SUBDOMAIN_INSTALL', true);
define('DOMAIN_CURRENT_SITE', 'mydomain.com');
define('PATH_CURRENT_SITE', '/');
define('SITE_ID_CURRENT_SITE', 1);
define('BLOG_ID_CURRENT_SITE', 1);
Remember, this will come below the line saying define(‘WP_ALLOW_MULTISITE’, true); but before the line saying
/* That's all, stop editing! Happy blogging. */
You will need to login again, but that’s it, your WP Multisite install is pretty much finished.
Adding plugins

We will want at least W3 Total Cache. I will assume you’re familiar with the plugin installation procedures, so I won’t go into much detail here. Go to My Sites > Network Admin > Dashboard and then choose Plugins > Add New, search for W3 Total Cache, install it, and set it to Network Activate. One of the great features of W3TC is that you can configure it for all sites in a multisite environment at once, and that’s exactly what we want to do here.
At this stage, you’ll probably be adding all your favourite plugins. I’m personally a fan of Jetpack, since it includes so many useful things like Akismet anti-spam measures, statistics, Photon to cache your images on WP.com’s cloud for free (which is very useful to keep traffic off your website!), and a reasonably good system for managing all your social networking integration. And due to the many security incidents with WP, I tend to install at least Limit Login Attempts.
I’m also very fond of Human Made Limited‘s pair of plugins, WP Remote and BackUpWordPress. The first will allow you to centrally manage all your WP blogs (even if hosted on different servers!) for free, making sure you keep them always up to date (core, plugins, and themes), and never forget to upgrade them all. BackUpWordPress is probably one of the simplest free backup plugins which will backup both the content and the database, and, in my experience, it’s one of the easiest to use if you wish to migrate from one server to another — which is always a mess under WordPress.
As a bonus, when both are installed, you can easily retrieve your backups from WP Remote’s backoffice, from any site. So if you’re administering a lot of WP blogs on different servers, both are a must. Since they’re both free, simple to use, and do their job right, there is little reason not to install them, even though there are better (paid) alternatives around. But, of course, this is all up to you!

What we’ll definitely add is WordPress MU Domain Mapping. There are deep theological discussions about why this isn’t part of the WordPress core. Basically, you have two options of having a network of sites: either they’re all under the same domain, but on different directories (e.g. mydomain.com/site1, mydomain.com/site2, and so forth), or under different subdomains (site1.mydomain.com, site2.mydomain.com). But in most real scenarios, what you have is totally different domains for each site, and you want the ability to manage them all together.
This is the job for WordPress MU Domain Mapping: you will tell it to point a certain domain — say, myotherdomain.com and anotherdomain.com— to specific sites on your install. Obviously you will need a little help from Nginx. The purpose of the next steps is to add these two sites, and make sure they’re properly pointed to the right place, and that Nginx can correctly forward the requests to the right place. All of that while still making sure that W3 Total Cache is working!
First, let’s confirm that W3 Total Cache likes the configuration so far. While still on the Network Administration panel, follow the link on Performance > Dashboard and click on Check Configuration. If all goes well, you should have something like this:
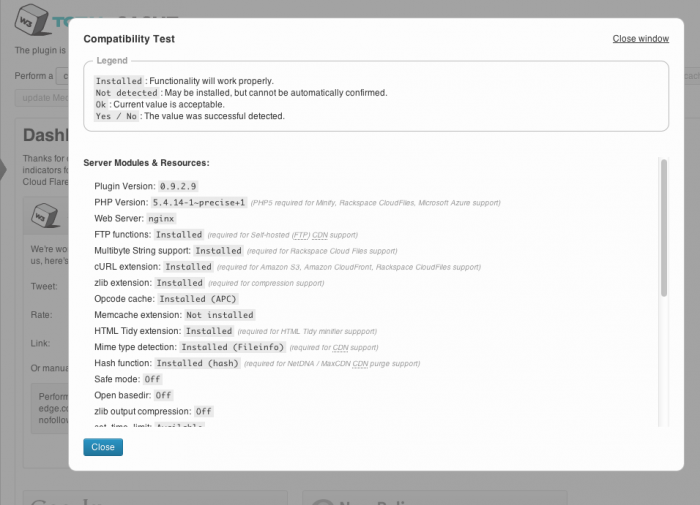
The important thing here is that Nginx should have been detected. You will also see that we have PHP with the Alternative PHP Cache (APC) module enabled.
Now go to Performance > General Settings and enable at least Page Cache, Minify, Database Cache, Object Cache (and Browser Cache should be on by default). For the method use Opcache: Alternative PHP Cache (APC). Save the configuration by clicking on Save All Settings. W3TC should tell you to Empty the Page Cache, so go ahead and do that.
If all went well, W3TC has done some under-the-hood magic for you. If you now open the /var/www/wordpress/nginx.conf file, you should have a surprise: W3TC will already have filled it on your behalf! (If you have an empty file, or got an error, it means that you have either forgotten to touch this file before or it doesn’t have the right user/group ownership or permissions; just take a look again if it’s set to www-data:www-data and is writable).
Fine-tuning W3TC is more an art than a science, although it has become quite easier on recent versions. Page Cache should be fine by default. Minify depends on a lot of things and is probably the trickiest bit. If you’re using CloudFlare, and are as lazy as I am, just let CloudFlare handle minification for you. If you add the login data for CloudFlare on W3TC, the latest versions will communicate with your account, correctly identify that it’s set to auto-minify things, and disable those options on W3TC.
It’s always better to allow CloudFlare to waste CPU cycles on minification, instead of spending your precious resources on that. However, I have a particular instance of a website where CloudFlare’s minification does not work well, but W3TC’s does. This will depend a lot on the theme and the plugins you’re using, and it’s great to know that you have this option.
If you’re not using CloudFlare, try the automatic settings, and on Performance > Minify enable at least HTML & XML (with Inline CSS minification and Inline JS minification), JS and CSS. This should also combine all JS and CSS automatically, which will give you extra points on Google PageRank.
I usually don’t mess around with Database Cache and Object Cache, but I go wild on Browser Cache and turn everything on except
Note that W3TC is a plugin with a very active development cycle. This means that many options are constantly being added and/or removed, specially if they’re a bit obscure or hard to understand what they’re doing. If you’re reading this tutorial many years after it was written, I would recommend you to check a recent W3TC-specific tutorial, to see what options have changed and what they do.
Now let’s install the WordPress MU Domain Mapping plugin. Remember, this has to be network activated to work. Then go to Domains > Domain Mapping and set the checkboxes under Domain Options like this:

Adding two new sites
So when this tutorial is finished, you should have a network of three sites: mydomain.com, myotherdomain.com and anotherdomain.com. What we’re doing is the following mapping:
- mydomain.com points to the overall installation, the default site, i.e. mydomain.com
- myotherdomain.com points to site1.mydomain.com
- anotherdomain.com points to site2.mydomain.com
Firstly, you need to go to your DNS provider and add records for all that. We’ve seen how mydomain.com was already configured to point to your IP address. Now you will need to point site1.mydomain.com, site2.mydomain.com, myotherdomain.com and anotherdomain.com all to the same IP address (Nginx will handle the rest).
Once DNS has refreshed (and you can ping those domains and make sure they’re all pointing to the correct IP address — always the same one!) we can start adding the two sites. This, of course, is what you can do from Network Admin > Sites > Add Site. On Site Address put site1; under Site Title use myotherdomain; and the admin email could be the same as for the main site ([email protected] in this tutorial). Similarly, for site2, use anotherdomain for the title, and the same email address once more.
Let’s get it all properly mapped. Go to Settings > Domains. You will see the following message popping up:
Please copy sunrise.php to /var/www/wordpress/wp-content/sunrise.php and ensure the SUNRISE definition is in /var/www/wordpress/wp-config.php
First, let’s copy that file (this is the handler for domain mapping):
cp /var/www/wordpress/wp-content/plugins/wordpress-mu-domain-mapping/sunrise.php /var/www/wordpress/wp-content/
Now edit /var/www/wordpress/wp-config.php and add
define( 'SUNRISE', 'on' );
just above of:
/* That's all, stop editing! Happy blogging. */
Go to Settings > Domains again, now it should show:

We’re ready to add our own mappings. Sadly, the panels for WordPress MU Domain Mapping are not very user-friendly — we need to figure out the Site IDs on our own.
Fortunately, this is not too hard, since they’re listed on the Sites > All Sites panel:
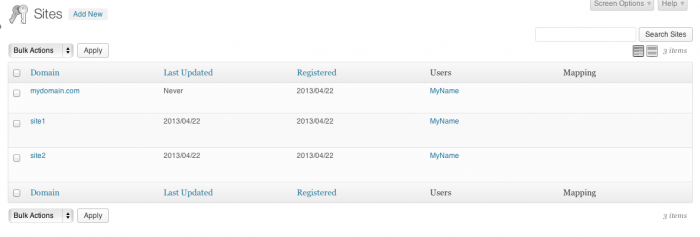
Now when you hover with the mouse over the Domain name, it should give you it’s ID, with an URL like this:
http://mydomain.com/wp-admin/network/site-info.php?id=1
Notice that there is an extra column, called Mapping, which was added by WordPress MU Domain Mapping. It starts as being blank. If you have followed this tutorial, and haven’t added and then deleted any domains, the logic is simple: the first site is ID 1, the second 2, and so forth (but as soon as you add and delete domains, this can quickly get out of order).
So these are the assignments we wish to do:
- mydomain.com uses ID 1 (default — no need to add it)
- myotherdomain.com uses ID 2
- anotherdomain.com uses ID 3
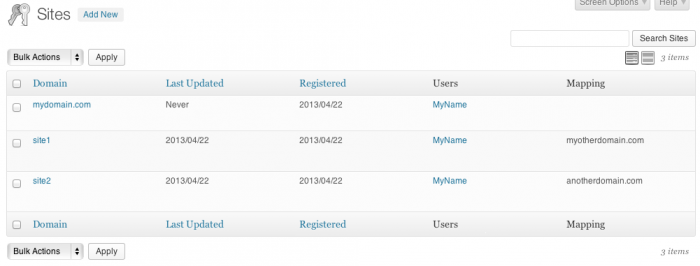
If the options have been correctly set, it should now look like this:

And, under Sites > All Sites, you should have:
WordPress is now configured to handle the domain mapping, but we have to let Nginx know about it too!
So let’s get back to opening /etc/nginx/sites-available/mydomain.conf. You will have noticed the map directive at the top. What we’re going to do is to pretty much replicate here what we have setup via WordPress:
map $http_host $blogid {
 default 0;
 mydomain.com 1;
 myotherdomain.com 2;
 anotherdomain.com 3;
}
server {
 server_name mydomain.com myotherdomain.com anotherdomain.com;
 root /var/www/wordpress;
access_log /var/log/nginx/mydomain.com-access.log;
 error_log /var/log/nginx/mydomain.com-error.log;
include conf.d/restrictions.conf;
 include /var/www/wordpress/nginx.conf;
 include conf.d/wordpress-mu.conf;
}
Restart nginx with:
sudo service nginx reload
And now it’s testing time! If all went well, you should be able to view http://myotherdomain.com/ and http://anotherdomain.com/ on your browser and they will be properly redirected.
Final note: How to test all the above before going into production?

Following the above tutorial requires owning at least three domain names which you’re not using for any purpose, and, of course, adapting every line of code to reflect your real domain names. But you might wish to do some testing first to be sure that you have the configuration right, before you move to a production environment.
Here is a neat little trick that you can use: using the HOSTS file for creating “fake” domains. Most computers are pre-configured to read static IP address assignments from their HOSTS file first, and only then hit the DNS nameservers. All you need to know is your server’s IP address.
You should do this on two places: on the server where you’re running your WordPress installation and on your desktop computer. Under Linux/Mac OS X, the file is under /etc/hosts, so with sudo nano /etc/hostsyou should be able to edit it and add the following line at the bottom:
192.168.0.1 mydomain.com site1.mydomain.com site2.mydomain.com myotherdomain.com anotherdomain.com
where, of course, you should replace 192.168.0.1 with your server’s real IP address. Under Windows, it depends a bit on what version you’ve got; it’s usually under C:\WINDOWS\system32\drivers\etc\hosts. Use something like Notepad to edit it (don’t use Write or Word, since it will add lots of useless formatting and break everything!).
After you’ve done the changes, you will very likely need to exit your browser and launch it again (because most browsers will cache DNS).
There are a few caveats, though: since you’re not using “real” DNS, your WordPress installation will not be able to use any plugins that require a XML-RPC call to your server. A typical example is Jetpack, which really requires “real” addresses, because it contacts your server directly to do its magic.
However, almost all other plugins — even the core auto-update feature which needs to contact the “outside” world — don’t have that restriction. CloudFlare may also have a few issues: you have to be careful not to let CloudFlare clear the cache, or it will be caching the wrong site instead! The best is to turn it off on your development environment and just activate CloudFlare again when you move the site to the production environment.
photo credits: aussiegal, sachinpurohit, rdecom,
world map from BigStockPhoto