How to Change the User Notification Email Address for WordPress
When a user registers with your single site installation or creates a new site inside your WordPress multi-site installation, he or she is automatically sent a new account email notice from the WordPress system containing that person’s login information, temporary password, and a link to login at your site. It’s a great internal WordPress feature that allows you to manage your user and site registrations almost hands-free.
But…when each user receives that email notification it appears to be sent by a stock system email address through your domain, and, even worse – the name used on that email is just “WordPress.”
This happens regardless of what you have listed for the admin email address under your website’s general settings.

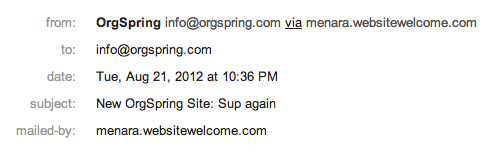
If the user digs a bit deeper into that email he’ll see more details about the sender’s address and email subject, which looks something like this:

This time he’ll see the full email address ([email protected]) and that it was sent via your server – in the case shown above menara.websitewelcome.com – an alias that Hostgator often uses.
There are two problems with this setup.
- There is a higher likelihood cloaked emails will end up in the new user’s spam folder, resulting in a delay in his login, a direct call for help, or the logging of a support ticket. Not a great way to start the new user out.
- The email is not personalized to your website, community, or company. This is a missed opportunity to further brand your user experience.
What we prefer, is to drop the “WordPress” and have that email be sent directly from your WordPress admin email. You can see an example of that in the two images below, which were taken after applying one of the two fixes you are about to learn.

You’ll also notice the information remains consistent when the user checks the email details. In my case, I’ve set the email to send using the name “OrgSpring” (my company name) and using the address “[email protected]” (my general site admin email address).
A subtle change, yes, but a much cleaner notification.
How to Change the Default WordPress System Email Address
Luckily, there are two relatively easy ways to clean the new user or new site notification sent by WordPress; a plugin or some custom code.

FREE EBOOK
Your step-by-step roadmap to a profitable web dev business. From landing more clients to scaling like crazy.

FREE EBOOK
Plan, build, and launch your next WP site without a hitch. Our checklist makes the process easy and repeatable.
The Plugin
The quickest way to change this default WordPress behavior is through a plugin. I like WP Mail SMTP. This plugin allows you to specify the from name and email address of any system email using php mail function, or your own SMTP server, like Gmail.
After installing and activating the plugin, navigate to the settings page for that plugin. The quickest way to get up and running is to use WordPress’ native mail php functions. This requires only 3 quick changes:
1. Enter your email address in the “From Email” box.
2. Enter your name (or company name) in the “From Name” box.
3. Check the box for “Use the php mail function to send emails.”
That’s it, you’re done.
If you want to send mail from your own server, you’ll continue down to the lower area of the plugin settings page and enter your server-specific information. A quick google search should show you those settings for nearly every server under the sun.
The Code
If you’d rather not install another plugin, you can change the default behavior with code. It requires editing two lines inside a stock WordPress file, in particular, the class_phpmailer.php file, which can be found inside the folder /wp-includes.
The current version of this file is 5.2.1 and is included with the current standard version of WordPress.
Using your favorite code editor, open class_phpmailer.php and make a copy of the file as a backup for safekeeping. When you’re ready to start editing, scroll down to lines 77 through 87, which should look like this:
/**
* Sets the From email address for the message.
* @var string
*/
public $From = ‘root@localhost’;

/**
* Sets the From name of the message.
* @var string
*/
public $FromName = ’Root User’;
Changing the System Email Address
To change the email address WordPress uses with these system notifications from “[email protected]” to something more branded to your site, browse to the line that reads public $From = ‘root@localhost’; and change what’s between the single quote marks to the email address you prefer.
In my case, I used the same email address listed in my general settings for admin: [email protected].
That new line, edited, looks like this:
public $From = '[email protected]’;
Changing the System Email From Name
To change the name from which the email is sent, you’ll edit the line which reads:
public $FromName = ’Root User’;
Again, you change only what’s between the single quotes. Basically, stay to the right of the equals (=) sign.
I used my company name, OrgSpring. My editing line of code looks like this:
public $FromName = 'OrgSpring’;
Save the file and upload it back to its original folder on your server /wp-includes.
The Downside to the Code Method
Subsequent WordPress updates will likely overwrite this class_phpmailer.php file. Keep a copy of it saved on your local machine and ready to re-upload on WordPress updates.
Summary
Now, when a user registers with your site or creates a new site on your network, he will see your branded email name and from address, rather than the stock WordPress system information.
Tags: