WordPress Power Tools – Plugins to Build a Killer Portfolio
The WordPress Community has over 23,000 plugins to date that do a crazy amount of things. I’m going to show you three quality, free plugins that can help you kickstart a well structured portfolio.
TL;DR
If you’re here to scan the article, here’s a list of the plugins I’m talking about:
Download the theme source code.
Now for the most part, these plugins all do something we should know how to do using the WordPress APIs.
Custom Post Types UI creates custom post types and taxonomies. Meta Box creates an easier meta box API. And Posts 2 Posts creates relationships between post types.
Why use plugins to do these things when we can create our own WordPress plugins? To take the heavy lifting out of it. If you’re like me, you’ve built tens, maybe hundreds of WordPress themes and find it tedious re-writing the same code over and over again. This toolkit super charges your start time when creating themes and gives you a plethora of features from the get go, so you can focus on what’s really vital- the customization.
The Final Product
Here are some screenshots of the mock portfolio we’re going to create with these excellent plugins.

The Plugins
I’m going to give you a brief overview of what each plugin can do for you, and how they can work well together for you. Jump down the page for the code if you already know about them.
Custom Post Types UI
CPT is a fantastic plugin for easily creating custom post types and taxonomies. Sure, you can do this from scratch with code using the Custom Post Types API and Taxonomy API, but CPT uses a clean UI to input all the necessary information for each Post Type. Once you’ve entered your settings, you can then “get the code” and place it directly into your theme. I like this because there’s no dependancy on the plugin nor the database for custom post types to continue to work.
Meta Box
Meta Boxes have always been invaluably handy when creating custom WordPress themes. They’re relatively easy to set up using the add_meta_box() function; however, can become tedious when dealing with image upload, color picking, and more advanced inputs. Meta Box gives you a wide range of inputs to use with an API that is even simpler than the one WordPress provides you by default. Once again, you define the Meta Boxes through code. The plugin just provides you with extended functionality for advanced inputs.
Posts 2 Posts
One thing that WordPress doesn’t supply out-of-the-box is post type relationships. Using Posts 2 Posts, with a single line of code you can connect post types together, and the plugin automatically adds a meta box to the editor page to link them up. This is quite handy for when you want to link People to Projects, Projects to Clients, etc.
Putting All This Together
So now you’ve got the low down on my power kit, it’s time to put it to a practical use. We’re going to build a fully functional portfolio theme in under an hour, just to show you how easy it can be.
Note: I’ll be showing you minimal CSS, only building off twenty twelve, since this article isn’t about the design of a portfolio, just the functionality.
Planning the Information Architecture
Very briefly, let’s come up with a plan for the way the content is structured. Meet Creatr, a fake design agency for our purposes.
Creatr has come to us for a WordPress portfolio. The portfolio will have projects — that’s one content type. A portfolio may have a team working on projects — there’s another content type and a post relationship too. Finally, Creatr has several offices, and each office will have many team members that belong to those offices. So our post types and relationships are:
- Offices have many Team Members
- Team Members have many Projects
- Projects have many Team Members
- Projects have one Office through a Team Member

For each post type, we’ll want a different set of meta boxes. Below I’ve shown the custom fields each will have.
Office
- Location
- A photo (thumbnail)
Team Member
- Role
- Age
- Education
- A photo (thumbnail)
Project
- A client
- A budget
- Multiple photos
Let’s Go!
I’m starting with a fresh install of WordPress. If you do not know how to do so, follow the tutorial on the wordpress.org website. Here’s a quick table of contents for easy reference.
- Create post types
- Create post type relationships
- Create meta boxes
- Add dummy content
- Add pages to display content
- Create ‘Offices’ page
- Create office profile with team listing
- Create team member profile page with project listing
- Create projects listing page
- Create single project page
Download, install, and activate the following plugins.

Once installed, we’ve got three new APIs and a new settings page- Great! Now its time to get stuck into some code.
Post Types
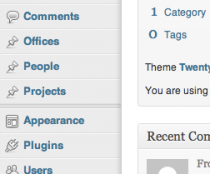
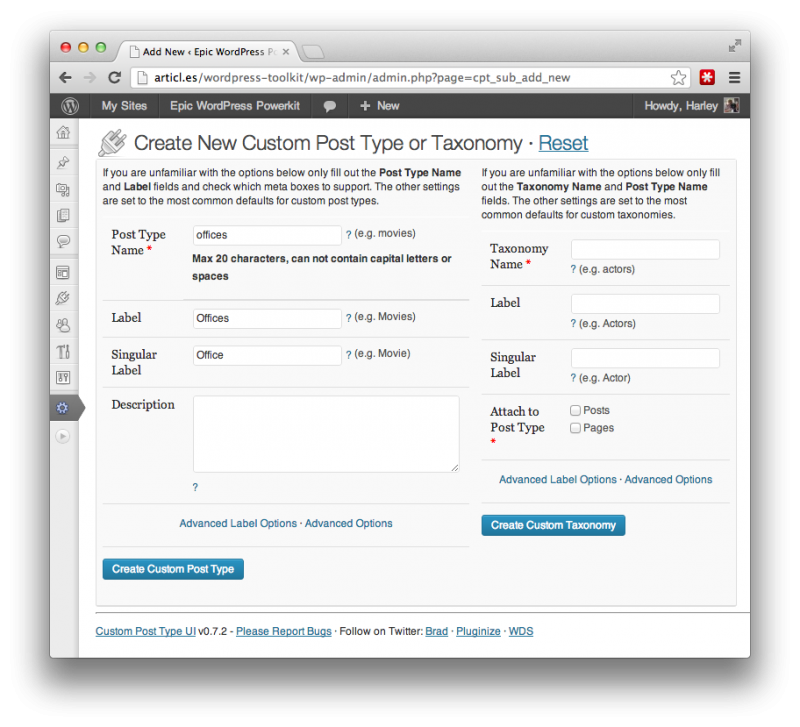
Great. So we need to create Offices, Team Members and Projects. Hover over the new settings menu you see in your sidebar called “Custom Post Types,” and hit “Add New.”

Here you’ll be given the opportunity to create either a custom post type or a taxonomy. Let’s stick to CPTs for now. Go ahead and fill in the simple settings for our post types.
- For offices, the post type name should be “offices”
- Label should be “Offices”
- Singular label should be “Office”
Once done, hit “create custom post type.”
For Team Members:
- For Team Members, the post name should be “people”
- Label should be “People”
- Singular label should be “Person”
- For Projects, the post name should be “projects”
- Label should be “Projects”
- Singular label should be “Project”
We’re also going to add a taxonomy to Projects, simply “Types.” We do this in case we have a blog on the website as well, so WordPress default categories do not return a mix of post types.
Note: it’s important that the slug for the taxonomy is “project-types” as “types” is reserved for core WordPress functionality. The labels can be just “Types” and “Type” though. Don’t forget to select “Projects” for the “attach to post type” input. Hit “create custom taxonomy.”

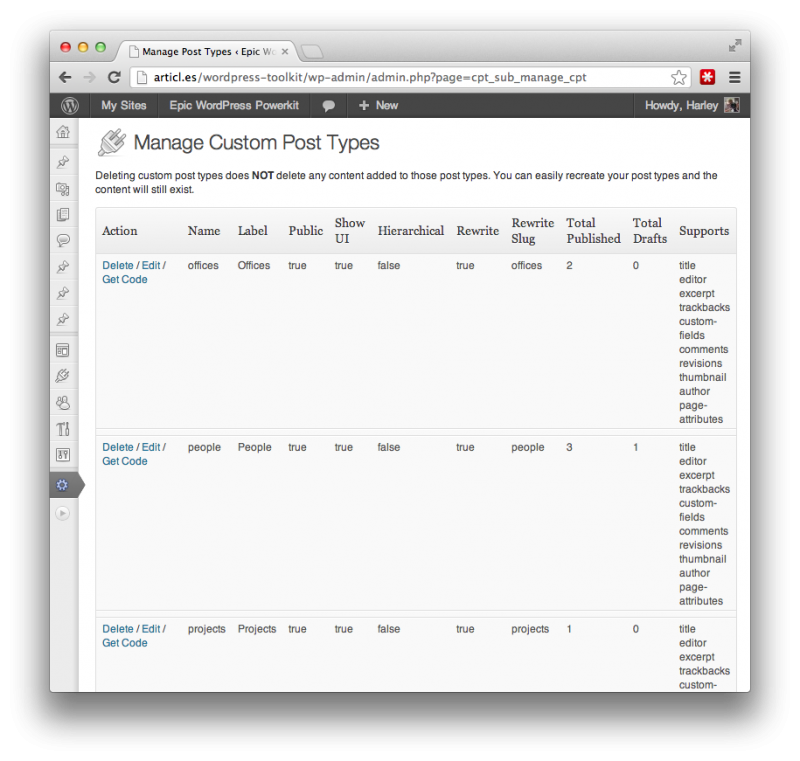
Once you’ve created them all, hover back over the Custom Post Types menu item, and select manage post types. Here you’ll be presented with the three post types we’ve just made. In a UI. Gross. You’ll also notice that there are new menu items in wp-admin. Let’s transfer them to code!
TwentyTwelve’s functions.php
To keep it clean, we’re going to place all code written in this article at the top of TwentyTwelve’s functions.php file. Open it up in your favourite text editor. Right after the opening <?php tag, hit return a few times and add a comment title:
/**
 * 	Post Types: Offices, People and Projects
 */
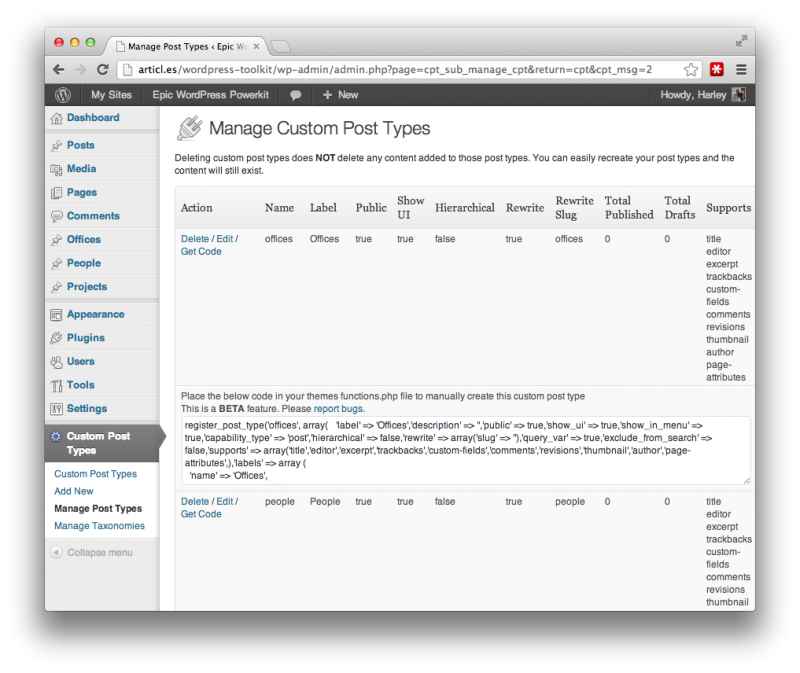
Head back to the admin screen, and select “Get the code” for Offices. Copy all this, and paste it under the title comment you just added. Repeat this for People and Projects. Each code snippet should look something like this:
register_post_type('offices',
  array(
  	'label' => 'Offices',
    'description' => '',
    'public' => true,
    'show_ui' => true,
    'show_in_menu' => true,
    'capability_type' => 'post',
    'hierarchical' => false,
    'rewrite' => array('slug' => ''),
    'query_var' => true,
    'exclude_from_search' => false,
    'supports' => array(
      'title',
      'editor',
      'excerpt',
      'trackbacks',
      'custom-fields',
      'comments',
      'revisions',
      'thumbnail',
      'author',
      'page-attributes'
      ),
    'labels' => array (
      'name' => 'Offices',
      'singular_name' => 'Office',
      'menu_name' => 'Offices',
      'add_new' => 'Add Office',
      'add_new_item' => 'Add New Office',
      'edit' => 'Edit',
      'edit_item' => 'Edit Office',
      'new_item' => 'New Office',
      'view' => 'View Office',
      'view_item' => 'View Office',
      'search_items' => 'Search Offices',
      'not_found' => 'No Offices Found',
      'not_found_in_trash' => 'No Offices Found in Trash',
      'parent' => 'Parent Office',
    ),
  )
);
Once this is in your functions.php file (there should be 3x register_post_type() calls), do exactly the same for the taxonomy: hit “manage taxonomies” in the menu under Custom Post Types. Once there look for the new “project-types” taxonomy we created. Hit “Get Code,” and paste it under the custom post type registration code.
We need to make one quick change though — if we leave the code for the taxonomy as is, it will act as a tagging system, where as we want to make it act like categories. Change the “hierarchical” property from this:
register_taxonomy('project-types',array (
 0 => 'projects',
),array( 'hierarchical' => false, 'label' => 'Types','show_ui' => true,'query_var' => true,'rewrite' => array('slug' => ''),'singular_label' => 'Type') );
to this:
register_taxonomy('project-types',array (
0 => 'projects',
),array( 'hierarchical' => true, 'label' => 'Types','show_ui' => true,'query_var' => true,'rewrite' => array('slug' => ''),'singular_label' => 'Type') );
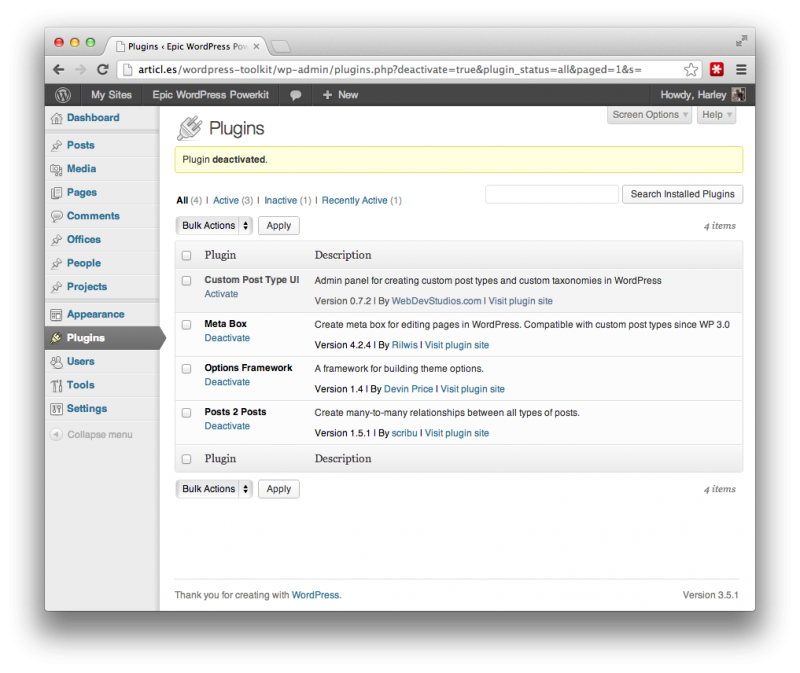
Brilliant. If you so wish, head over to the plugins page and deactivate the Custom Post Types plugin. Seriously! If all goes well, your post types and taxonomies should remain in the menu, thus remain available to your theme.
Post Relationships
Now we’ve got the custom post types set up, it’s really easy to create relationships between them. Just one line per relation in fact! Here’s a revised list of the relationships we want to create.
- Offices have many Team Members
- Team Members have many Projects
- Projects have many Team Members
- Projects has one Office
The cool part about Posts 2 Posts is that we can create nested relationships, i.e. a project belongs to an office through a person. These kind of complex connections are one of the features that puts frameworks like Ruby on Rails ahead of WordPress in content structuring. Here’s a quick diagram demonstrating this, the red line being the nested relationship.

You register connections with a hook containing a function. Simple. Below are the 2 snippets you need to create the relationships we want.
/**
 * Post Relationships
 */

function portfolio_relationships() {
 p2p_register_connection_type( array(
 'name' => 'offices_to_people',
 'from' => 'offices',
 'to' => 'people'
 ) );

 p2p_register_connection_type( array(
 'name' => 'people_to_projects',
 'from' => 'people',
 'to' => 'projects'
 ) );
}

add_action( 'p2p_init', 'portfolio_relationships' );
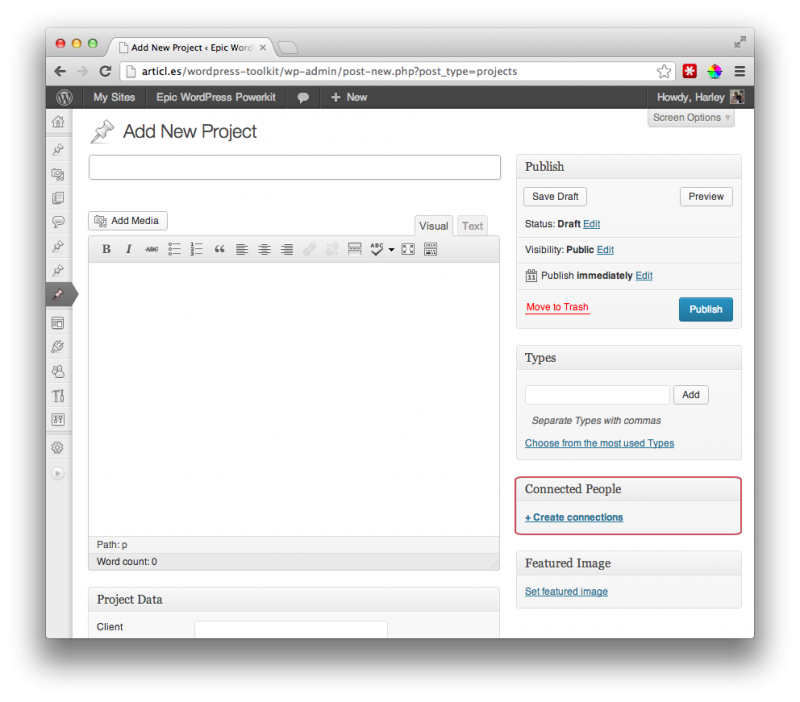
That’s it. If you visit the add new projects page, you’ll see that we can instantly create connections to people. Same goes for People and Offices. This is beneficial to us for when we want to show these relationships in our theme, i.e. show team members that worked on a project. This will come into play when we add some content to our blog. Let’s get the basics done first for the cleanest possible database though.
Meta Boxes
Since we activated the Meta Box plugin at the start of the tutorial, the new API is available to us immediately. I like this plugin because the API is basically an array of information that builds the meta box. It follows this syntax:
function register_my_meta_boxes(){
  $meta_boxes = array();

  $meta_boxes[] = array(
    'title'  => 'Meta box Title',
    'pages'  => array('post', 'types', 'here'),
    'fields' => array(
      array(
        'name' => 'My field title',
        'type' => 'text'
      )
    )
  );

  $meta_boxes[] = array(
    //info and fields for second meta box in here
  );

  foreach($meta_boxes as $meta_box) new RW_Meta_Box($meta_box);
}

add_action('admin_init', 'register_my_meta_boxes');
Simple enough. A quick breakdown of this goes as follows:
- Create empty array
- Add 2 meta boxes to the array
- Loop through the newly created meta boxes and register them
The greatest part about this, is that we can use a variety of inputs — 19 to be exact. You can check out the full list, but we’re only going to use a handful for our purposes.
The “Offices” Meta Box
To quickly recap, we want a photo and a location for each office. Since we can leverage the project thumbnail (core) for a photo, all we need is a location. Simple! The following code will instantly create a meta box that allows us to specify a text based location to each office. Below the post type relation code, add the following.
function register_portfolio_meta_boxes()
{
    $prefix = 'p_';
    $meta_boxes = array();

    $meta_boxes[] = array(
        'title'    => 'Office Location',
		'desc'	=> 'Please enter the physical location of the office',
        'pages'    => array( 'offices' ),
        'context'  => 'side',
        'fields'  => array(
			array(
				'name' 	=> 'Location',
				'id'	=> $prefix . 'location',
				'desc'	=> 'Please enter the physical location of the office',
				'type'	=> 'text'
			),
		)
    );
    foreach ( $meta_boxes as $meta_box )
        new RW_Meta_Box( $meta_box );
}

add_action('admin_init', 'register_portfolio_meta_boxes');

If you head to the “Add New” page for Offices, you’ll notice a new meta box in the top left. To place this lower down the stack, add 'priority' => 'default', just below where you declare the context of the meta box in the code.
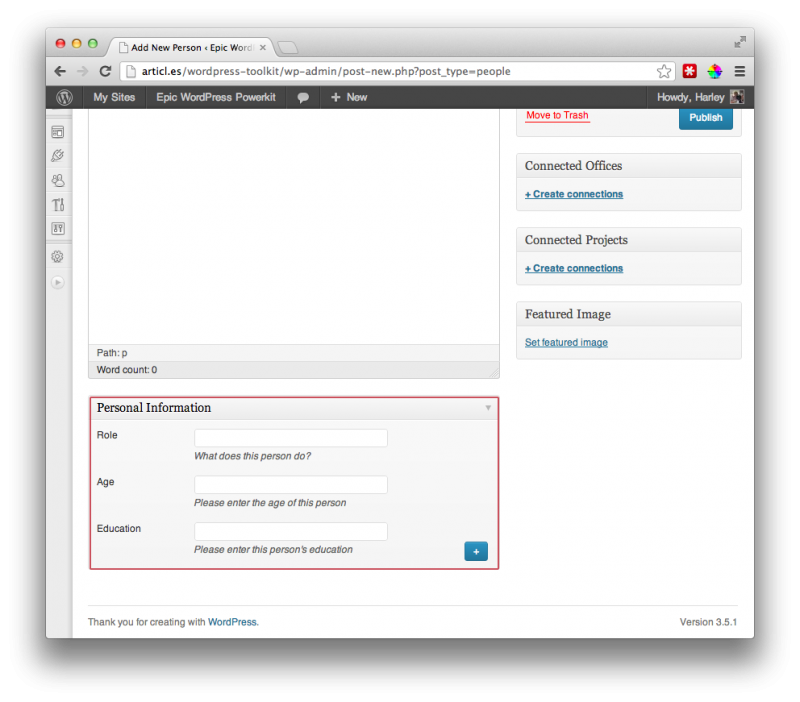
A Meta Box for the People
For each person, we want a meta box that allows role, age, education, and a photo to be displayed. Once again, a singular photo can be handled by the post thumbnail meta box; however, we need a separate one for age and education. From here, we add to our register_portfolio_meta_boxes() function. In case a person has multiple degrees or educations, we want to make that field clonable. Simply add the 'clone' => true, property to the field declaration as seen below.
function register_portfolio_meta_boxes() {
  $prefix = 'p_';
  ...
  $meta_boxes[] = array(
    'title' => 'Personal Information',
    'desc'	=> 'Please enter the age and education of this person',
    'pages'    => array( 'people' ),
    'fields'  => array(
      array(
  	'name' 	=> 'Role',
  	'id'	=> $prefix . 'role',
  	'desc'	=> 'What does this person do?',
  	'type'	=> 'text'
      ),
      array(
  	'name' 	=> 'Age',
  	'id'	=> $prefix . 'age',
  	'desc'	=> 'Please enter the age of this person',
  	'type'	=> 'text'
      ),

      array(
  	'name' 	=> 'Education',
  	'id'	=> $prefix . 'education',
  	'desc'	=> 'Please enter this person\'s education',
  	'type'	=> 'text',
  	'clone' => true
      ),
    )
  );
  ...
} ...
By visiting the “Add New Person” page, you can see our new meta box is there, with the ability to add an age and multiple educations.
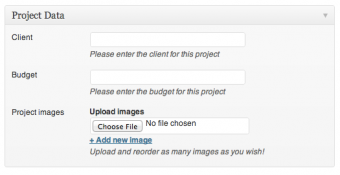
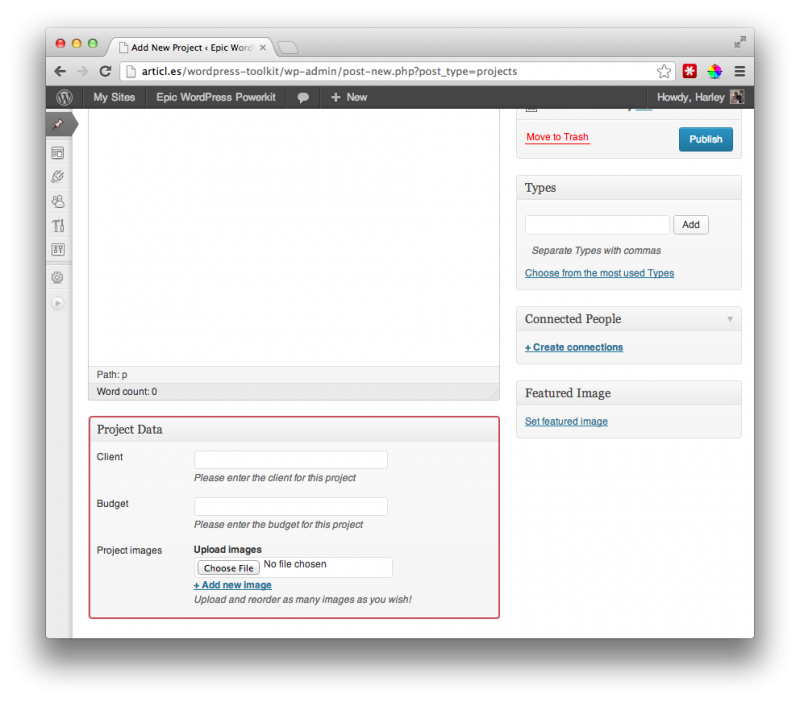
Project Meta Box
Finally, we want to add a client, budget, and multiple images to each project. Here, the clone feature is not necessary. We can easily attach and order multiple images to projects without fuss.
function register_portfolio_meta_boxes() {
...
$meta_boxes[] = array(
  'title'  => 'Project Data',
  'desc'   => 'Project information goes here.',
  'pages'  => array( 'projects' ),
  'fields' => array(
    array(
      'name' => 'Client',
      'id'   => $prefix . 'client',
      'desc' => 'Please enter the client for this project',
      'type' => 'text'
        ),
    array(
      'name' => 'Budget',
      'id'   => $prefix . 'budget',
      'desc' => 'Please enter the budget for this project',
      'type' => 'text'
    ),
    array(
      'name' => 'Project images',
      'id'   => $prefix . 'proj_images',
      'desc' => 'Upload and reorder as many images as you wish!',
      'type' => 'image'
    ),
  )
);
...
}...
Of course, all functionality for image upload is provided for you, and you can upload and reorder the images. I find this super handy when dealing with unsavvy clients who easily get frustrated at the simplest of tasks.

FREE EBOOK
Your step-by-step roadmap to a profitable web dev business. From landing more clients to scaling like crazy.

FREE EBOOK
Plan, build, and launch your next WP site without a hitch. Our checklist makes the process easy and repeatable.
Fill ‘er Up!
Now all our custom post types, post relationships and meta boxes are complete, we can (at long last) add some fake content to the portfolio. If you can’t be bothered, lucky I made an export of my fake portfolio for you. Unfortunately, you’ll have to upload some images yourself.
Top Down Content
Our content structure has offices as top level content items, each office has many members, and each member belongs to many projects. Let’s start by creating two offices- “Head Quarters” and “Design Wing.” Head over to your “Add Office” screen, and punch in some details. No need to be specific, this is just for fun.

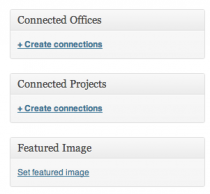
Once you’ve created those two, add some people. Once again, no need to be specific with details, these are just made up. We can now, however, make connections between people and offices! In the meta box “Connected Offices,” click “create connections,” and select an office. Boom. Each post is now instantly available through a function in our theme. This will really shine when we get to project level though.

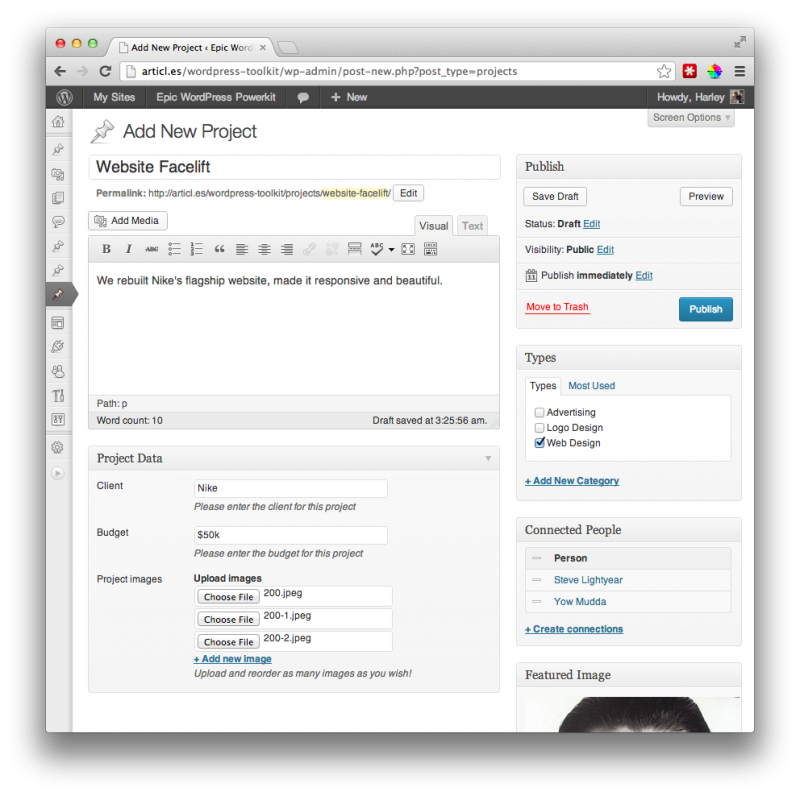
Be sure to take full advantage of the custom meta boxes we’ve created! Once you’ve made up a few people and connected them to some offices, head to the “Add New” Projects page. Just a handful of projects will do. Don’t forget to upload some photos, so we can see how Meta Box Plugin’s powerful reordering works. Assign people to each projects, it can be one or multiple. Through this, we’ll be able to see the project’s relation to an office.
Create Pages
Finally, we need to add some pages to display the information we’ve just created. Creating Pages is easy — you can delete the “sample page” Page, then add “Offices” and “Projects.” Our two offices will be displayed on the Offices page, and all projects will be displayed on the Projects page. We omit a “Team Members” page, as they will be displayed on the single office page.

The Office Listing page
To display a list of offices, we can leverage a cool theme feature of WordPress — naming template files after a page to create a template for it, i.e. for the page “Offices,” name a file page-offices.php and anything within will be used when viewing the page.
Duplicate index.php, and rename it to page-offices.php. Now, we have to use a custom query to display all offices on the page. If you’re not familiar with WP_Query, it’s what the loop uses to fetch posts. We can create our own copy of it, and pass through certain parameters to fetch specific posts. Update your page-offices.php template between lines 21 and 27 to the following.
...
<?php $offices_query = new WP_Query( array(
  'post_type' => 'offices' ) ); ?>
<?php if ( $offices_query->have_posts() ) : ?>
<?php /* Start the Loop */ ?>
<?php while ( $offices_query->have_posts() ) : $offices_query->the_post(); ?>
  <?php get_template_part( 'content', 'office' ); ?>
<?php endwhile; ?>
...
You’ll notice a couple of things here. Firstly, we’ve initiated our new WP_Query object, detailing we want only posts with the post type “offices.” We then modify the loop so that have_posts() and the_post() are functions of our new object, instead of free-standing ones. This ensures they are called with our specific arguments. Secondly, we’ve modified the get_template_part() function to search for content-office.php. Since it’s non-existant, it will use just content.php for now. If you save, and then visit the offices page, which will list our offices! There’s a bit of modification to be done though, i.e. omit reply links, add location, etc. Go ahead and duplicate content.php and rename it to content-office.php, then open it up.
Firstly, delete the entire <footer> element. Secondly, get rid of lines 26-30, which is the comments line. Next, move the_post_thumbnail() to below the is_single()conditional. Below both <h1> elements in the is_single() section, add the location of the office like so.
<h2><?php echo get_post_meta($post->ID, 'p_location', true); ?></h2>
content-office.phpshould now look like this
...
<header class="entry-header">
  <?php if ( is_single() ) : ?>
    <h1 class="entry-title"><?php the_title(); ?></h1>
    <h2><?php echo get_post_meta($post->ID, 'p_location', true); ?></h2>
  <?php else : ?>
    <h1 class="entry-title">
      <a href="<?php the_permalink(); ?>" title="<?php echo esc_attr( sprintf( __( 'Permalink to %s', 'twentytwelve' ), the_title_attribute( 'echo=0' ) ) ); ?>" rel="bookmark"><?php the_title(); ?></a>
    </h1>
    <h2><?php echo get_post_meta($post->ID, 'p_location', true); ?></h2>
  <?php endif; // is_single() ?>
  <?php the_post_thumbnail(); ?>
</header><!-- .entry-header -->
...
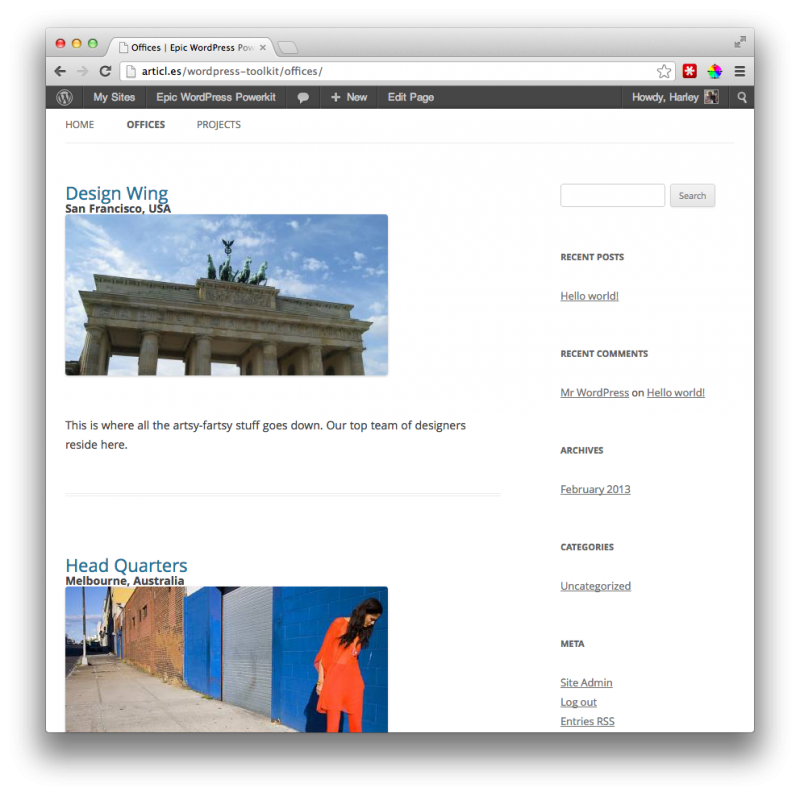
And if you visit the “Offices” page, it should look something like this!
Office Profile Page
Now that’s in place, we can get our hands dirty with a single office profile. Here, we want to list all team members working at a specific office. We can recycle content-office.php, but will need to create a new template file for single offices. Duplicate single.php and rename it to single-offices.php. Delete lines 19-25. This gets rid of post navigation and the comments template.
Very simply, we’re going to show all team members associated with each office. Posts 2 Posts has a function that we call before the loop to add the relationship data through the $post variable. Add the following right before the while(have_posts()) conditional.
<?php p2p_type('offices_to_people')->each_connected( $wp_query, array(), 'people' ); ?>
Breaking this function down, the p2p_type() function (which returns an object) accepts the relationship name parameter. Remember when we first defined the relationships? They were named offices_to_people, and people_to_projects. Here’s where we use them.
The function ‘each_connected’ that gets returned takes $wp_query, since that’s where the single post data resides when visiting the single office page.
Finally, the last parameter lets us define what we want the array containing connected posts to be accessible via. By specifying “people,” the posts returned will be available under $post->people. Easy!
Now we’ve got $post->people available to us, we can jump back into content-office.php. Since we only want this to display on the single page, we need to add a conditional in. Go ahead and add the following right before the closing </article> element tag.
<?php if(is_single()) : ?>
  <!-- additional code for single page goes here -->
<?php endif; ?>
In between here, we can loop through $post->people, and easily display the team members. We want a small thumbnail and their name, which should link to their own profile page. Within the new conditional we’ve just made, add the following code.
<h2>The team</h2>
<ul class="list-of-thumbs">
  <?php foreach($post->people as $person) : ?>
    <li>
      <a href="<?php echo get_permalink($person->ID); ?>">
        <?php echo get_the_post_thumbnail( $person->ID, array(100,100)); ?><br>
        <?php echo $person->post_title; ?>
      </a>
    </li>
  <? endforeach; ?>
</ul>
Here, we’ve got a title for the team. Then a list to contain the team members within. We loop through $post->people, which gives us a post object. Everything else is standard WordPress, create a link to the single person page, spit out the post thumbnail, and their name. Go back to your browser and click on an office from the Offices page. Here’s what you should see!

Add a little bit of CSS and it will look even better. Open style.css, and just after the reset styles (around line 178), paste the following.
/* =Custom CSS
-------------------------------------------------------------- */

.single h2{
	margin-bottom: 10px;
}

.single .list-of-thumbs li{
	display: inline-block;
	margin-right: 20px;
	margin-left: 0;
	text-align: center;
	list-style: none;
}

.single .list-of-thumbs li img{
	margin-bottom: 5px;
}

.single .list-of-thumbs li a{
	text-decoration: none;
}
Refresh, and you should see a tidier looking page.
Team Member Profile Page
Great! Now we’ve finished the single offices page, we can start working on the single people page. Duplicate single.php again, and rename it to single-people.php. Once again, delete lines 19-25 to get rid of comments and post navigation. To show a list of related posts, we follow the same method as with the offices_to_people relationship, only with people_to_projects instead. Go ahead and add in the p2p_type function right before the while(have_posts()) function in single-people.php.
<?php p2p_type('people_to_projects')->each_connected( $wp_query, array(), 'projects' ); ?>
We also need a new “template part” for a person to show the list of projects we’ve just added to the $post variable. Duplicate content.php as well, rename it to content-person.php.
We’re going to add a section that shows all information you’ve entered for them, along with the office they belong to and projects they’ve worked on. In content-person.php, delete the <footer> element again. Delete lines 26-30, getting rid of the “Leave a reply” link.
Under line 20 (title for single post page), add the following code, which is all of the meta data we previously entered into the back end. Make sure you delete the original title, else it will show up twice.
<div class="about">
  <h1 class="entry-title"><?php the_title(); ?></h1>
  <h2 class="role"><?php echo get_post_meta( $post->ID, 'p_role', true ); ?></h2>
  <p><?php echo get_post_meta( $post->ID, 'p_age', true ); ?> years old</p>

  <h3>Education</h3>
  <ul class="education">
    <?php $education = get_post_meta($post->ID, 'p_education', true); ?>
    <?php foreach($education as $ed) : ?>
      <li><em><?php echo $ed; ?></em></li>
    <?php endforeach; ?>
  </ul>

  <?php the_content(); ?>
</div>
Now for the projects related to a person. Previously, we already added projects to the post variable, which means they are available in $post->projects. In single-person.php, look for the entry-content div, and fill it with the following.
<h2>Projects <?php the_title(); ?> has worked on</h2>
<ul class="list-of-thumbs">
  <?php foreach($post->projects as $project) : ?>
    <li>
      <a href="<?php echo get_permalink($project->ID); ?>">
        <?php echo get_the_post_thumbnail( $project->ID, array(100,100)); ?><br>
        <?php echo $project->post_title; ?>
      </a>
    </li>
  <?php endforeach; ?>
</ul>
You’ll probably notice this is almost identical to the office page, where team members are displayed. We use the same ul class “list-of-thumbs” to take advantage of the CSS we wrote before. We’re going to add a little more CSS though to make it look a tad nicer. Back where our custom CSS is in style.css, add the following.
.single-people .wp-post-image, .single-projects .wp-post-image{
	width: 150px;
	float: left;
	margin-right: 20px;
}

.single .about{
	float: left;
	width: 300px
}

.single .about p{
	margin: 10px 0;
}

.single .about li{
	list-style: disc;
	list-style-position: inside;
}

.single-people .list-of-thumbs{
	clear: both;
}

.single-people .list-of-thumbs *{
	width: 100px;
}
You’ll notice we’ve added a selector for .single-projects .wp-post-image. We’ll give things on the project page similar selectors to the single profile page, so we can essentially recycle the layout without adding extra code.
Refresh or navigate to a single person page through the offices page, and voila! All projects are listed underneath a nice, neat profile.

Project Listing Page
Last but not least, we’re going to create a quick projects page that lists all project images (uploaded using the meta box we so easily created), along with the office that designed it. We’re doing two things here, firstly getting a list of images uploaded, and getting a post related a level above the projects related post. This is reverse nesting (going up the tree), or more eloquently put, a relationship through a post type. But first, we must create a projects listing page.
Duplicate page-offices.php, and rename it page-projoects.php. Open it up and modify the custom WP_Query by replacing all instances of “offices” with “projects.” Your loop should now look like this.
<?php $projects_query = new WP_Query( array(
  'post_type' => 'projects') ); ?>
<?php if ( $projects_query->have_posts() ) : ?>
<?php /* Start the Loop */ ?>
<?php while ( $projects_query->have_posts() ) : $projects_query->the_post(); ?>
  <?php get_template_part( 'content', 'project' ); ?>
<?php endwhile; ?>
And if you visit the projects page, you’ll see a list of all projects.

It looks pretty lame at the moment though, so duplicate content-office.php, rename it to content-project.php. We want to keep this page really simple, just an image, title and description. With content-project.php now in place, we’re nearly there. For projects though, let’s move the_post_thumbnail() on line 27 to line 17, which should be just above the entry-header div. Move the entry-content div to just before the <header> tag. Replace both instances of get_post_meta() as below to display the client & budget custom meta.
<h2><?php echo get_post_meta($post->ID, 'p_client', true); ?></h2>
<em>Budget: <?php echo get_post_meta($post->ID, 'p_budget', true); ?></em>
Then add the following CSS to our custom styles in custom.css.
.page .type-projects{
	min-height: 150px
}

.type-projects .wp-post-image{
	width: 150px;
	margin-right: 20px;
	margin-bottom: 20px;
	float: left;
}

.type-projects .entry-header{
	display: inline-block;
	float: left;
	width: 300px;
}
All going well, you should have a lovely looking projects page now.

Single Project Page
Last but not least, its time to work on the single project page. Here we’re going to add all the meta, link to the office using our belongs to office through team member relationship, and also display all images uploaded through the back end. As with the other two post types, we need a single-projects.php file. Duplicate single-offices.php, and modify it so that it calls for content-project.php instead of content-office.php. We’ve already got the p2p function that adds people to the $post object. We also need to add another p2p_type() function, to attach the office data to each team member. Make your single-projects.php file look like this.
<div id="content" role="main">
  <?php p2p_type('people_to_projects')->each_connected( $wp_query, array(), 'people' ); ?>
  <?php p2p_type('offices_to_people')->each_connected( $post->people, array(), 'offices' ); ?>
  <?php while ( have_posts() ) : the_post(); ?>
    <?php get_template_part( 'content', 'project' ); ?>
  <?php endwhile; // end of the loop. ?>
</div><!-- #content -->
Here, we first use the people_to_projects relationship to attach people related to this project to the $post object. Then, we use the new $post->people object and the offices_to_people relationship to attach the office data to each person. The result is that $post now has all attached people, and each person has their office attached to them still within the post object. Handy! Now we have to use that information in content-project.php.
Since we duplicated content-office.php, we’ve already got the is_single() conditional where we need it. Instead of the team members though, we want to show thumbnails of photos here. We’re going to use get_posts() to get all attachments of the post. Then, we’ll loop through it and display the images using wp_get_attachment_image(), a handy function that grabs an image with a specific ID and formats a html tag with a specific width and height. The reason we use get_posts instead of get_post_custom is so we can use the menu order, which is needed when re-ordering images on the back end in our meta box.
Modify lines the last is_single() conditional of content-project.php to match the following.
<?php if(is_single()) : ?>
  <?php $image_args = array(
    'post_type' => 'attachment',
    'post_parent' => $post->ID,
    'orderby' => 'menu_order',
    'order' => 'asc',
    'exclude' => get_post_thumbnail_id( $post->ID )
  ); ?>
  <?php $images = get_posts( $image_args ); ?>
  <div class="project-images">
    <?php foreach( $images as $image ) : ?>
      <?php echo wp_get_attachment_image( $image->ID, array(100,100) ); ?>
    <?php endforeach; ?>
  </div>
<?php endif; ?>
Finally, we want to add the Office in which the project was done. Thanks to our second p2p_type call in single-projects.php, that’s accessible through team members attached to the project. We only want to display it once though, so we need the first person attached to the project, and then the first office attached to them. Add the code below just after the first set of get_post_meta() functions that returns the client and budget.
<?php $office_link = get_permalink($post->people[0]->offices[0]->ID); ?>
<p class="office-link">Made at the <a href="<?php echo $office_link; ?>">
  <?php echo $post->people[0]->offices[0]->post_title; ?>
</a></p>
It’s quite a long dig for data, but it shows the relationships quite well. Get the post title from the first office of the first associated team member. After all that code, your single project page will look like this.

Lastly, drop this CSS into your style.css file to get the projects page looking pretty. Well, as pretty as a basic TwentyTwelve theme can be!
p.office-link{
	margin-bottom: 10px;
}

.project-images{
	clear: both;
}
And at long last, the final project page should look like this.

That’s it! Kudos if you got through all of that. I’ve covered how to use three excellent plugins to kick start a well structured portfolio using custom post types, custom taxonomies, custom meta boxes, and content relationships.
Despite most of these components having a native API in WordPress, these plugins simplify the process to get stuff done quickly. Not to mention they are all code based solutions, so no need to worry about database dependance across site instances to keep consistency.
With these tools, you’ll be creating awesome portfolios in no time!
Download Source
For your reference, I’ve zipped up the theme. Feel free to compare your code to this!
Tags: