5 Tips to Organize Your WordPress Theme Stylesheet and Make it Easier to Navigate

But first, a WordPress theme quiz…
Author’s note: this is a low-tech quiz; answers saved in your head will suffice :-)
- Are you a WordPress theme designer?
- Are you a hobbyist or enthusiast?
- Is your WordPress theme stylesheet a little confusing?
- Do you spend too much time trying to figure out where your custom styles should be inserted?
- Do you just plop styles in anywhere in the stylesheet and then wind up with conflicts that can be hard to track down?
- Do you compulsively customize the heck out of stuff? (that’s me!)
- Do you just like to futz around to get stuff looking right in your chosen theme?
If you answered “Yes” to any of the questions above, then the following simple tips might come in handy.
Tip #1 – Get to know your browser’s developer tools

All popular internet browsers have great sets of tools for development purposes. They can help you with many aspects of your WordPress theme projects, not just the CSS. But those tools and tasks are too numerous to list in this article (and kinda off-topic). We’ll just be focusing on one of the tools available in every kit that is designed specifically for CSS, and we’ll use the Firefox toolkit for our example.
First off, be sure to install the Firebug addon to your Firefox browser. Get it at GetFirebug.com. Once installed and you’ve restarted your browser, you’ll see the Firebug logo either at the top or the bottom of your screen. Click that bug!
A window much like the one in the screenshot above will appear at the bottom of your screen. To inspect any element on any webpage
- click the “Inspect element” icon at the top-left of the Firebug window
- select the element you want on the page by clicking on it
- all the associated HTML markup will be visible in a pane on the left
- all the CSS pertaining to the selected element shows up in a pane on the right
You can now edit the CSS directly in Firebug and you’ll see your changes live on the page. Don’t worry, it doesn’t change anything in any files, it just temporarily modifies the on-screen display to reflect the changes you make. Once you’re satisfied with how your modifications look on screen, simply copy the style rules to your stylesheet using your favorite editing software (mine is Notepad++, what’s your favorite?).
How does this help keep the stylesheet organized, you ask? Well, at the top-right corner of the CSS pane, you’ll see a link to your stylesheet and the exact line number of the style rule you’ve been modifying. You can now jump right to that line in your stylesheet, and apply your customizations to that style rule, or add your more specific ones right below it.
Also, if you’re using a child-theme of any WordPress theme, you can add your custom styles to its stylesheet, while maintaining the same order or structure as its parent.
Here’s a handy list of links to documentation for all popular browser developer tools:
- Firebug for Firefox: http://getfirebug.com/wiki/index.php/Main_Page
- Chrome (tools already built-in the browser): https://developers.google.com/chrome-developer-tools/docs/overview
- Internet Explorer 9 (tools built-in): http://msdn.microsoft.com/en-us/library/ie/gg589507%28v=vs.85%29.aspx
- Safari (tools built-in): https://developer.apple.com/technologies/safari/developer-tools.html
- Opera (tools built-in): http://www.opera.com/dragonfly/documentation/
Tip #2 – Build a table of contents
What? That’s right, a table of contents added to your WordPress theme stylesheet will help tremendously when
- adding style rules
- trying to find the ones you’ve added
- trying to find those you want to modify
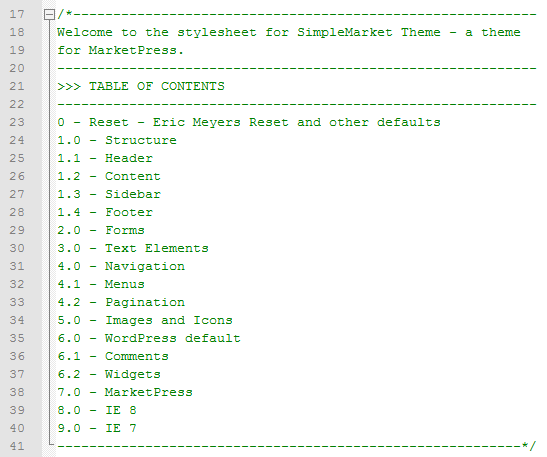
To the right is a screenshot of an extremely well-organized table of contents from the SimpleMarket theme available from WPMUdev (props to Tammie Lister, who also redesigned this very website).
It’s up to you to decide how to group things under various headings. You can follow the example here, or you could choose to organize things differently.
Once you have defined the section headings, group all applicable style rules together and add the heading name to the top of the section as in the image to the right. Be sure to wrap your table of contents and headings in each section in CSS comments like this: /*Comment here*/

FREE EBOOK
Your step-by-step roadmap to a profitable web dev business. From landing more clients to scaling like crazy.

FREE EBOOK
Plan, build, and launch your next WP site without a hitch. Our checklist makes the process easy and repeatable.
Now it’ll be real easy to jump to the section you need in your stylesheet without having to scroll to find it. Simply type or copy/paste the section name you want in your editing program’s “Search” feature and… click.
Tip #3 – Give it some breathing room

Many WordPress theme designers like to bunch all the style rules for any given selector together on a single line. This would appear to be an attempt to reduce the file-size of the stylesheet so it loads faster. While aiming for faster load times of your WordPress theme is an admirable and necessary goal, it can sometimes compromise usability.
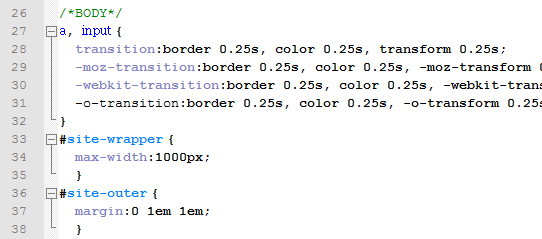
Entering each style rule on its own line, and indenting those same rules, can greatly enhance the readability of the stylesheet. What happens to the file-size? Well, as line-breaks and tab-spaces each add a single byte to the file-size, having even 1000 line-breaks and/or tabs in a custom stylesheet would add only 1k to the overall file-size. Not a huge difference when you consider that the average WordPress theme stylesheet is between 30k and 50k.

Compare the two stylesheet excerpts to the right. Same information, different presentation. What’s the difference in file-size? Exactly 48 bytes or 0.048k. If we were looking at a 500-line stylesheet instead of a 17-line excerpt, the additional line-breaks and tabs would add up to about 1.4k.
You decide which layout is more readable… and searchable.
Tip #4 – Avoid repetition by grouping similar styles
When developing or customizing a WordPress theme, we can sometimes wind up declaring the same sets of rules over and over for various elements. This can happen especially when
- development occurs over a lengthy period of time and we simply forget we’ve already styled something similar
- we customize down to the last pixel to ensure a uniform look throughout the theme
- more than one designer contributes to a common effort
- we’re a relative newbie with CSS and want to be sure to “get it right”

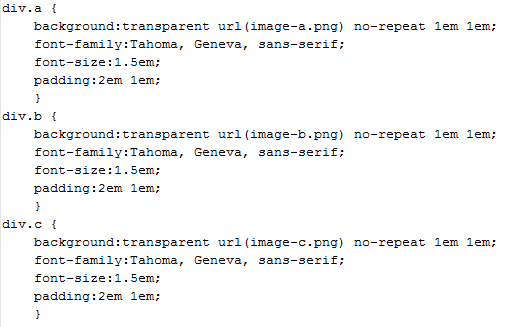
For example, if we were styling some div containers with different background images, we could wind up with something similar to the first image at right.
Taking a closer look at our CSS, we can see that the only thing that’s actually different in the 3 divs is the background image. By combining common style rules in a single declaration (div.a, div.b, div.c), then adding the different background image properties right after that, we get a much more readable and concise stylesheet.
The differences and similarities of our 3 divs are immediately evident as shown in the second image. As a bonus, we also just reduced the file-size of our stylesheet by 197 bytes. Cool.
Tip #5 – Get to know and use CSS shorthand
Now this tip won’t necessarily help make your WordPress theme stylesheet easier to navigate – and it kinda flies in the face of Tip #3 – but it’ll definitely cut down on scrolling and help to greatly reduce its file-size. You’ll become a better, wiser, and stronger CSS karateka (wax on, wax off, Daniel-san).
What is CSS shorthand? It’s a method of combining several individual properties into a single property that can be expressed on a single line. Shorthand properties can be declared for the following selectors:

- Background
- Font
- Border
- Border-width
- Margin
- Padding
- List-style
- Outline (rarely used anymore)
Take a look at the background examples in the image above. The first part shows all the background properties on individual lines. The second part shows all those same properties expressed in shorthand.
That’s one heck of a difference in file-size when you consider that there may be dozens of similar declarations sprinkled throughout your stylesheet!
Rather than listing and going into the details of all the various properties in this article, I’ll simply link to another article I found that will help you learn all you need to know about CSS shorthand: Introduction to CSS Shorthand
I hope you find some of these tips useful on your quest for a better WordPress theme stylesheet. If you have additional tips you’d like to share, by all means, please do so by a leaving a detailed comment below!
See also: WordPress housekeeping
Photo credit: Flickr.com
Tags: