A Guide to WordPress Discussion Settings

Readers like to see comments appear on your post as soon as they hit that little gray submit button, but as an administrator you want control over what is published on your site. Hence the blogger’s dilemma – let the comments flow freely or send them to moderation before publishing?
Of course, there’s no correct answer — only what’s right for you and your style of blog. In an effort to help make that decision easier, we’ve come up the following guide to WordPress discussion settings — the place where you tell your blog how to handle comment submission and publication.
 The Case for Moderation
Sending comments to moderation will allow you to review them before they are posted on your site. There are times when extreme moderation makes sense. For example, a family friendly blog doesn’t want visitors leaving comments with “F-bombs.” Similarly, a political candidate might not want commentary that helps strengthen the opponent’s position and not hers.
The drawback to moderation is that readers want their comments to appear immediately, and will likely stop visiting your site if it takes a few days before their comment is posted.
The Right to Free Speech
Free speech, in this case – free-flowing comments, encourages community and keeps visitors on your site longer, but with free-flowing comments comes the spammers, so even though comments are automatic, you’ll likely need to spend some time pruning every few days.
Whether you prune or prevent comments, the following tips will help you better understand WordPress discussion settings and manage your site more efficiently.
Default Article Settings
There are three main settings in this first sub-section of your blog’s discussion settings, as shown in the image below.
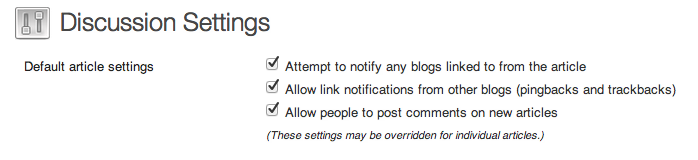
Checking the “Attempt to notify any blogs linked to from the article” box will force WordPress to ping the article or blog(s) which you mention as links within the text of your post. For example, if within your post you mention an article from WPMU.org, upon publishing that post WordPress will ping WPMU.org, and that ping will show up in the linked article’s comments section – if that blog allows pingbacks and trackbacks.
If you check off the box to “Allow link notifications from other blogs (pingbacks and trackbacks)” when other blog authors mention your articles as links in their posts your blog will be notified via WordPress ping, and that trackback will show up in the comments section of your post. Pingbacks and trackbacks shows up using the commenter’s avatar – if they have one – like in the picture below.

The last setting in this section is the least ambiguous of the three. By selecting the check box for “Allow people to post comments on new articles” you are telling your blog to automatically allow comments for each new post. This is shown in the individual post editor screen also: where the two check boxes for allowing comments and trackbacks will be selected. Remember, even thought you choose to allow comments on each new post in general, you can change that setting on the individual post page. Settings changed there will override any general blog settings you may have chosen through the admin panel. Overriding discussion settings at the individual post level is a great way to gain more granular control over your blog, and to reserve posts for singular commentary without adding the voices of potential commenters.
Other Comment Settings
Think of this section as the “law” for your comments. It determines the rules of posting comments on your site and establishes requirements that must be met while a visitor is crafting that comment.
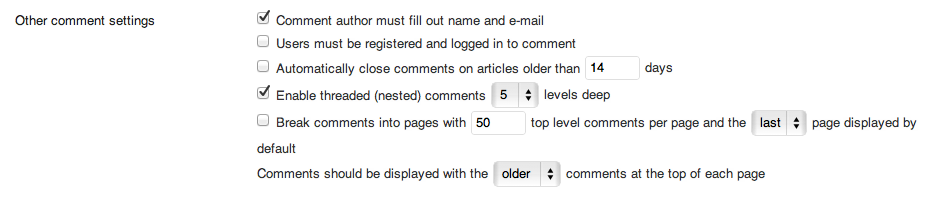
The option for “Comment author must fill out name and e-mail” means that for a visitor to submit a comment to your site, she must first fill in her name and email address. Neither of these things are confirmed electronically, but they do represent a step that most spammers don’t take when leaving junk comments on a site.
“Users must be registered and logged in to comment” offers another level of spam protection by forcing visitors to register on your site and login before posting comments. Standard WordPress registration requires name and email like the previous option, but it also requires the visitor to confirm his registration by clicking on a link within a confirmation email sent automatically by your system. Of course, this setting requires your site to allow open registration.
In an effort to keep your blog lean and mean, WordPress gives you the ability to close comment sections on older posts through its option to “Automatically close comments on articles older than 14 days.” As an admin this can be helpful. As your site starts to build its readership you want to focus your efforts conversing on more recent topics, and not spend your time moderating new comments on posts published five years ago.
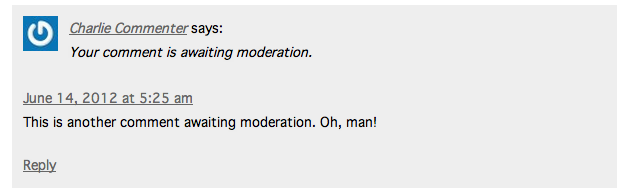
When a comment is left, you (or any other viewer) can reply to that comment rather than starting a new top-level comment. This reply is directed at another comment, not the blog post itself. To show that distinction, WordPress allows threading within comments. This is usually displayed with an indent, and each successive reply gets posted underneath the comment to which it applies. For comments with longer threads, WordPress allows you to spread those replies across several pages. The default value is 50 top-level comments per page, but that number can be changed in the “break comments into pages” setting. WordPress allows up to 10 levels of threading. WordPress’ own example of comment threading can be seen in the image below:

The last setting in this section allows you to choose which comments are shown at the top and which get pushed down lower. Choosing “Older” means the first comments made are the ones which show up on top, while newer comments get added to the bottom of the list. choosing “Newer” puts the newest comment first, and pushes the old comments down.

FREE EBOOK
Your step-by-step roadmap to a profitable web dev business. From landing more clients to scaling like crazy.

FREE EBOOK
Plan, build, and launch your next WP site without a hitch. Our checklist makes the process easy and repeatable.
E-mail Me Whenever
The email section of WordPress discussion settings allows you receive email notifications when comments are made to your site.
The first selection, “Anyone posts a comment,” will send the site administrator an email whenever a comment is placed on the site, regardless of that comment type – approved, held for moderation, or even potential spam. The email which serves as notification includes several links for your administration, including a link to the comment whereby you manage the comment in your WordPress comment panel, a direct link to approve the comment, and even a link to push the comment to spam. To the user who just submitted that comment, he will see something like the following:
Choosing the check box for “A comment is held for moderation” will notify you via email only when comments require your attention. This is helpful for authors who have chosen to moderate first time commenters. These comments will require your approval, but repeat visitors with previously approved comments will not need your verification and you will not be notified via email when those comments post.
Before a comment appears
This section attempts to help you more efficiently administer site comments by restricting how and when comments appear.

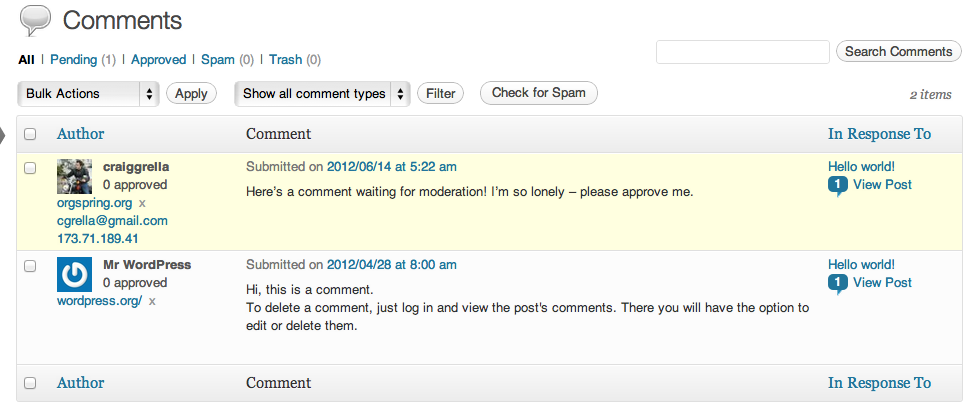
The first check box “An administrator must always approve the comment” will send every new comment on your posts to the moderation panel, found in the comments section of your admin dashboard. This means the visitor’s comment will not show up on your site until you approve it. This gives you the opportunity to read the comment thoroughly, inspect it for link spamming or malicious content, and decide whether to approve it or delete it. New, unapproved comments show up in your admin panel highlighted in yellow.
The “Comment author must have a previously approved comment” is a step between moderating all comments and just letting them show up freely. Essentially, what this setting does is allow you to moderate any comment that comes from a new visitor to your site, while new comments from returning visitors with at least one comment already approved by you will automatically be approved and show up on the post comment list immediately.
Comment Moderation
This section allows you to set how comments are moderated, and it offers a bit of automation to make the admins job easier.
Many admins allow visitors to include links or URLs in a comment. But too many links are usually not welcome, and are often a distinguishing feature of blog spam. To prevent against having too many links in your comments you can use this section to tell WordPress how many comment links will automatically flag that post for moderation or blacklisting. Simple enter the number in the settings box and you’re on the way to cleaner comments.
You can also set a list of words, URLs, email addresses or IP addresses which will trigger that same comment moderation blocking. This is typically where you would put a list or curse words you want to monitor, or emails of past comment abusers. You can also block out entire IP addresses if you happen to have that information too. This can be effective in blocking entire domains if your website has come under attack by a competitor or nasty enemy.
Avatars
WordPress’ own explanation of an avatar is fairly direct:
“An avatar is an image that follows you from weblog to weblog appearing beside your name when you comment on avatar enabled sites.”
Simply put, it’s the little picture that shows up beside your comment when you leave them on blogs.
The avatar section of the WordPress Discussion settings allows you to determine whether avatars are shown on your blog and along side the comments.
Gravatar, the most popular avatar site on the web, allows you to upload, save, and standardize an image across all websites upon which you might submit a comment. Therefore, the picture that shows up next to your comment on domain-x.com will also be the same picture that shows up next to your comment on domain-y.com. This makes for a more graphical representation of the commenter, and it also breaks up the monotony of pure text which some blogs have become known for.
Going further, the this section allows you to automatically moderate the presentation of avatars based on age appropriate filters similar to movie ratings:
- G — Suitable for all audiences
- PG — Possibly offensive, usually for audiences 13 and above
- R — Intended for adult audiences above 17
- X — Even more mature than above
This rating is set by the user when he or she uploads a Gravatar, and encoded into that Gravatar reference. For example, should you set your blog to “G” only avatars that are suitable for all audiences will be displayed next to comments. That means a commenter with a Gravatar that has an “R” rating will not have his Gravatar displayed on your blog. A blog set to display a maximum rating of “R” will show a Gravatar with the G, PG, and R ratings, but not those rated X.
Default Avatar
The last setting within the WordPress Discussion settings area is the Default Avatar setting. This allows you, the site admin, to determine which avatar will be shown next to your site comments. These are the same avatars used in the pingbacks and trackbacks area too.
If you prefer to be consistent, you can keep everyone the same by choosing “blank” or you can opt to allow people to show their custom avatars by selecting “gravatar.” The generated avatar types, Identicon, Wavatar, Monster ID, and Retro are system generated icons based on the user’s email or IP address entered during the comment stage. While unique to that input info, the system generated avatars typically look alike, helping to maintain that consistent theme throughout your comment section.
Discussion Settings Summary
Before your next quest for blogging glory, take a moment to review the WordPress discussion settings to make sure they are in alignment with the structure and tone of the overall site. Also, by adding a comment policy you should find a reduction in replies with banned buzzwords and off-color remarks, thus developing a stronger community and making your posts easier to read and much more likely to be shared.
Tags: