How to Create a Drop Down List for Posts on WordPress
The following two options will allow you to create a drop-down list for your posts.

Want to add a dropdown list to your WordPress site? There are ways to do it quickly and easily. This article shows you how.
The following two options will allow you to create a drop-down list for your posts. You’ll see the more technical way (code) and the more straightforward way (WordPress admin). Both will do the trick!
Continue reading, or jump ahead using these links:
Creating a Dropdown Menu Using Code
The first solution is fairly simple. Just insert the following code into your theme — for example, in your sidebar (Appearance > Editor > Sidebar).
You can control the number of posts it displays by changing the number in this line of the code:
$args = array( 'numberposts' => -1);To show all your posts, leave the “-1” in place. To show ten posts, for example, replace the “-1” with the number “10.”
<form action="<? bloginfo('url'); ?>" method="get">
 <select name="page_id" id="page_id">
 <?php
 global $post;
 $args = array( 'numberposts' => -1);
 $posts = get_posts($args);
 foreach( $posts as $post ) : setup_postdata($post); ?>
                <option value="<? echo $post->ID; ?>"><?php the_title(); ?></option>
 <?php endforeach; ?>
 </select>
 <input type="submit" name="submit" value="view" />
 </form>
And here’s the code in action.

Now that we went over ways to do this with code, there’s another simple way. It’s by…
Creating a Dropdown Menu Using No Code
Not a fan of using code? No problem. Here’s another method that works just as well (if not better).
First, you just need to create a navigation menu. That’s easy to do. Simply go to Appearance>Menus and at the top of the menu, click Create a New Menu.

You’ll add a name to your navigation menu. The name you give it won’t be publicly visible, however, it’ll help you identify the menu in your admin.

After naming, click Create Menu and WordPress creates a new empty menu.
It’s now just a matter of selecting the pages you want to add from the left column and clicking on Add to Menu button.

Once added, the pages appear in the right column.

Next, we’ll be adding Sub-items. The sub-items are what will appear inside the dropdown menu. You can add them under any existing items — it’s up to you.
It’s a matter of simply dragging and dropping. By dragging a page to the page that you want it to be a submenu, it will instantly become one. You can even add additional submenus under a submenu!

When done, click Save Menu — and you’re all set and ready to publish.
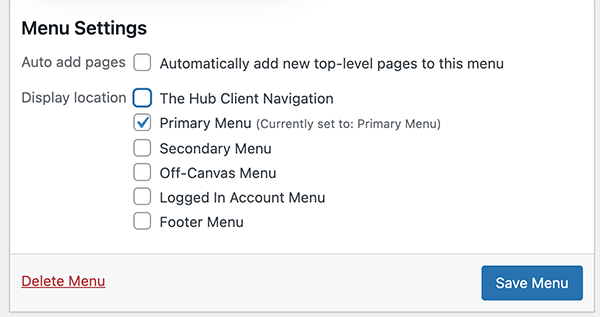
If this is a menu that was edited on your main site, then once the new menu is created, it’ll be displayed right away. But, if the menu is new, you’ll choose a theme location.
This opinion is under Menu Settings. Simply pick the best option under Display Location and click Save Menu.

Your new dropdown menu is live and ready.

Edit the menus at any time in the WordPress admin. Additionally, you can unpublish or move locations if needed.
That’s How You Drop a New Menu
And that’s how you easily create a new dropdown menu in WordPress! As you can see, it’s simple and easy to do. Plus, you have a couple of options on how to go about it.
So, go drop a new menu today!
Share article

Create your free account to post your comment
Login to post your comment