SEO Checklist to Get Your WordPress Site Ranking Higher
Have you ever Googled your own website and been disappointed with the results? Maybe a random snippet of text rather than a proper site description was displayed. Or maybe you found that it takes Google far too long to locate and index your content.
In either scenario, you’ve got a problem on your hands — unless, of course, you’re ok with funneling traffic to your site exclusively with paid ads. Organic search is the single most important driver of traffic for most websites, so getting your site properly indexed is of primary importance both for you and your web development clients.
The solution is to optimize site content for search engines, a practice that is generally referred to as on-page search engine optimization (SEO). In this post we’ll look at the key factors your on-page SEO strategy must address and how you can fix up your site for the best possible visibility in search engine result pages (SERPs).
On-Page vs Off-Page SEO
Before we jump right into practical on-page SEO tactics, let’s first clarify a couple of terms so that we’re all solidly on the same page.
There are two keys to cracking the SEO code:
- On-page SEO
- Off-page SEO
On-page SEO refers to the things you can do on your own website to improve your site’s appearance in search engines results. In essence, on-page SEO involves making it as easy as possible for search engines to index your site’s content properly.
Off-page SEO refer to the things that happen off of your website, but that improve your site’s rank in SERPs. Off-page SEO generally involves getting other sites to link back to your website through a combination of link-building strategies — guest blogging, creating high-quality content that earns backlinks from other blogs, participating in forums, commenting on other blogs, and so forth.
We’ve written about off-page SEO in the past. For this post, we’re going to focus on-page and talk about how you can configure a WordPress website for the best possible presentation in SERPs.
As a WordPress developer, in many instances you simply build a product and then hand it over to a customer. In that scenario, you’re responsible for the initial on-page SEO configuration, but ongoing on-page SEO and off-page SEO are both up to the long-term site owner. So think of this article as a “how-to” for building a solid on-page SEO foundation for every WordPress website you create.
Let’s get to it.
The Four Factors That Define On-Page SEO Mastery
Fundamentally-solid on-page SEO boils down to four critical factors:
- Keyword optimization
- Proper title tags and meta descriptions
- Generous internal link building
- Comprehensive up-to-date sitemaps
Master those four factors and you’ll be well on your way to on-page SEO success.
The great news is that WordPress makes it really easy to handle many on-page SEO tasks. Have you ever heard anyone say that WordPress is good for SEO? Built-in controls for on-page SEO are exactly why people say that about WordPress. Armed with nothing more than the WordPress core, you can take care of three of the four on-page SEO factors relatively well, if not quite comprehensively. Throw in one easy-to-use plugin, SmartCrawl, and you can knock out the fourth factor and also fine-tune your approach to the first three factors.
Let’s take a look at each factor in turn.
Keyword Optimization for WordPress
Keyword optimization is the process of optimizing a webpage around a single set of target keywords. For example, the target keywords for this specific post are: “on-page SEO for WordPress.”
So how do you actually go about optimizing a WordPress webpage for a specific set of target keywords? I’m glad you asked. There are five places your keywords need to appear to produce the best possible keyword optimization results:
- In the title tag,
- In the first heading of the page, which is generally the page or post title,
- In the webpage URL,
- In one or more image alt text attributes, and
- In the page content.
You can tick off all of these boxes in just four steps.
Step 1: Add your keywords to your page or post title
The most important thing you can do for keyword optimization is to make sure you get your keywords in your page or post title. This is important for two reasons.
- By default, WordPress reuses your post or page title as a title tag and displays it in search results, thus taking care of items one and two from the list above in one fell swoop.
- Search engines place a lot of emphasis on the first heading to determine the subject of the webpage. And the keywords that search engines decide to apply to your page will determine the keywords that your site ranks for.
Step 2: Add your keywords to the page or post permalink
WordPress makes it thankfully easy to set up pretty permalinks which have decent SEO value right out-of-the-box. However, you can take things a step further by manually editing your permalinks prior to publishing each page or post.
While you should craft custom permalinks for pages prior to publishing them, you should avoid changing the permalinks of content you’ve published previously unless you’re willing to go all-in and also add 301 redirects to permanently redirect old permalinks to their new replacements.
Step 3: Add useful alt text to all images
Make sure that you add useful alt text attributes to all of your images. Once again, WordPress makes this easy with the Add Media tool. Simply drop a sentence-case description of the message conveyed by your image into the alt text box of the Add Media modal window and make sure to include your target keywords if applicable.
Step 4: Use your keywords as appropriate throughout your content
This last step is fairly self-explanatory. As you craft the content of your page or post, it’s important that you include your keywords throughout your post in a natural way. Don’t use them awkwardly or excessively, but take advantage of opportunities to naturally work your keywords into your post every few paragraphs for the best possible on-page SEO for WordPress.
See what we did there?
Write Proper Title Tags and Descriptions
Let’s talk about titles for a moment. When we talked about keyword optimization a minute ago we made it clear that your target keywords should be included in your page or post title — the title that appears at the top of each post or page. That means that your keywords should be included here:

However, the term title tag means something slightly different. While your post or page title will appear as the first heading on the page, a title tag is a separate HTML tag that is literally a <title> tag. The title tag isn’t displayed on your site. Instead, it shows up in two places: on the browser tab and as the page title in search engine results.

By default, WordPress will reuse your page or post title as the title tag. However, your title tag can be different if you use a plugin such as SmartCrawl to change it manually — a step we’ll talk about momentarily.
Your page description is not used by search engines to determine the subject of your page. However, it is displayed in search engine results. For this reason, it’s important to provide a site description that will prompt search engine users to visit your site.
WordPress does not create a default page description. Instead, search engines simply grab the first portion of your page content and use it as the description. Quite often, this does not produce ideal results and you will want to use a plugin to manually write descriptions for every page and post. Keep reading and I’ll show you how to do this.
Internal Link Building

When a search engine encounters a link on a webpage, it associates the anchor text – the textual content of the link itself – to the webpage being linked to. Take the following link for example:
<a href="http://premium.wmpudev.org/blog">The best source for WordPress knowledge</a>
A search engine would associate the anchor text “the best source for WordPress knowledge” with the link http://wpmudev.com/blog. This is one of the ways that internal links can help improve the on-page SEO of your website. By building internal links to related content you help search engines find your content and you associate specific keywords with your webpages by using those keywords as anchor text.
Internal links can be built in a few different ways:
- WordPress comes with automatic internal link building in the form of archive pages. When archive pages are indexed the page titles are used as anchor text and search engines are able to find lots of your site’s content.
- A related posts section at the end of each page or post helps build internal links. You can create a simple list of related posts and pages manually or use a related posts plugin to add them automatically.
- A powerful way to build internal links is to add them to your page and post content naturally. For example, in the previous bullet point, we linked the term “related posts plugin” to a recent post on the same topic. You can add these sorts of links manually or with an automatic internal link building plugin like SmartCrawl — more on this topic shortly.
Comprehensive Sitemaps

Think of a sitemap as a comprehensive archive page that lists out all of your content in a machine-readable format. Sitemaps aren’t really intended for human consumption, although some visitors may stumble upon them if you link to them within your site. Instead, sitemaps are really just there for the benefit of search engine web crawlers.

FREE EBOOK
Your step-by-step roadmap to a profitable web dev business. From landing more clients to scaling like crazy.

FREE EBOOK
Plan, build, and launch your next WP site without a hitch. Our checklist makes the process easy and repeatable.
Unfortunately, WordPress doesn’t include native support for sitemaps. However, a good SEO plugin such as SmartCrawl makes sitemap generation trivially simple.
Take On-Page SEO for WordPress Up a Notch with SmartCrawl
You can cover a lot of on-page SEO ground without the use of any plugins just by properly optimizing your content for your target keywords and building internal links. However, you can take your efforts and results up a notch or two by installing a quality SEO plugin.
Our SEO plugin is called SmartCrawl. It’s a solid package of WPMU DEV goodness that will help you refine your on-page SEO with minimal effort. It allows you to take the inbuilt on-page SEO power of WordPress and fine-tune the results.
The easiest way to demonstrate how SmartCrawl can be used to fine-tune your on-page SEO efforts is to walk through the process.
Step 1: Install SmartCrawl

You’ll need to install SmartCrawl, but in order to do that, first install the WPMU DEV Dashboard. Then, with the Dashboard installed, and after signing into your WPMU DEV account, go to WPMU DEV > Plugins. Type SmartCrawl into the search prompt, click Install, and then click Activate.
Step 2: Use the SmartCrawl Setup Wizard

With SmartCrawl installed and activated, go to Settings > SmartCrawl. You will see the SmartCrawl Wizard – a 5-step menu that will walk you through the most important settings.
As you go through the wizard, be sure to click Save Settings at the bottom of each menu before proceeding on to the next step. If you need help with any specific menu, look no further than our SmartCrawl usage instructions.
By the time you finish working your way through the wizard you will have created comprehensive sitemaps for your site, verified your site with Google and Bing, created a description for your site homepage, connected to a free Moz account for SEO reporting, and enabled automatic internal link building.
Step 3: Use SmartCrawl to Fine Tune Your Title and Description on Each Post and Page
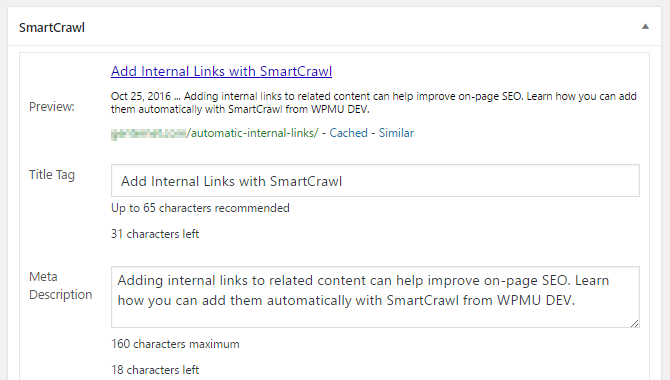
The next time you edit a post or page, scroll down until you see the newly-added SmartCrawl section. The first two fields – Title Tag and Meta Description – are the most important. As we already covered, the title tag will default to the post or page title, but you can create a different title tag if you wish. In addition, it’s important to write a meta description that encapsulates the content of the page and will entice search engine users to visit your site.
There are also several additional options you can learn more about by reading through the SmartCrawl usage instructions, but for on-page SEO purposes, the title tag and meta description are the most important and you should leave the rest of the options in their default configuration unless you know what you’re doing.
Step 4: Produce New Content and Watch the Internal Link Building Magic
Now for the fun part.
As you publish new content, SmartCrawl will check your new content for the appearance of keywords relevant to existing posts. If any relevant keywords are found, SmartCrawl will automatically link the keywords in your new posts to the related content.
If you only have a dozen posts and pages this feature may seem trivial. However, if you are an avid blogger with hundreds or thousands of posts, it will come in very handy. No doubt, there are many times that you publish content that is related to existing content without making the mental connection yourself. With SmartCrawl automatic linking enabled, those connections will be made for you pointing your readers toward useful and related content that you neglected to link to manually.
Step 5: Monitor SEO Activity From The Hub

File this last step under: Coming Soon.
If you use the Hub, no doubt you’ve noticed that there’s an SEO tab quietly awaiting activation. Once that tab goes live it will include a report of on-page SEO activity related to your site. That way, you can check on the on-page SEO health of every one of your sites from a single central location and spot any issues that need to be addressed as soon as they arise.
What sort of details will be included in SEO monitoring? Well, the plan is to include noteworthy sitemap issues, such as URLs that are generating 404s, pages in the sitemap that aren’t accessible from any internal links, and URLs that exist but aren’t included in your sitemap. The idea is to let you know of on-page SEO issues that are hurting your site’s visibility in search engine results so that you can fix these issues as quickly as possible.
Using the Other Guys for SEO
As you surely know, SmartCrawl isn’t the only SEO plugin for WordPress. For the last few weeks we’ve been comparing WPMU DEV as a provider of core WordPress services — performance, security, monitoring, backups, and SEO — to comparable WordPress products such as JetPack Premium and iThemes. Let’s see how each of these products compare to SEO with SmartCrawl and WPMU DEV.

Well, that wasn’t even a fair fight! Obviously, Jetpack and iThemes haven’t made the effort to offer a full-featured SEO product. And that’s ok!
The point isn’t to beat up on the competition — Jetpack Premium and iThemes both offer some solid features and products — the point is to illustrate that a WPMU DEV membership offers more value than any other premium WordPress product or service money can buy.
Sure, there are standalone SEO plugins that would stack up much more favorably to SmartCrawl. However, if you’re managing client sites and go with a standalone SEO solution, now you’re faced with different licensing for each site, and the need to keep track of all of the paperwork. Use WPMU DEV, on the other hand, and you’ll get a set of products and services that comprehensively meets all five of the core needs of every WordPress website — performance, monitoring, security, backups, and SEO — and you’ll be able to use them on an unlimited number of sites.
Really, it comes down to this: would you value having access to a single source where you can meet all of the core needs of your WordPress empire? No more worrying about licensing a half-dozen different plugins and services for every site you build. No more forgotten licensing fees when you price out a new project.
If that sounds like a deal you want in on, well, get on it!
Getting Your On-Page SEO for WordPress On Point
On-page SEO is oft-neglected, but it needn’t be. It really isn’t all that complicated, especially if you follow an on-page SEO checklist.
When it comes down to it, you can build a solid on-page SEO foundation if you just take four steps:
- Optimize titles, headings, image alt text, and permalinks for your target keywords;
- Carefully craft an informative and interesting meta description;
- Build lots of useful internal links; and
- Generate sitemaps that search engines can use to fully catalog your content.
That might sound like a lot to do, but thanks to the built-in SEO power of the WordPress core and easy-to-use SEO plugins like SmartCrawl, every WordPress website can exercise proper on-page SEO for maximum search engine visibility with minimal fuss.
Tags:
James Farmer CEO of Incsub, WPMU DEV, CampusPress & Edublogs