Adding Custom Google Fonts to WordPress with Enqueue
The default web browser fonts are functional, but adding custom fonts to your WordPress site can give your theme a style boost and a more cohesive look.
You can add individual fonts with CSS3’s @font-face rule, but this method requires you to upload the font files to your server. Using an enqueue script on the other hand, links external scripts to your site, which saves space.
This isn’t always the best method to use for scripts that aren’t your own since it means the external site will have an increased server load, but Google suggests this method when using their fonts.

You may find the scripts provided for adding Google Fonts to your site don’t work well or at all in WordPress. In this Weekend WordPress Project we’ll looks at how to use an enqueue script to add Google fonts to your site in just a few simple steps. Ready to jazz up your site? Read on.
Basic Housekeeping
If you’re editing an existing theme rather than creating a new one, it’s a good idea to create a child theme to prevent your changes from being lost next time you update your WordPress installation. We have a great guide that shows you how to do it: How to Create a WordPress Child Theme.
Choosing Fonts to Use
With your child theme all ready to go, the next step is to choose the fonts you want to include in your theme. Search through the available fonts on the Google Fonts page and when you find ones you want, click Add to Collection next to the font sample.
A pop-up section will appear at the bottom of the page with a list of the fonts you chose.

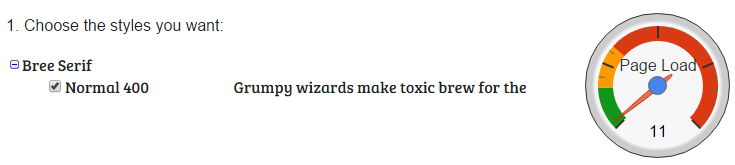
Next, click the Use button at the top, right of the Collections box. On the next page, click the checkboxes to select the font weights you wish to use.
The dial on the right will indicate how fast the page will load with the fonts you have selected. It’s important not to exceed about 160 on the scale and the lower the number, the faster your site will load.
Next, scroll down and choose whether you need extra character sets for displaying special symbols called subsets that come with certain languages such as Greek and Vietnamese by clicking their corresponding checkboxes.
If you only require English characters, then you can skip this step as they are included by default.
Finally, notice the link that appears in the box listed under step three.? Specifically, pay attention to the part of the link that includes the font names, weights and subsets.
In this example, you need the segment Open+Sans:700,400|Oswald:700.

FREE EBOOK
Your step-by-step roadmap to a profitable web dev business. From landing more clients to scaling like crazy.

FREE EBOOK
Plan, build, and launch your next WP site without a hitch. Our checklist makes the process easy and repeatable.
If you included subsets, you need that part of the link as well. Out of that segment which will read something like &subset=latin,latin-ext', all you need is the subset names. In this example, you would only need latin,latin-ext.

Beneath this section you’ll also see a sample of suggested CSS for styling your fonts. You will need this code in a moment when adding the fonts to your theme.
The next step is to edit your functions.php file, located in your theme’s folder: wp-content > themes > your-theme.
If you’re using cPanel, select the file and click Edit at the top of the page. If a pop-up opens that you haven’t previously disabled, click Edit to continue. Add the following code to the bottom of the page, leaving a blank line above the last line of code:
Copy and paste the fonts from the link into line three of this example. If you included the subset option for special characters, enter it next to 'subset' => which is on line four in the example above. Finally, save the file.
You may notice the link on line six in the above example. It doesn’t actually reference the unsecured URL given by Google. This method will ensure your site will stay secure if you’re using an SSL certificate on your site.
If you created a child theme, you may not have a functions.php file and that’s okay. You can simply create one by following the directions in our article How to Create a WordPress Child Theme to properly set it up.
Once you’re done, edit your style.css file. Find the instances where you want the font to update to your new fonts and enter in the code Google provided for you.
Just remember that you can’t just enter what was suggested, like in the example below, because it’s not complete CSS code.
Instead, the structure should be like the example below if you’d like your header one and paragraph text to be updated with a new font.
Line 17 specifies a font weight that is bold for paragraph text that becomes bold as shown on lines 15 and 18. You can add different attributes to the fonts as the example displays.
Save your changes and you’re done!
Conclusion
By now you will have successfully added Google fonts to your theme and you won’t have to continue adding the fonts to each and every page as Google suggests in its standard installation approach.
If you would rather save time and use a plugin to add fonts to your site there are many to choose from in the WordPress plugin directory. For a comprehensive review of the best ones, check out our post Top WordPress Custom Fonts Plugins Reviewed.
If you would like to a lot more with fonts like adding them to the admin back end, check out Frank Klein’s post about adding Google fonts to your theme. If you’d like to know even more about fonts, check out one of our other articles, Most of What You “Know” About WordPress Typography is Wrong.
What are your favourite Google fonts? Have you added them to your site? Share your experience in the comments below.
Tags: