How to Set Up a Free WordPress Newsletter Using FeedBurner
If you’ve ever looked into sending out a regular newsletter for your site, you’ve probably come to the conclusion that you’ll either need to run the email from your own server, or you’ll need to sign up with a professional email service.
Running emails to a large list of addresses from your own server can get tricky. The world of email and spam and spam-blockers can be very complicated. In short, there’s a good chance a lot of your emails may never end up going to your users.
Professional email services can be good, and they offer a lot of advantages, but they can also be expensive. Some may have free services for a low number of contacts, but once you go above that, you’ll need to start paying.
A third option, and a FREE one, could be to use FeedBurner as your newsletter delivery service.
Advantages and Disadvantages of Using FeedBurner
There are both advantages and disadvantages to using FeedBurner. We’ll go over some of them below, and then we’ll run through how to set up a newsletter with the FeedBurner service.
Advantages
- It’s FREE!
- You can brand your email so that it looks as if it’s coming directly from your site.
- FeedBurner is owned and run by Google. This means your email is much more likely to get through to your intended contacts than it would be if you sent emails from your own server.
Disadvantages
- The ability to customize the look of your newsletters is limited.
- There are no hardcore statistics you might get with a professional service.
- You can send out simple newsletters whenever you like, but it doesn’t offer any type of auto-responder service as you might get with a professional service.
How to Set Up a Free WordPress Newsletter through FeedBurner
The basic idea behind all this is really very simple. And so we’ll outline it first, and then go into detail.
1. Set up a separate blog on your site only for your newsletter. (e.g. mysite.com/newsletter/)
2. Set up an account for that blog (not your main domain) on FeedBurner.
3. Get the email subscription form code that lets visitors enter their email address.
4. Place that code on your main domain.
5. Whenever you want to send out a newsletter, simply write a post on the Newsletter blog (not the main site).
1. Set Up a Separate Blog
As mentioned, probably the best thing to do would be to install a separate blog on your domain, something like mysite.com/newsletter/. You could also set up a blog on a free service like WordPress.com or Blogger, but if you can, I would suggest keeping everything under one roof.
Another option is to set up a special category only for your newsletter, but then you will need to jump through a number of hoops in order to make sure that your category isn’t public and that your users sign up for ONLY that category.
2. Set Up an Account at FeedBurner
Remember to sign up your NEWSLETTER blog, not your main site.

3. Get Email Subscription Code
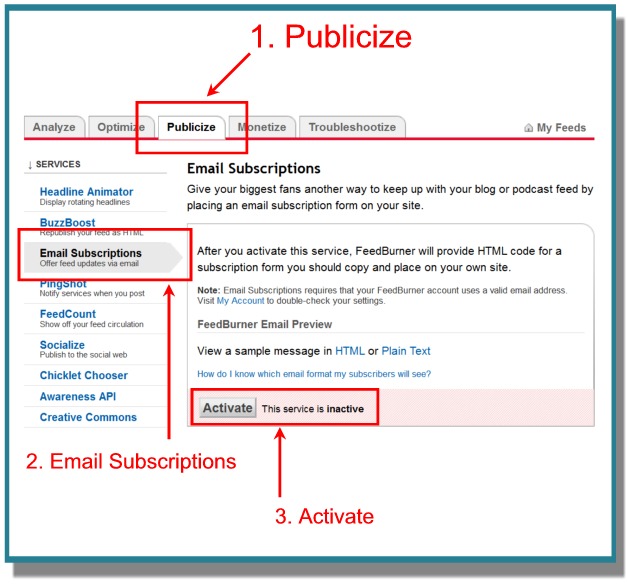
Continue through the sign up process until you get to the Account Management section. Once there, you will need to look for the Publicize tab at the top and then the Email Subscriptions link on the left. After that, you will need to click the Activate button.
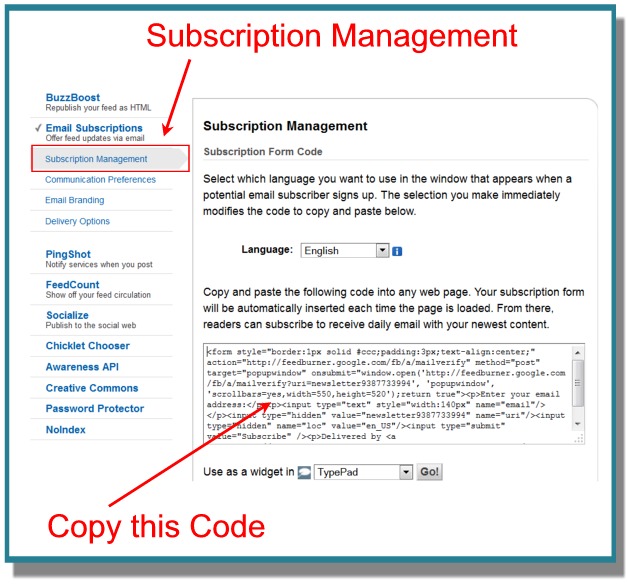
Next you should automatically be taken to the Subscription Management screen where you should copy the code for your email sign-up form.
FREE EBOOK
Your step-by-step roadmap to a profitable web dev business. From landing more clients to scaling like crazy.
FREE EBOOK
Plan, build, and launch your next WP site without a hitch. Our checklist makes the process easy and repeatable.
4. Place Code on Main Site
Take your copied sign up code and place it on your MAIN SITE. (You can also place it on the Newsletter site, of course, but the main thing is to place it on the main site.)
You can place the code from FeedBurner in a text widget if you like. Also, remember to put a label above or below the form that indicates it’s for a newsletter. You can reword the text in the copied code if you like, but it may be easiest to just create your own label. (If using a text widget, for example, then title the widget “Sign Up for Our Weekly Newsletter” or something along those lines.)
5. Send Out Your Newsletter
Whenever you’d like to send out a newsletter, then simply make a post on the Newsletter blog you set up.
When your users signed up on your main site for your newsletter, they were actually just signing up for updates from your private newsletter blog (although they didn’t know that).
Although you are somewhat limited to how you can style the emails that get sent through FeedBurner, you can include whatever links you like. So, of course, you can write a post on your Newsletter blog and link to content on your main site.
Configure Your Settings
You will want to make sure you go through each of the screens in the email section to configure your emails as you like. In these sections you can do things such as set the return address on the emails to look as if they came from your own domain.
Important Tip
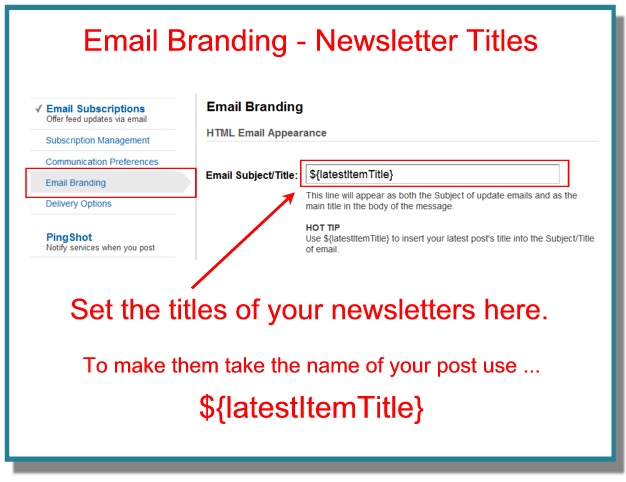
On the Email Branding screen, you can set the subject lines of all your newsletters. For some, it may be fine to title each newsletter something like “The Latest News from Site XYZ.”
However, if you would like more control over your subject lines for each newsletter, then do as FeedBurner suggests under the “Hot Tip” section and place the following bit of text in the Email Subject/Title box:
${latestItemTitle}
When you do this, the name you give your post on your newsletter blog will be the subject line for the email that goes out for that newsletter.
Free, Stable, Simple, Reliable
If you’re just looking for a simple newsletter delivery system, then it’s hard to beat this method. It’s free. It’s stable. It’s simple to use. And perhaps most important, it’s reliable.
All four of those things are not always so easy to find in the world of email.
Photo: Freenewsletterred from BigStock


